background image

0022247

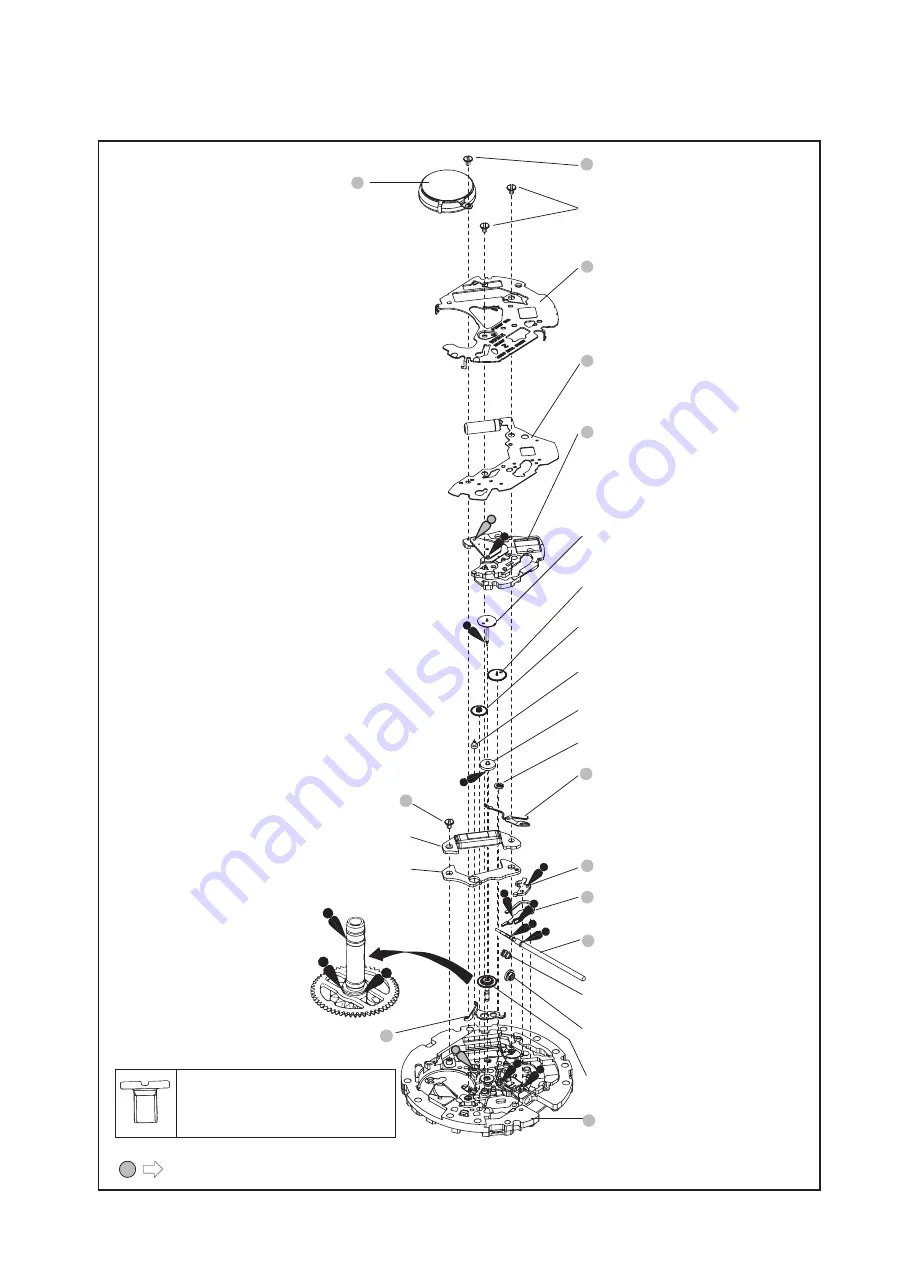
•  Battery lead terminal screw (1 pc.)

•  circuit Block coVer screw  (2 pcs.)

•  coil Block screw (1 pc.)

qk

ql

w;

wa

ws

wd

ra

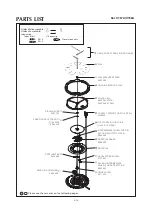
Cal. V157A/V158A

PARTS LIST

4/8

  Please see the remarks on the following pages.

circuit Block coVer
4461522 (V157a)
4461520 (V158a)

recHargeaBle Battery unit 
screw   0022247

recHargeaBle Battery unit
3023 24y

circuit Block coVer screw
0022247

circuit Block
4000655

train wHeel Bridge
0125907

wf

fourtH wHeel and pinion
0241559

wg

tHird wHeel and pinion
0231904

wh

fiftH wHeel and pinion
0701904

wj

step rotor
4146907

wk

minute wHeel
0261904

wl

setting wHeel
0281904

e;

train wHeel setting leVer
0391890

coil Block screw

0022247

ea

ef

setting leVer
0383891

ek

first intermediate wHeel for
date setting
0962890

ej

clutcH wHeel
0282890

eh

setting stem
0351892

coil Block

4002907

es

eg

yoke
0384890

main plate
0100576

r;

Battery connection (+)

4268655

el

center wHeel and pinion
0221602

ed

stator

4239907

Содержание V157A

Страница 1: ...start start function Energy depletion forewarning function The second hand moves at two second intervals Overcharge prevention function Electronic circuit reset function Second hand stop function Date calendar Instant setting device for date calendar Day calendar only for V158A Instant setting device for day calendar only for V158A Free Time setting Monthly rate less than 15 seconds worn on the wr...

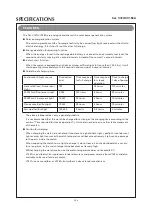
Страница 2: ...orescent light 3 000 120 hours 6 hours 30 minutes 30W 3cm Fluorescent light 10 000 35 hours 2 hours 10 minutes Cloudy weather Sunlight 10 000 35 hours 2 hours 10 minutes Fair weather Sunlight 100 000 9 hours 0 4 hours 2 minutes The above table provides only a general guideline It is recommended that the watch be charged for as long as the charging time according to the column Time required for ste...

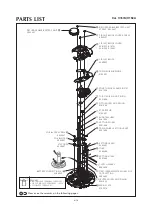
Страница 3: ...8A intermediate wheel for day setting only for V158A 0989 890 date jumper 0810 890 date setting wheel 0737 891 second intermediate wheel for date setting 0962 891 hour wheel 0271 639 date driving wheel 0802 890 4 5 6 9 7 8 date dial guard 0808 890 qa date dial qs qf qg qh qd qj PARTS LIST Cal V157A V158A 18 Please see the remarks on the following pages Order of disassembly 1 ra Order of assembly r...

Страница 4: ...ircuit block 4000655 Train wheel bridge 0125907 wf Fourth wheel and pinion 0241559 wg Third wheel and pinion 0231904 wh Fifth wheel and pinion 0701904 wj Step rotor 4146907 wk Minute wheel 0261904 wl Setting wheel 0281904 e Train wheel setting lever 0391890 Coil block screw 0022247 ea ef Setting lever 0383891 ek first intermediate wheel for Date setting 0962890 ej Clutch wheel 0282890 eh setting s...

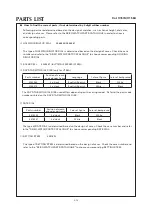
Страница 5: ... Position of crown and calendar frame Language Color of figure Color of background 0160565 3 o clock English Spanish Black White 0160575 3 o clock English Spanish White Black The DAY STAR WITH DIAL DISK used differs depending on the casing model Refer to the parts code number printed on the DAY STAR WITH DIAL DISK qs DATE DIAL Parts number Position of crown and calendar frame Color of figure Color...

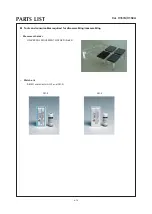
Страница 6: ...Cal V157A V158A PARTS LIST 18 l Tools and consumables required for disassembling reassembling Movement holder UNIVERSAL MOVEMENT HOLDER S 682 Watch oils SEIKO watch oils AO 3 and AO 2 AO 3 AO 2 ...

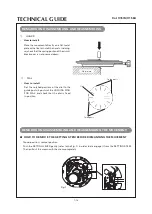
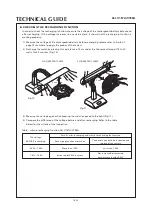
Страница 7: ...eassembling the movement l HOW TO REMOVE THE SETTING STEM before dismantling the movement Place the movement directly on a flat metal plate or the like to install the hands In doing so checkthatthespringportionofthecircuit block cover is not pressed down Set the notched portions of the dial to the guide posts 4 posts of the HOLDING RING FOR DIAL and check that the dial is fixed in position How to ...

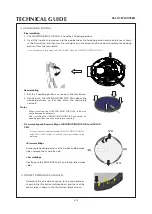
Страница 8: ...that they catch the main plate securely When installing the HOLDING RING FOR DIAL take care not to damage or deform it After installing the HOLDING RING FOR DIAL check that all hooking portions catch the main plate secuirely Notes Disassembling and Reassembling of HOLDING RING FOR DIAL and SOLAR CELL It is not necessary to disassemble HOLDING RING FOR DIAL and SOLAR CELL except in the case that a ...

Страница 9: ...clockwise until it goes on to the guide pin 2 Remove the DATE DIAL GUARD from guide pin of B part the same as A part 3 After confirming that the 3 hooking portions on the main plate are removed from the DATE DIAL GUARD remove it from main plate Assembling 1 PuttheDATEDIALGUARDonthepostionwhich is shown in the illustration Please put A and B parts on the guide pins 2 Set the hooking portion of D pa...

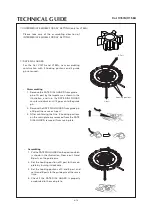
Страница 10: ...rt circuit its and terminals C portion Rechargeable battery unit wd Train wheel bridge Fourth wheel and pinion Minute wheel Refer to the illustrations below to check where to install the respective wheels Step rotor Third wheel and pinion Setting wheel Fifth wheel and pinion Step rotor Fourth wheel and pinion Fifth wheel and pinion Third wheel and pinion Minute wheel Setting wheel e Train wheel se...

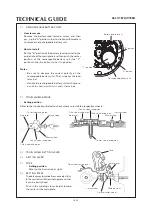
Страница 11: ...e probe to the input terminal of the qk RECHARGEABLE BATTERY UNIT SCREW and probe to the r BATTERY CONNECTION as illustrated in Fig 2 Whenmeasuringthecurrentconsumptionusing the SEIKO digital multi tester S 860 use the range of 40μA of SUPPLY V 1 55V GATE TIME 2S 3 Wait until a stable measurement becomes available It usually takes 30 seconds to a few minutes for getting a stable measurement 4 Make...

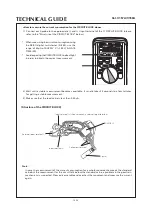
Страница 12: ...measurement of the current consumption for a whole movement exceeds the standard value but the measurement for the circuit falls below the standard value a problem in the gear train mechanism is suspected Please disassemble and overhaul the movement and measure the current again How to measure the current consumption for the CIRCUIT BLOCK alone 1 Connect each probe to the appropriate and input ter...

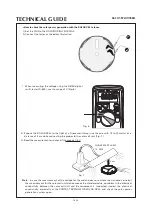
Страница 13: ...et the circuit 3 Connect the probe to the input terminal for the 5 SOLAR CELL and probe to the wa CIRCUIT BLOCK COVER as illustrated in Fig 3 When measuring the voltage using the SEIKO digital multi tester S 860 use the range of V Fig 4 4 Expose the watch to the light of a fluorescent lamp use the one with 15 to 20 watts at a distance of 5 cm while connecting the probes to the watch Fig 5 5 Read t...

Страница 14: ...OR SOLAR CELL and check the solar power generation system again How to check the solar power generation with the SOLAR CELL alone 1 Set the DIAL to the HOLDING RING FOR DIAL 2 Connect the tester as the below illustration When measuring the voltage using the SEIKO digital multi tester S 860 use the range of V Fig 6 2 Expose the SOLAR CELL to the light of a fluorescent lamp use the one with 15 to 20...

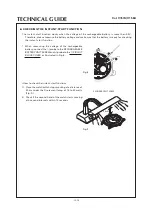
Страница 15: ... instant start function When measuring the voltage of the rechargeable battery connect the probe to the RECHARGEABLE BATTERYUNITSCREWand probetothe waCIRCUIT BLOCK COVER as illustrated in Fig 8 How to check the instant start function 1 Place the watch which stops working at a distance of 50 cm under the fluorescent lamp of 15 to 20 watts Fig 9 2 Check if the second hand of the watch starts moving ...

Страница 16: ...r the fluorescent lamp of 15 to 20 watts for 30 minutes Fig 10 FLUORESCENT LAMP 5 cm 5 cm FLUORESCENT LAMP Fig 11 Fig 10 3 Measure the voltage again while keeping the watch exposed to the light Fig 11 4 Compare the difference of the voltage before and after recharging Refer to the table below for the criteria of the inspection 0 50V 1 00V Results after recharging and criteria for checking the func...

Страница 17: ...t the day changes smooth ly Pull out the crown to the 1st click then turn it Calendar mechanism correcting the date Make sure that the date changes smooth ly Second hand stop function Make sure that the second hand stops when the crown is pulled out to the 2nd click Setting mechanism hour and minute hand setting Make sure that the hour and minute hands move smoothly without touching each other or ...

Страница 18: ...T 10BAR 10 BAR WATER RESIST 15BAR 15 BAR WATER RESIST 20BAR 20 BAR SCUBA DIVER S AIR DIVER S 150 m 18 75 BAR 150 m times 0 125 SCUBA DIVER S AIR DIVER S 200 m 25 BAR 200 m times 0 125 He GAS DIVER S 300 m 37 5 BAR 300 m times 0 125 He GAS DIVER S 600 m 75 BAR 600 m times 0 125 He GAS DIVER S 1000 m 125 BAR 1000 m times 0 125 Water pressure test Condensation test Condensation test Condensation test...

Отзывы: