Seiki SM28UTR Скачать руководство пользователя страница 16

16

Connections

Connections

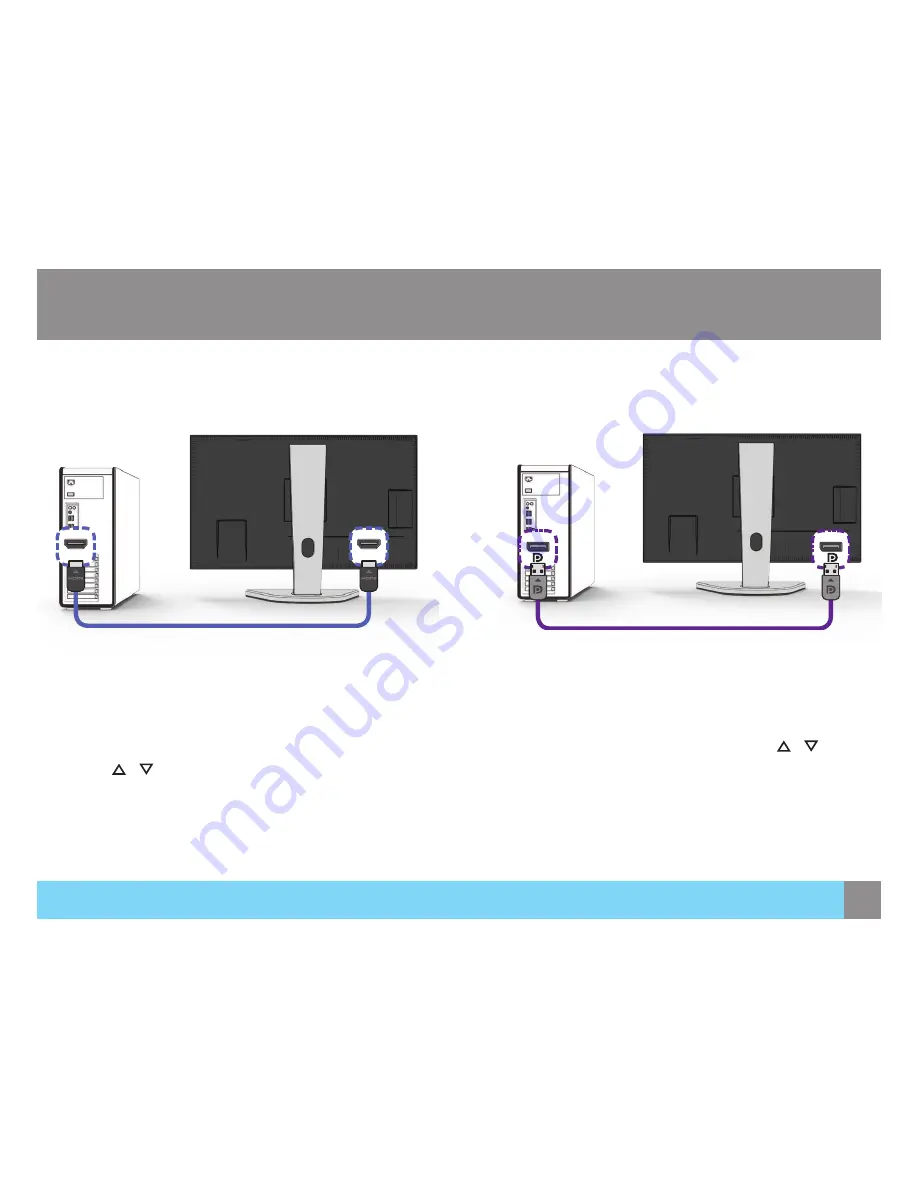
Connection Using the HDMI Cable

1.  Connect the HDMI cable to the 

HDMI 1


HDMI 2 

or 

HDMI 3

 port 

on the back of the product to the 

HDMI

 port on the PC.

2.  Connect the power cable to the product and a power socket. 

Next, turn on the power switch on the PC.

3.  Change the input source to 

HDMI 1


HDMI 2 

or 

HDMI 3

 by 

touching 

 / 

, when input source is not set.

Note:

HDMI 1 port version is 2.0 and other HDMI port version is 1.4.

HDMI 2.0

 can support the 3840*2160@60Hz max resolution and

HDMI 1.4

 only support the max resolution to 3840*2160@30Hz.

HDMI

HDMI

Connection Using the DisplayPort (DP) Cable

1.  Connect the DP cable to the 

DP

 port on the back of the 

product and the 

DP 

port on the PC.

2.  Connect the power cable to the product and a power socket. 

Next, turn on the power switch on the PC.

3.  Change the input source to 

DP

 by touching 

 / 

, when 

input source is not set. 

Содержание SM28UTR

Страница 1: ...SEIKI com USER MANUAL SM28UTR...

Страница 2: ...23 24 25 26 27 28 29 31 Cleaning Securing the Installation Space Correct Posture to Use the Product Symbols Electrical Safety Installation Safety What s Included Installation Before Connecting Connec...

Страница 3: ...not touch the cable with wet hands Otherwise an electric shock may result 3 Wipe the monitor screen using a clean soft and dry cloth Do not apply a cleaning agent that contains alcohol solvent or sur...

Страница 4: ...entilation An internal temperature rise may cause fire and damage to the product Be sure to allow the amount of space as shown below or greater when installing the product The exterior may differ depe...

Страница 5: ...irectly in front of the screen Adjust the angle so light does not reflect on the screen Keep your forearms perpendicular to your upper arms and level with the back of your hands Keep your elbows at ab...

Страница 6: ...to make any kind of contact with any internal part of this product This symbol alerts you that important literature concerning operation and maintenance has been included with this product A serious o...

Страница 7: ...plug pins and power socket with a dry cloth Otherwise a fire may result Safety Information Caution Do not unplug the power cord when the product is in use The product may become damaged by an electri...

Страница 8: ...he product may fall and injure children Do not expose the product to direct sunlight heat or a hot object such as a stove Otherwise the product lifespan may be reduced or a fire may result Do not inst...

Страница 9: ...a thunderstorm or lightning strike turn off the power and disconnect the power cable An electric shock or fire may result Safety Information Do not move the product by pulling the power cord or any c...

Страница 10: ...the monitor upside down or move it by holding the stand The product may fall and break or cause personal injury Do not use humidifiers or stoves around the product An electric shock or fire may result...

Страница 11: ...ts may differ from the image shown Display Panel Base Stand SM28UTR SEIKI com QUICK SETUP GUIDE USER MANUAL 002 BBF SEIKI Copyright 2015 SEIKI LLC All rights reserved Quick Setup Guide User Manual Dis...

Страница 12: ...the convex on the base then anticlockwise rotate the stand to the end Fasten the connecting screw at the bottom of the stand base Push the assembled stand into the main body in the direction of the a...

Страница 13: ...irection Move the screen up and down 11cm The screen can lean backward 15 lean forward 5 Turn the screen 45 to the left or 45 to the right Move the screen up to the top and lean backward to the maximu...

Страница 14: ...removing the product place the product down on a flat and stable surface Toggle the lever on the stand then pull the assembled stand out of the main body in the direction of the arrow as shown in the...

Страница 15: ...product you want to connect Connecting PC Select a connection method suitable for your PC Do not connect the power cable before connecting all other cables Ensure you connect a source device first bef...

Страница 16: ...hing when input source is not set Note HDMI 1 port version is 2 0 and other HDMI port version is 1 4 HDMI 2 0 can support the 3840 2160 60Hz max resolution and HDMI 1 4 only support the max resolution...

Страница 17: ...onnect an audio output device such as headphones or speakers to port on the product The sound could only be heard when using the Mini Audio cable HDMI to HDMI cable DP cable LINE OUT OR Connections Co...

Страница 18: ...the monitor The power indicator light will turn blue when the Monitor is ON Menu Button Function Adjusting OSD menu settings by controlling menu buttons on the front of the monitor Enter the main menu...

Страница 19: ...ain to enter the input source list Touch the to select your desired input source and touch the to confirm Touch the to exit AUTO To select the source automatically DVI Maximum resolution 3840x2160 30H...

Страница 20: ...llow users to choose from available languages Touch the to display the On Screen Display menu Touch the to select LANGUAGE Touch the again to enter the language setting Touch the to select your desire...

Страница 21: ...o select your desired setting and touch the to enter Then use the to adjust the setting Touch the to exit Brightness To adjust the clarity of a non UHD Resolution 3840x2160 signal Contrast To adjust t...

Страница 22: ...Display menu Touch the to select COLOR Touch the again to enter the color setting Touch the to select your desired setting and touch the to enter Then use the to adjust the setting Touch the to exit...

Страница 23: ...en as following Sub Win2 Input To select input source for sub screen as following Sub Win3 Input To select input source for sub screen as following PiP Size To adjust sub screen window size PiP Positi...

Страница 24: ...select your desired setting and touch the to enter Then use the to adjust the setting Touch the to exit Volume To adjust the volume of speaker output Mute To turn the Mute ON OFF Audio Source When in...

Страница 25: ...ur desired setting and touch the to enter Then use the to adjust the setting Touch the to exit DisplayPort To set the Displayport version Displayport 1 1 support max resolution 3840x2160 30Hz Displayp...

Страница 26: ...OSD setting Touch the to select your desired setting and touch the to enter Then use the to adjust the setting Touch the to exit Horizontal Position To horizontally adjust the OSD position Vertical P...

Страница 27: ...ting Temperature 32 F 95 F 0 C 35 C Humidity 20 80 non condensing Storage Temperature 32 F 122 F 0 C 50 C Humidity 5 95 non condensing Panel Dots Pixels Due to the nature of the manufacturing of this...

Страница 28: ...Power Consumption Power saving mode Power Consumption 50 watts 0 5 watts The power consumption level can vary in different operating conditions or when settings are changed ENERGY STAR is a US registe...

Страница 29: ...DMI Resolution Optimum Resolution 3840 x 2160 60Hz DisplayPort 60HZ Only HDMI 1 Maximum Resolution 3840 x 2160 60Hz DisplayPort 60HZ Only HDMI 1 If a signal that belongs to the following standard sign...

Страница 30: ...24 x 768 48 363 60 004 65 000 VESA 1024 x 768 56 476 70 069 75 000 VESA 1024 x 768 60 023 75 029 78 750 VESA 1152 x 864 67 500 75 000 108 000 VESA 1280 x 720 45 000 60 000 74 250 VESA 1280 x 800 49 70...

Страница 31: ...low instructions improper installation or maintenance alteration accident or excess voltage or current b improper or incorrectly performed repairs by non authorized service facilities c onsite consume...

Страница 32: ...SEIKI com 2015 Seiki LLC All rights reserved Printed in China Service Hotline 1 855 MY SEIKI 1 855 697 3454...

Отзывы: