background image

Installation and assembly instructions

6

2

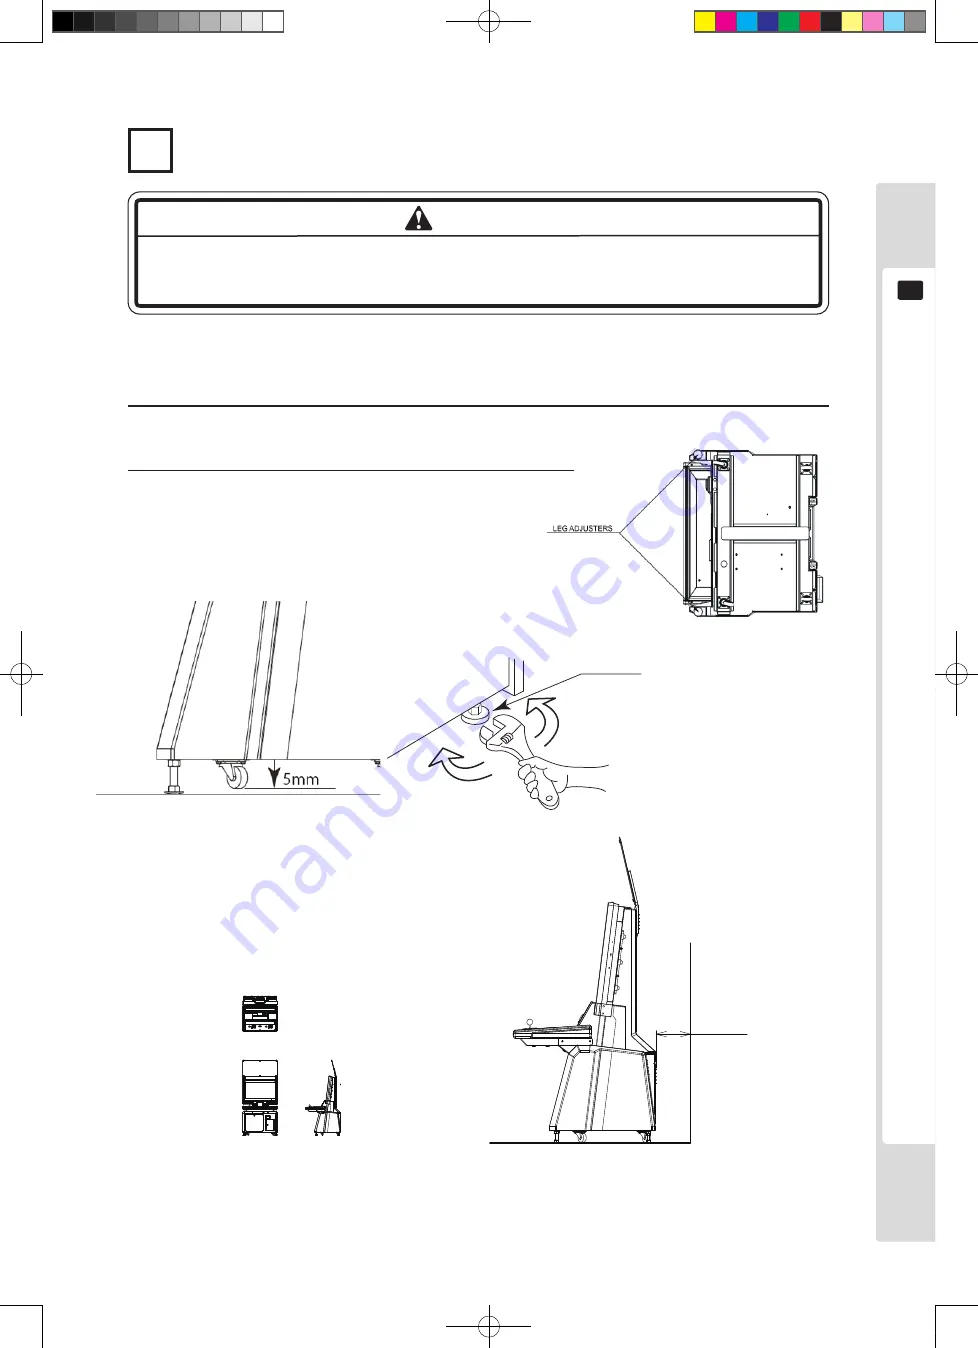
 Fastening in the installation location (adjustment of the adjusters)

Make sure all adjusters touch the floor. If they do not, the cabinet could move and 

cause an accident. 

There are four casters and four adjusters on the bottom of the cabinet. Once the installation position is determined, 

move the adjusters down to the ground and adjust them so that this product is level. 

1

  Move the machine to the installation position.

Figure6.1c  Underside plan

150mm

Figure 6.1e

1/100 scale.

Refer to the layout leading to 

the installation position. 

Figure 6.1f

Allow space for air movement on 

the side with ventilation openings.

2

  Bring the adjusters into contact with the ground. Use a spanner to 

adjust the four adjusters so that the product is held level. 

Figure6.1c  Underside plan

Adjuster

WARNING

Lindburg.indb   13

2/16/2007   19:12:07

Содержание Lindbergh Universal

Страница 1: ...reading this manual be sure to keep it near the product or in a convenient place for easy reference when necessary IMPORTANT SEGA CORPORATION 2007 Suite 3A Oakes House 12 22 West Street Epsom Surrey...

Страница 2: ...hether by accident or design 7 Faults caused by failure to service the machine maintenance and inspection at the required intervals 8 Overhauls regular maintenance movement and re installation of larg...

Страница 3: ...Internal switches and the coin meter 18 9 For mounting the control panel 20 9 1 Replacing the control panel 20 9 2 Replacing the instruction sheet 23 10 10 The coin selector 24 11 The monitor LCD disp...

Страница 4: ...Table of contents ii 15 Parts list 51 16 Wire color reference table 80 17 Overall wiring diagrams 81 Lindburg indb 2 2 16 2007 19 11 57...

Страница 5: ...stand it thoroughly If this product does not operate correctly contact the service contact stated in this manual and make sure nobody other than the appropriate technician touches any internal systems...

Страница 6: ...nt arcade or store under the management of the owner or operator of this product Tasks include assembly and installation of machines maintenance and inspection and the replacement of units and consuma...

Страница 7: ...If the power cable is damaged order a replacement from the vendor or from the office stated in this manual Continued use with a damaged power cable could cause fire electric shock or ground leakage A...

Страница 8: ...rd Before starting work on an IC board always touch a grounded metal surface or take other action to discharge static electricity from your body Some of the components used in this product were not de...

Страница 9: ...the serial number when contacting us to enable a rapid response in such cases Warning indications Our products carry adhesive or attached labels or printed markings in places where there is a potentia...

Страница 10: ...d match the specification A label stating the electrical specification is affixed to the product Use with a different electrical specification can cause fire and electric shock The installation locati...

Страница 11: ...fire could result This company bears absolutely no liability including for compensation to third parties for accidents that occur when the product is used in an area smaller than that specified in thi...

Страница 12: ...player who feels unwell Check that all adjusters are touching the ground If they are not the cabinet could move and cause an accident Do not place heavy objects on top of this product Falling objects...

Страница 13: ...eel unwell while playing so instruct such children that they can only play under the supervision of a parent or guardian Advise those who have begun to feel unwell to undergo a medical examination Mak...

Страница 14: ...rt names 4 Part names 4 Table 4 Main dimensions Dimension Cabinet 820 mm W x 827 mm D x 1 800 mm H Complete cabinet 820 mm W x 827 mm D x 2 100 mm H Figure 4a Figure 4b Lindburg indb 8 2 16 2007 19 12...

Страница 15: ...ti bacterial cap switch 253 5442 6 For the control panel see chapter 9 Billboard sheet LCA 0002 1 The billboard may be already attached or packaged separately depending on the game which is installed...

Страница 16: ...be already attached or packaged separately depending on the game which is installed when the machine is shipped The entry lid may be already attached or packaged separately depending on the game which...

Страница 17: ...product consists of the following three main steps 1 Billboard attachment 2 Fastening in the installation location adjustment of the adjusters 3 Connection of power supply and ground connections Phili...

Страница 18: ...12 Installation and assembly instructions 6 1 Attaching the billboard 1 Use four hexagonal bolts to attach the billboard holder to the cabinet Figure 6 1a Lindburg indb 12 2 16 2007 19 12 04...

Страница 19: ...ove the adjusters down to the ground and adjust them so that this product is level 1 Move the machine to the installation position Figure6 1c Underside plan 150mm Figure 6 1e 1 100 scale Refer to the...

Страница 20: ...ire hazzard Do not leave power cables exposed Exposed cables could trip people and suffer damage Electric shocks or short circuit accidents could result from damaged cables Run cables where they will...

Страница 21: ...power cable securely into the socket and plug the connector opposite the plug securely into the inlet of the AC unit 3 Connect the power cable and grounding cable Attach a wiring cover to protect the...

Страница 22: ...t That is a very dangerous situation which must be avoided It is not possible to connect one Lindbergh equipped cabinet to the service outlet of another as the maximum current capacity would be exceed...

Страница 23: ...lug plugged in could damage the power cable and cause fire and electric shock Take care not to damage the cable by treading on it or trapping it while moving the machine Do not push strongly on the to...

Страница 24: ...Take care not to damage the wiring Electric shocks or short circuit accidents could result from damaged wiring Adjust the volume to an appropriate level for the surroundings The entry lid opens when t...

Страница 25: ...board into test mode Service button This is the service credit button The coin meter does not count up Volume VR This adjusts speaker volume There is a coin meter inside the cash box door The game ca...

Страница 26: ...ox upper cover can close unexpectedly under its own weight potentially trapping fingers Support it securely in place when working with it open If you remove the bolts and nuts fastening the control pa...

Страница 27: ...Figure 9 1b 4 There are nine connectors on the connector panel inside the control box Disconnect all nine connectors In some cases some of the connectors may already be disconnected depending on the g...

Страница 28: ...nel 9 Switch caps When converting to a game with fewer control buttons remove the buttons from the control panel and fit switch caps into the empty button holes Switch caps 253 5442 Figure 9 1d Lindbu...

Страница 29: ...ents Careless handling can break glass components and fragments can cause injury 2 Remove the four screws from the back of the control box upper cover then remove the two brackets the instruction cove...

Страница 30: ...lector When the entry lid is open the coin selector is behind it on the right side The selector stopper is behind the selector Remove it to tilt the selector and pull it out upwards Stopper Coin selec...

Страница 31: ...procedure below to clean it 1 Turn off the game power supply Open the entry lid 2 Remove the coin selector from inside 3 Open the gate and use a soft brush to brush dirt out 4 Moisten a soft cloth wi...

Страница 32: ...switch test Did the coin meter count the coin normally Did the coin fall into the cash box normally If the coin was inserted with the return button pressed did it drop out of the coin return slot Figu...

Страница 33: ...c shock Contact your vendor to arrange an inspection If the machine machine has fallen or the cabinet has broken unplug it from the socket immediately Continued use could cause fire or electric shock...

Страница 34: ...soak it into a soft cloth and wring the cloth before using it for wiping Do not use detergents or powders which contain abrasive particles detergents containing bleaching agents or similar cleaners N...

Страница 35: ...etting values Operation and adjustment The basic operation method for using the key switches to make adjustments is explained below The monitor adjustment board is visible when the entry lid is open S...

Страница 36: ...4 Use the and keys to change each of adjustment and setting items 5 Use the ENTER key to store each of adjustment and setting items 3 5 The menu Care is required because incorrect operation can change...

Страница 37: ...The monitor LCD display 31 11 List of setting items Lindburg indb 31 2 16 2007 19 12 24...

Страница 38: ...POSI CLOCK PHASE 2 Press the MENU key The cursor is at the BRIGHT position so press the ENTER key to display the adjustment and setting item menu The MENU screen is displayed BRIGHT 0 The adjustment...

Страница 39: ...osition and press the ENTER key The adjustment and setting items are displayed The MENU screen is displayed COTNRAST 0 The adjustment and setting item menu is displayed 3 Use the and keys to adjust BR...

Страница 40: ...ursor Move to the SHARPNESS position and press the ENTER key The MENU screen is displayed SHARPNESS 0 The adjustment and setting items are displayed 3 Use the and keys to adjust SHARPNESS 1 Adjusted d...

Страница 41: ...The adjustment and setting items are displayed The MENU screen is displayed B CUTOFF 0 G CUTOFF 0 R CUTOFF 0 B DRIVE 0 G DRIVE 0 R DRIVE 0 W B The adjustment and setting item menu is displayed 3 R DRI...

Страница 42: ...nd press the ENTER key The adjustment and setting items are displayed The MENU screen is displayed The adjustment and setting item menu is displayed 3 H POSI 1 Adjusted data values change Adjust the s...

Страница 43: ...e MENU key then use the key to move the cursor Move to the CLOCK position and press the ENTER key The adjustment and setting items are displayed The MENU screen is displayed The adjustment and setting...

Страница 44: ...the MENU key then use the key to move the cursor Move to the PHASE position and press the ENTER key The adjustment and setting items are displayed The MENU screen is displayed The adjustment and sett...

Страница 45: ...ESET 1 3 1 2 MODE MENU is displayed The MENU P2 screen is displayed The adjustment and setting item menu is displayed 3 The display screen changes when the setting value changes 4 Press the ENTER key...

Страница 46: ...y display when the above input is changed Notes In case of No Input Signal or Out of Range the OSD is displayed continuously while the condition persists regardless of whether the setting is on or off...

Страница 47: ...ency phase Horizontal vertical display position Memory can hold up to 136 settings in the user area so once the number of settings exceeds 136 they will be overwritten sequentially 1 STRAT ENTER KEY Q...

Страница 48: ...11 12 640x400 640x480 VESA 640x480 NAOMI 640x480 TRIFORCE 640x480 CHIHIRO 800x480 800x600 1024x600 1024x768 1280x768 1280x1024 1360x768 31 46 kHz Hz 70 07 31 38 59 77 31 69 59 79 31 47 59 94 31 47 59...

Страница 49: ...t circuit accidents Touching a hot fluorescent tube could cause a burn Take care when replacing the tube 1 Use the main switch of the AC unit or the sub power switch behind the service door to turn th...

Страница 50: ...ssembly to replace the fluorescent lamp Figure 12b S tight screw x 2 M3 x 16 with flat washer Light box lid assembly FL TUBE 18W T8 600MM 390 0100 18DUK ASSY FL TRAY LCB 100V 18W 390 0100 18XUK Screw...

Страница 51: ...ther than the specific dedicated wiring risks causing overheating and fire This manual explains how to remove the Lindbergh Before starting work to change to a different game board contact the game bo...

Страница 52: ...en remove it from the cabinet with the game board still attached Figure 13 1b 4 Remove the four screws and take the game board off Screw x 4 M4 x 16 with flat and spring washer Figure 13 1c Base Thumb...

Страница 53: ...cing the billboard sheet 1 Remove the two truss screws and lift the billboard assembly up to remove it Billboard assembly Truss screw black x 2 M4 x 8 Figure 13 2a 2 Remove the six Allen screws and th...

Страница 54: ...48 Replacing the game board 13 Sub instruction sheet Affix the sub instruction sheet to the entry lid Sub instruction sheet Figure 13 2c Lindburg indb 48 2 16 2007 19 12 34...

Страница 55: ...tion of the setting can damage the IC board and cause malfunctions The power supply unit inside the cabinet has a VR for adjusting game board DC power supply voltage Volume for 5V Volume for 3 3V Figu...

Страница 56: ...t See the game board servicing manual Task Interval Reference item Cabinet Check that all adjusters touch the ground Daily Ch 3 Monitor Clean the screen surface Weekly 11 2 LCD display Check adjustmen...

Страница 57: ...B 2150UK ASSY ENTRY LID 17 LCB 2170UK ASSY COIN SELECTOR 18 LCA 2180UK SW UNIT 19 LCA 2190UK I O UNIT 20 LCA 4000UK ASSY PWR SPLY 21 LCA 4050UK ASSY SUB ELEC 2 LCB 1000UK ASSY CABINET UR 1 LCB 00001UK...

Страница 58: ...52 Parts list 15 1 TOP ASSY LCB UR VT3 LCB 00001UK D 1 2 204 203 1 1 1 4 1 2 6 201 6 202 1 5 1 6 1 1 1 3 Lindburg indb 52 2 16 2007 19 12 42...

Страница 59: ...6 LCA 0004 STICKER SUBINSTR LCA 201 031 0S0416 CRG BLT STN M4 16 202 050 F00400 FLG NUT M4 203 032 000425 WING BLT M4 25 204 068 441616 FLT WSHR 4 4 16 1 6 205 060 S00400 SPR WSHR M4 401 253 5442 ANTI...

Страница 60: ...54 Parts list 15 2 ASSY CABINET UR LCB 1000UK D 1 3 Lindburg indb 54 2 16 2007 19 12 43...

Страница 61: ...Parts list 55 15 2 ASSY CABINET UR LCB 1000UK D 2 3 Lindburg indb 55 2 16 2007 19 12 43...

Страница 62: ...K ASSY I O UNIT 13 LCA 4000UK ASSY PWR SUPPLY 14 LCA 4050UK ASSY SUB ELEC 16 421 7988 91UK STICKER SERIAL NUMBER 17 LB1046 LABEL TESTED FOR ELEC SAFETY 18 LB1130 LABEL WEEE WHEELIE BIN 21 421 7020UK S...

Страница 63: ...Parts list 57 15 3 ASSY BASE CABINET LCA 1100UK D 1 2 Lindburg indb 57 2 16 2007 19 12 44...

Страница 64: ...4 LCB 1101UK REJECT DUCT 5 LCB 1102UK COM BRKT 6 LCA 1103UK FLOOR LID 8 PP1087 BAX CASH FOR MINI DOOR 9 LCB 1152UK STICKER BASE UNIT L 10 LCB 1153UK STICKER BASE UNIT R 11 LCB 1109UK PLATE COM BRKT CO...

Страница 65: ...ASE BOX LBG 102 601 5699X LEG ADJUSTER BOLT M16X75 SEGA 103 601 11635X SUK CASTOR 50 SWIVEL BLACK 104 601 11635X FUK CASTOR 50 FIXED BLACK 105 FN102 FAN GUARD 106 260 0011 02 AC FAN 100V 201 050 H0160...

Страница 66: ...60 Parts list 15 5 ASSY SERVICE DOOR LCB 1270UK ITEM NO PART NO DESCRIPTION 1 LCB 1271UK SERVICE DOOR 2 DP 1167UK TNG LKG 101 220 5575UK LOCK J9117 W KEY Lindburg indb 60 2 16 2007 19 12 45...

Страница 67: ...NO DESCRIPTION 1 LCB 1301UK AC BRKT 3 LB1096 STKR PROTECT EARTH NOT SHOWN 101 EP1381 FILTER IEC SW 6A ROXBURGH 301 LCA 60001UK WH AC BKT NOT SHOWN 302 600 9010 44K WH EARTH 100MM M4 M4 NOT SHOWN 6 ASS...

Страница 68: ...2UK MONITOR SUPPORT LID 3 105 5549UK SW REG BRKT LCA 4 LCB 1511UK BRKT MONITOR SUPPORT 101 400 5461 01 SW REG FOR LCD 32TYPE 301 LCA 60017UK WH LCD POWER 24V 302 600 9010 44K WH EARTH 100MM M4 M4 303...

Страница 69: ...Parts list 63 15 8 ASSY MONITOR 32 LCA 1600UK D 1 2 Lindburg indb 63 2 16 2007 19 12 48...

Страница 70: ...ISPLAY PLATE LCX 14 LCA 1609UK WINDOW PLATE BLBD FRONT LIGHT 15 LCA 1610XUK SPEAKER BRKT LCX A 16 LCA 1611UK SPEAKER BRKT LCX B 17 LCA 1612UK WINDOW PLATE BRKT 19 423 0355 EMBLEM SEGA 101 200 6046 ASS...

Страница 71: ...560UK ITEM NO PART NO DESCRIPTION 1 140 5089 SPEAKER COVER FOR 130 5260 2 LCA 1651YUK SPEAKER HOOK L 101 130 5260 SPKR BOX 6OHM 15 40W W SHLD 201 000 P00305 M SCR PH M3 5 202 012 P00406 TAP SCR 2 PH 4...

Страница 72: ...1660UK ITEM NO PART NO DESCRIPTION 1 140 5089 SPEAKER COVER FOR 130 5260 2 LCA 1661YUK SPEAKER HOOK R 101 130 5260 SPKR BOX 6OHM 15 40W W SHLD 201 000 P00305 M SCR PH M3 5 202 012 P00406 TAP SCR 2 PH...

Страница 73: ...O PART NO DESCRIPTION 1 LCA 1701UK BILLBOARD BASE 2 LCA 1702UK BILLBOARD HOLDER 3 LCA 1703UK BILLBOARD FRONT PLATE 201 FAS 290045 HEX SKT LH CAP SCR STN M4 6 202 000 T00408 0B M SCR TH BLK M4 8 203 28...

Страница 74: ...CA 2030UK ASSY CONTROL BOX UPPER 2 LCA 2060UK ASSY CONTROL BOX LOWER 3 LCA 2001UK HINGE PLATE L 4 LCA 2002UK HINGE PLATE R 6 LCA 2004UK SIDE COVER L 7 LCA 2005UK SIDE COVER R 201 000 P00408 W M SCR PH...

Страница 75: ...Parts list 69 15 13 ASSY CONTROL BOX UPPER LCA 2030UK D 1 2 Lindburg indb 69 2 16 2007 19 12 52...

Страница 76: ...R COVER OPTION 12 SHE 1238 SPACER COLLAR 14 LCA 2042UK TONGUE RETAINER 101 390 6815 WH V CCFL D 15 L 700 WHITE W V TUBE OPTION 102 838 14587 CCFL INV OPTION 103 280 5275 SR10 CORD CLAMP SR10 OPTION 20...

Страница 77: ...OX LOWER 2 LCA 2062YUK SLIDE TONGUE L 3 LCA 2063YUK SLIDE TONGUE R 4 LCA 2064UK TONGUE SPACER 5 LCA 2065 TONGUE SPRING 6 LCA 2066UK TONGUE GUIDE 7 LCA 2067 TONGUE ROLLER 201 000 P00416 W M SCR PH W FS...

Страница 78: ...01XUK ENTRY BOX 2 LCA 2102UK TONGUE 3 LCA 2103UK CONN PANEL PLATE 4 LCA 2104UK STICKER ENTRY UNIT L 5 LCA 2105UK STICKER ENTRY UNIT R 101 220 5575UK LOCK J9117 W KEY 102 601 11440 STAY 201 000 P00408...

Страница 79: ...2153 FLAT LID USED WHEN NO CARD RW FITTED 4 LCA 2154 OPEN LID 6 LCA 2158UK PLATE LID HOOK 7 250 5669 ASSY REJECT BUTTON L59 8 220 5428 09 COIN ENTRY 10 LCB 2157UK STICKER ENTRY UNIT FRONT 201 000 P004...

Страница 80: ...4UK LOWER COIN CHUTE 5 VSC 1474UK REJECT CAM 103 EP1380 R CREDIT BD EXCEL 104 280 L01640 PS STANDOFF 16MM 4MM PANEL SMALL 201 000 P00408 W M SCR PH W FS M4 8 202 000 P00308 W M SCR PH W FS M3 8 203 05...

Страница 81: ...TCH 3 LCA 2183UK LATCH HOLDER 4 CTF 1173 LATCH SPRING L 5 CTF 1174 LATCH SPRING R 6 421 12136UK STICKER SW PANEL LCA 101 838 14548 01UK SW C VOL BD 201 065 E00700 E RING 7MM 202 000 P00408 W M SCR PH...

Страница 82: ...T LCA 2190UK ITEM NO PART NO DESCRIPTION 1 LCA 2191 IO BD BASE 2 837 14572 I O CONTROL BD 3 FOR JVS COM 201 000 P00320 W M SCR PH W FS M3 20 19 ASSY I O UNIT LCA 2190UK 19 ASSY I O UNIT LCA 2190UK Lin...

Страница 83: ...ts list 77 15 20 ASSY POWER SUPPLY LCA 4000UK ITEM NO PART NO DESCRIPTION 1 SHT 4904 ELEC BRKT 101 400 5457 01 SW REGU ATX JVS AUTO 201 000 P00308 W M SCR PH W FS M3 8 Lindburg indb 77 2 16 2007 19 12...

Страница 84: ...05 400 050 024 01 PSU 24VDC 50W MW LPS 50 24 201 000 P00308 W M SCR PH W FS M3 8 202 011 T03516 TAP SCR TH 3 5 16 203 011 P00320 TAP SCR PH 3 20 301 LCA 60007UK WH AC SUB ELEC SW REGU FOR AMP 303 LCA...

Страница 85: ...B D24 YELLOW 111 610 0404 01 ASSY 8 WAY JOYSTICK GREEN 112 610 0404 02 ASSY 8 WAY JOYSTICK PINK 113 509 5755 01 SW PB D30 GREEN 114 509 5755 02 SW PB D30 PINK 115 253 5185UK CAP SW 30PH 201 000 P00412...

Страница 86: ...ter after the wire color code indicates the thickness of the wire U AWG16 K AWG18 L AWG20 None AWG22 The wire color codes used in the overall wiring diagrams in the next chapter are as stated below CO...

Страница 87: ...81 Overall wiring diagrams 18 Overall wiring diagrams D 1 2 17 Lindburg indb 81 2 16 2007 19 13 05...

Страница 88: ...82 Overall wiring diagrams 18 D 2 2 Lindburg indb 82 2 16 2007 19 13 13...

Отзывы: