background image


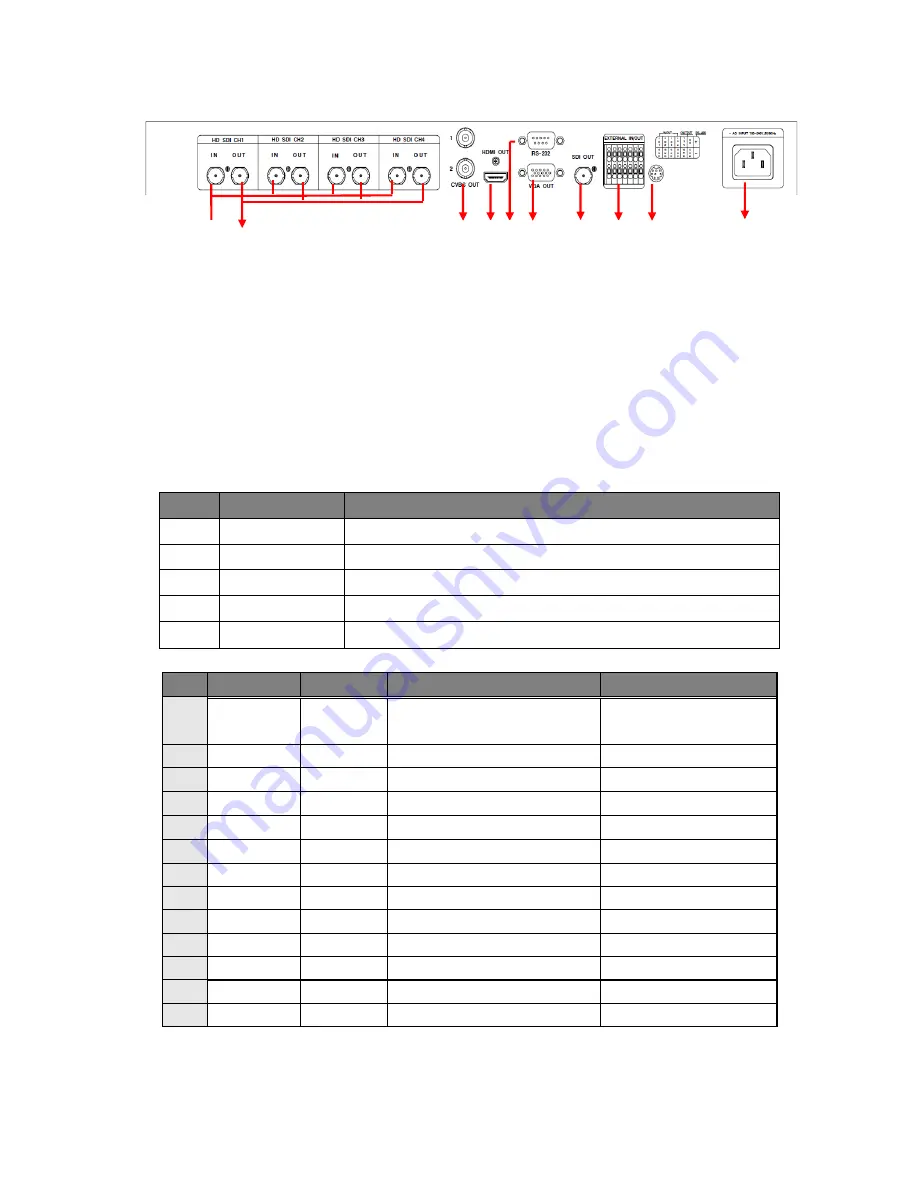
3-1-2. SC-HD04QS (D) - Rear

(connection port) 


  SDI in X 4: 

Connect with the 4 of HD-SDI camera.


  SDI Loop thru out X 4: 

Connect the other devices.


  Monitor(SPOT) Output: 

Connect the SD(standard definition) Video Monitor. 

- NTSC/PAL selectable for Monitor output format. 

  HDMI OUT: Connect the HD (High Definition) Monitor with HDMI input 

port.   

  Serial Port: Connect the RS-232C to link external devices for remote 

control function. 

• Data configuration 

- Data Length: 8 Bit, Start/Stop Bit: 1Bit, Parity Bit: None, Baud rate: 9,600 bps 

Packet structure


Control Communication Data format


Byte 

Value 

Function 

0xA0 

STX (Launching Data) 

0x00 ~ 0xFF  0x16 (Device Code) 

0x00 ~ 0xFF  Address (Device ID) 

Data byte 

Control Data 

Check Sum 

Check Sum = Byte2 + Byte3 + Byte4 

    - 

Control DATA Code 

NO 

Hex 

ASCII 

Function 

Remarks 

0x30 ~ 

0x33 

0 ~ 3 

CH  01  ~  04  Full 
Display 

Display Control 

0x47 

Multi Screen 


0x48 

Menu 


0x49 

Enter 


0x4A 

ESC 


0x50 

Quad screen Display 

Display Control 

0x5A 

Auto Sequence 


0x64 

Down 

Menu move 

0x6C 

Left 


10 

0x72 

Right 


11 

0x75 

Up 


12 

0x6D 

Minus 

Set Value change 

13 

0x70 

Plus 


  VGA OUT: 

Connect the Monitor with the VGA input


  SDI OUT: Connect the HD (High Definition) Monitor with SDI input or 


Содержание SC-HD04QS (D)

Страница 1: ...Released version 2 0 DIGITAL FULL HD QUAD SPLITTER SC HD04QS D User s Manual SC HD04QS D ...

Страница 2: ...e Use this product under temperature conditions only between 0 C and 50 C Should use the DC 12V 1 5A adaptor certified for electromagnetic wave and for safety Should be careful not to have the lines changed when connecting them Prior to turn on the device check the cable insulation condition of the data cable connected with external devices Before installing the product check its voltage rate and ...

Страница 3: ...he monitor as well as when it occurs any channel loss 1 2 Features Supporting 4 of HD SDI Inputs 4 of Loop through outputs Displaying in quad four HD SDI signals at real time Auto sequence mode Supporting Various output mode 1920x1080 1680x1050 1600x1200 1440x900 1280x1024 1360x768 1024x768 1280x720 Displaying date time channel name and the current status OSD RS 232C RS 485 communication port for ...

Страница 4: ...gain to cancel the auto sequence mode You can set the auto screen dwell time of split screen in menu Sequence Time Please refer to menu 5 5 5 Sequence Time Sec Full Single screen mode MULTI SCREEN Please press the multi screen button to select the Quad screen mode ESC Press this button to cancel the menu configuration in Setup Menu mode ENTER Press this button to select the menu you want in Setup ...

Страница 5: ... 600 bps Packet structure Control Communication Data format Byte Value Function 1 0xA0 STX Launching Data 2 0x00 0xFF 0x16 Device Code 3 0x00 0xFF Address Device ID 4 Data byte Control Data 5 Check Sum Check Sum Byte2 Byte3 Byte4 Control DATA Code NO Hex ASCII Function Remarks 1 0x30 0x33 0 3 CH 01 04 Full Display Display Control 2 0x47 G Multi Screen 3 0x48 H Menu 4 0x49 I Enter 5 0x4A J ESC 6 0x...

Страница 6: ...nly enter to the menu mode and other function button may not operate During the Alarm Hold Time press any button to escape from Alarm mode 2 Alarm Input Cancel When the external control data or Alarm input is eliminated it returns to the last display mode which has been displayed before the external data has entered after the Alarm Hold Time is ended You can set the Alarm Hold Time in the Alarm Ti...

Страница 7: ...The relay may not activate properly when an overrated power is applied in the alarm output contact point 7 Function The relay maintains closed when any external input is ON that is when the Alarm Input port is produced a short circuit The relay maintains open when any external data is off or the alarm input is off after the alarm time is ended Port for upgrading Firmware Power Input SC HD04QS D DC...

Страница 8: ...Selectable Screen splitting mode 1 4 OSD On Screen Display Inserting up to 16 characters alphabet and or numbers External Interface MINI DIN 8PIN Firmware upgrade RS 232C Connection port for external devices 14P T Block ALARM Input 4 8P Output 1 2P RS 485 Connection port for external devices Power Output DC 12V 300mA 2P POWER INPUT HD04QS D 2P Terminal Block DC 12V 2A 이상 HD04QS AC 100 240V 50 60Hz...

Страница 9: ...ct the mode by pressing buttons Press ESC to cancel or go back the previous menu S S SE E ET T TU U UP P P M M ME E EN N NU U U S S SY Y YS S ST T TE E EM M M S S SE E ET T T I I IN N NP P PU U UT T T O O OU U UT T TP P PU U UT T T S S SE E ET T T D D DI I IS S SP P PL L LA A AY Y Y S S SE E ET T T D D DA A AT T TE E E T T TI I IM M ME E E S S SE E ET T T C C CH H HA A AN N NN N NE E EL L L S S SE...

Страница 10: ...5 BUZZER OUT To set the Buzzer when button is used Alarm is detected and video signal loss is detected SYSTEM SET Go to BUZZER OUT by pressing buttons Press buttons to select ON OFF 5 3 6 BUZZER TIME To set buzzer duration time SYSTEM SET Go to BUZZER TIME by pressing buttons Press buttons to set the time Second 1 99 sec S S SY Y YS S ST T TE E EM M M S S SE E ET T T S S SY Y YS S ST T TE E EM M M...

Страница 11: ...rmat INPUT OUTPUT SET Go to INPUT by pressing buttons Press buttons to set the input resolution out of 1024x768p60 1280x720p 24 25 30 50 60Hz 1920x1080 50i 60i 24p 25p 30p 5 4 2 OUTPUT To set the video resolution outputted from HDMI SDI VGA When you connect SC HD04QS with the monitor set the resolution as the monitor supports INPUT OUTPUT SET Go to OUTPUT by pressing buttons Press buttons to set t...

Страница 12: ...channels in Quad mode DISPLAY SET Go to BORDER by pressing buttons Press buttons to select ON OFF 5 5 4 SEQUENCE MODE To display the screen in auto sequence mode according to the dwell time adjusted in each channel 5 5 5 SEQUENCE TIME To set display switching time by second 1 99 when selecting Auto Sequence mode SYSTEM SET Go to SEQUENCE TIME by pressing buttons Press buttons to set the time Secon...

Страница 13: ... to set the time 5 7 CHANNEL SET C C CH H HA A AN N NN N NE E EL L L S S SE E ET T T C C CH H HA A AN N NN N NE E EL L L 0 0 01 1 1 I I IN N N D D DE E EF F FA A AU U UL L LT T T S S SD D DI I I T T TI I IT T TL L LE E E C C CH H H0 0 01 1 1 M M MO O OV V VE E E S S SE E EL L LE E EC C CT T T E E EX X XI I IT T T D D DA A AT T TE E E T T TI I IM M ME E E S S SE E ET T T D D DA A AT T TE E E F F FO...

Страница 14: ... the time when the event of ALARM LOSS were occurred L LOSS A ALARM E E EV V VE E EN N NT T T L L LI I IS S ST T T N N NO O O Y Y YY Y Y M M MM M M D D DD D D H H HH H H M M MM M M S S SS S S E E EV V VT T T C C CH H H 0 0 00 0 01 1 1 1 1 11 1 1 0 0 04 4 4 2 2 29 9 9 1 1 15 5 5 3 3 38 8 8 2 2 20 0 0 L L L 0 0 02 2 2 0 0 00 0 01 1 1 1 1 11 1 1 0 0 04 4 4 2 2 29 9 9 1 1 17 7 7 0 0 00 0 0 3 3 30 0 0 ...

Страница 15: ...14 6 Connection Diagram HD SDI input resolution supports only 1280x720p 24 25 30 50 60Hz 1920x1080 60i 24p 25p 30p ...

Страница 16: ...age or trouble made by breaking the product guide or manual Breakage or trouble made by wrong power voltage or frequency When you want to reassemble for full system or replace parts within warranty service period When unauthorized person modified or made damage on the product trying to repair it Please note that we don t support the breakage after warranty service period is expired If the customer...

Отзывы: