SecurityMan DigiminiAir Скачать руководство пользователя страница 3

2

Warranty Disclaimers 

SecurityMan Inc, makes no other warranties, express, implied or otherwise, 
regarding this product, and specifically disclaims any warranty for merchantability 
or fitness for a particular purpose. 

The exclusion of implied warranties is not permitted in some states and the 
exclusions specified herein may not apply to you. This warranty provides you with 
specific legal rights. There may be other rights that you have which vary from state 
to state.

Limitation of Liability

The liability of SecurityMan Inc, arising from this warranty and sale shall be limited 
to a refund of the purchase price. In no event shall SecurityMan be liable for costs 
of procurement of substitute products or services, or for any lost profits, or for any 
consequential, incidental, direct or indirect damages, however caused and on any 
theory of liability, arising from this warranty and sale. These limitations shall apply 
not withstanding any failure of essential purpose of any limited remedy. 

For Tech Support Call: 888-977-3777

SecurityMan

4601 E. Airport Drive  
Ontario, CA, 91761, USA
Tel: 909-230-6668 
Fax: 909-230-6889
Email: [email protected]
Website: www.securitymaninc.com

Copyright 2012 by SecurityMan v1.0

Содержание DigiminiAir

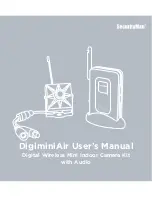
Страница 1: ...DigiminiAir User s Manual Digital Wireless Mini Indoor Camera Kit with Audio...

Страница 2: ...ject to the following two conditions 1 This device should not cause harmful interference 2 This device must accept any interference received including interference that may cause undesired operation O...

Страница 3: ...ty of SecurityMan Inc arising from this warranty and sale shall be limited to a refund of the purchase price In no event shall SecurityMan be liable for costs of procurement of substitute products or...

Страница 4: ...atures Package Contents Product Basics Quick Start Camera Installation SM 209DT On Screen Display Signal Strength Channel No Signal Operation Adding and Pairing Camera to the Receiver Switching betwee...

Страница 5: ...ess analog devices such as Wi Fi routers Bluetooth devices cordless phones microwaves and cell phones Important This guide provides important information on the use and operation of your DigiminiAir P...

Страница 6: ...ng children can choke on these items if they put them into their mouths DO NOT plug the AC adapter into the outlet in improper situations Plugging in an AC adapter with wet hands might cause electric...

Страница 7: ...e receiving range DO NOT use the camera in the places which are covered with metal The around metal such as elevator and cabin might shield the electromagnetic wave and result in inability to receive...

Страница 8: ...in or moist and it shall not be put in or near bathrooms washing polls wash houses moist basements or swimming pools unless it is well shielded In use of sockets set on walls or extension wires attent...

Страница 9: ...ital wireless pairing between camera and receiver worry free of signal interception by neighbors Supports up to 4 sets of digital wireless camera receiver CH1 CH4 to a location One receiver can suppor...

Страница 10: ...9 Package Contents 1 x Receiver SM 451DR 1 x Camera SM 209DT 2 x AC Adapters 4 x Screws 1 x AV Cable User s Manual...

Страница 11: ...Basics Lens Power Jack Pairing Button Mounting Bracket Channel Button Pairing Button Audio Output Video Output Power Socket Docking Stand Antenna Antenna Camera SM 209DT Receiver SM 451DR LED Lights...

Страница 12: ...eiver are both working and that the receiver are able to pick up the camera image Camera Installation SM 209DT 1 Mounting the camera a Detach the cameras mounting bracket by removing the two screws lo...

Страница 13: ...djust the viewing angle as needed adjust by tilting up and down as illustrated below 2 Connect the power adapter plug into the power socket attached to the camera and then connect the power adapter 5V...

Страница 14: ...riate input channel The TV monitor must be on the A V Input that you connected the receiver to For Example A V 1 Input 1 Video 1 Line 1 or Game 1 Once the TV monitor is on the proper input channel you...

Страница 15: ...ft On Screen Display Signal Strength The signal bars on the on screen display indicates the signal strength between the camera and the receiver 0 1 bars weak no reception 4 bars strong reception Chann...

Страница 16: ...The camera image will immediately be displayed on the screen after successfully being matched to the receiver A NO SIGNAL notification will be displayed followed by a melody if you switch the receiver...

Страница 17: ...ance Operating Temperature Operating Humidity 1 4 CMOS Color 510 x 492 pixels NTSC 60 degree Microphone built in up to 30ft 3 Lux F1 2 1 DC 5V 1 5A 1 45 x 1 45 x0 8 1 CH button Manually Select CH1 CH4...

Страница 18: ...on the on screen display to observe signal strength 0 1 bars no weak reception 4 bars strong reception Q I can t hear any sound on my TV Check the connections between the receiver and the TV specifica...

Страница 19: ......

Отзывы: