background image

60 

XR500/XR100 User’s Guide

Appendix C

Appendix D


XR500/XR100 User’s Guide 

61

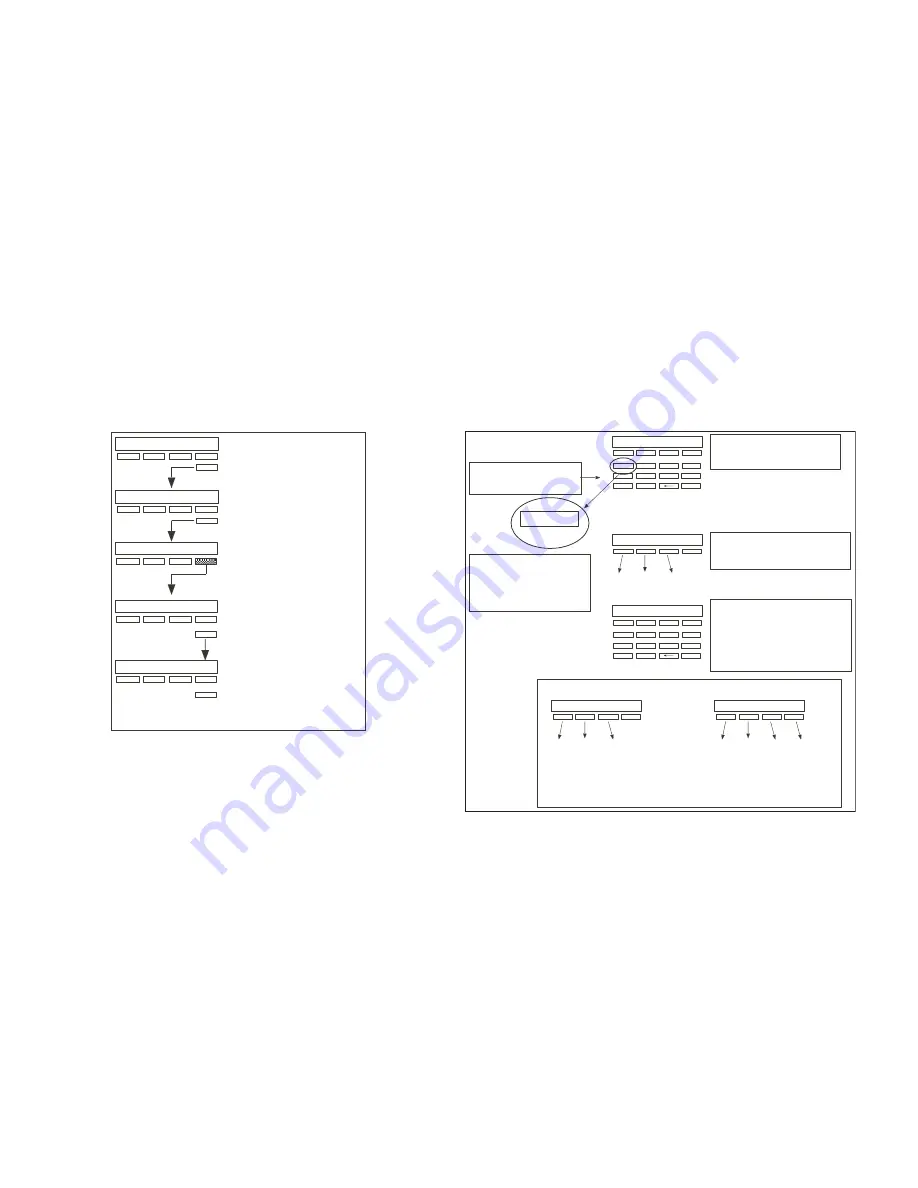
Entering User Names 

Refer to the following when entering names information into the 

keypad.

-

Once you've cleared the default
name, the display shows a dash
on the display left side.

To enter a custom name into
the keypad, you use the 
three rows of number keys.

To enter a custom name, 
press the number key above 
the letter you want to enter.

Under each number key are
three letters.

1

2

4

3

5

6

8

7

9

0

{

1

A B C

1

A

B

C

1

2

Once the letter you want displays,
press the number key above the
next letter you want to enter.

You can enter up to 16 characters
for each name into the keypad.

A

1

2

4

3

5

6

8

7

9

0

3

4

9

The nine and zero keys . . .

Y

Z

(space)

Pressing the 

9

 key provides you

with Y, Z, and a space to use
between names. For example:
BOB SMITH.

0

.

Pressing the 

0

 (zero) key provides

you with a – (dash), . (period),
* (asterisk), and a # (pound sign).

*

#

With the number displayed, press
the SELECT key/area that matches
the letter position. See example.

CMD

CMD

User Disarm and Entry

Use  the  following  steps  to  disarm  your  system  and  silence  an 

alarm.

THU     1:29   PM

ARM DISARM

MENU?

NO YES

ENTER CODE: -

From the Status List, press 
the COMMAND key.

Press the COMMAND key 
again.

At the Menu prompt, press 
the right SELECT key/area.

At the 

ENTER CODE: 

prompt,


enter your user code.

Press COMMAND.

ALARM SILENCE?

Once in the User Menu, the 
first menu prompt appears.

Press any SELECT key/area to choose the option.
Press COMMAND to advance to the next prompt.

CMD

CMD

CMD

CMD

Appendix C

Содержание XR500 Series

Страница 1: ...User s Guide XR500 XR100 ...

Страница 2: ...ing enter your user code or present your card to a keypad or reader during the Status List display All Perimeter or Home Sleep Away System CANCEL VERIFY displays If a burglar alarm is valid press VERIFY to send a verification message to the Central Station If a valid alarm has not occurred press CANCEL to cancel the alarm and send an Abort or Cancel message to the Central Station and the security ...

Страница 3: ...y Command Thinline Aqualite Keypads 3 Clear Touch Keypads 4 Common Keys on All Keypads 4 Panic Functions 5 Security Command Thinline Aqualite Keypads 5 Using the Keypad 6 Multi lingual Display Option 6 Keypad Displays Current Programming 6 Multiple Displays XR500 System Only 6 Asterisks in Area Armed Displays 6 Keypad User Options 7 Backlighting Brightness 7 Internal Speaker Tone 7 Volume level 7 ...

Страница 4: ...Disarming the Area System from the keypad 17 Quick Disarming 17 All Perimeter System Arming 17 System Ready System Not Ready 17 All Perimeter Shortcut Key Arming 17 Arming an All Perimeter System 18 All Perimeter System Disarming 18 Disarming an All Perimeter System 19 Disarming During an Alarm 19 Home Sleep Away System Arming 19 System Ready System Not Ready Keypad Displays 19 Home Sleep Away Sho...

Страница 5: ...29 Adding User Profiles 30 Browser Feature 30 Changing User Profiles 30 Browser Feature 31 Deleting User Profiles 31 Section Page Browser Feature 31 TEMP CODE 31 ANTI PASS NO 31 SHIFT TIME ACCESS 1 2 3 4 ANYTIME 31 RE ARM DELAY 31 Browser Feature 31 User Profiles Chart 32 User Codes 33 Adding User Codes 33 Browser Feature 34 Changing User Codes 34 Browser Feature 34 Deleting User Codes 34 Browser ...

Страница 6: ...lays 53 Wireless Jamming Event Displays 53 Wireless Trouble Event Displays 53 Appendix B 54 Zone Status Browser 54 Bypass Zones Browser 55 Zone Monitor Browser 55 Add User Codes Browser 56 Section Page Change User Codes Browser 56 Delete User Codes Browser 57 Add User Profiles Browser 57 Change User Profiles Browser 58 Delete User Profiles Browser 58 Output Groups Browser 59 Outputs On Off Browser...

Страница 7: ...the System Test section of this guide for instructions on testing the burglary portion of your system and refer to the Fire Drill section for instructions on testing your system fire bells XR500 and XR100 Security Command Systems This Guide covers operation of the XR500 Series and the XR100 Series Security Command system About Your Security System The system has been designed with your safety and ...

Страница 8: ...floor plan to show escape routes from each room Decide Where to Meet Prearrange a meeting place outside and away from where emergency personnel are likely to be working A neighbor s house or across the street in front of the house are good locations Always perform a head count to make sure all occupants safely exited NEVER ENTER A BURNING BUILDING If the head count shows one or more persons missin...

Страница 9: ...ese keys are one of the features that make your system so easy to operate They allow you to make selections by pressing the Select key under a choice shown in the display Note For the purposes of this guide when instructed to press the first Select key press the far left Select key the second Select key is the second from the left third Select key is second from the right and the fourth Select key...

Страница 10: ...a Entry Digit keys These keys allow you to enter your user code when arming or disarming or enter other information into the system COMMAND CMD key The COMMAND key allows you to advance through the keypad displays User Menu or complete a data entry function Back Arrow key The Back Arrow key is used to go back through the keypad displays while operating your system You can press the Back Arrow key ...

Страница 11: ...nd Keypad Panic Keys Top Row Select Keys Police Emergency Fire Thinline Aqualite Keypad Panic Keys Clear Touch Keypads Touch the icon for 2 seconds until a beep is heard Police Emergency Fire Touch Select Areas Clear Touch Keypad Panic Icons Security Command Thinline Aqualite Keypads 7 0 Panic Function Security Command Thinline and Aqualite Keypads may also be programmed at installation to allow t...

Страница 12: ...y to go to the next option Multiple Displays XR500 System Only For some User Menu options such as Access Areas under User Profiles there are several displays containing lists For example when using Access Areas areas 1 through 32 display on four separate displays First areas 1 through 8 display Press the COMMAND key to display areas 9 through 16 Press the COMMAND key again to display areas 17 thro...

Страница 13: ...he speaker is sounding the backlight illuminates at one half 1 2 brightness Internal Speaker Tone Set the tone of the keypad internal speaker At the SET TONE display use the top left Select key to make the tone lower Use the right Select key to make the tone higher Volume level Set the volume level of the keypad internal speaker for key presses During alarm trouble and prewarn conditions the volum...

Страница 14: ... A continuous pulsed tone that sounds when you open an entry delay door on a system that is armed turned on reminding you to disarm the burglary protection The tone silences as soon as the first user code digit key is pressed If a valid user code is not entered or an invalid user code is entered within five seconds the prewarn tone begins sounding again Exit tone A continuous pulsing tone that sou...

Страница 15: ...pped Your system may sound bells or sirens TRBL TROUBLE There is a problem with a protection device or system component This display is accompanied by a description of the problem ALARM NOT SENT The alarm signal was aborted and was not sent to the central station because a user code was entered to disarm the system before the alarm signal was sent to the central station Also your system may be pre...

Страница 16: ...properly The user must exit the area through the proper door If not possible your system administrator should select the Forgive option in the User Codes menu option SYSTEM TROUBLE or SERVICE REQUIRED There is a problem with one or more of the components in your system Contact our service department as soon as possible SYSTEM BUSY The system is performing another task of a higher priority This usu...

Страница 17: ...ed together under the same zone name and number Often similar devices in the same general location share the same zone For example the windows on the east side of the premises can all be grouped together in a zone named E WINDOWS Instant Zone Interior protection devices and perimeter devices such as exterior windows passive infrared detectors PIR and non entry doors are typically not programmed wi...

Страница 18: ...n a zone and any trouble condition on an internal system monitor The system monitors include the AC power battery power panel box tamper printer and phone lines If more than one alarm or trouble condition occurs at the same time the keypad sequences this information on its display If the alarm is from a 24 hour zone or a system monitor it remains in the Status List until it restores If one or more...

Страница 19: ...tion is similar Throughout this guide any differences between the systems are noted for your convenience Arming Functions Arming or Disarming You can arm and disarm all areas at one time or each area individually You can only arm or disarm areas authorized for your user code Arm All or Selective Arming After entering your user code the system allows you to arm either all of the areas to which you ...

Страница 20: ...rmed zones are armed Note If your system uses a keyswitch to arm an area the exit delay time does NOT show on the keypad display When you arm both the Perimeter and Interior to leave the building but then you do not exit by the time the exit delay ends the system automatically arms but the interior area s will remain disarmed because you have not exited Should you exit the building and the door do...

Страница 21: ...lted Priority zone cannot be armed 7 At this point you can force arm or bypass any faulted zones A zone that is force armed is restored into the system if it later returns to normal A zone that is bypassed remains bypassed until the system is disarmed See steps 7a through 7d 7a If a problem exists on a zone the zone name and problem is shown followed by OKAY BYPASS STOP 7b Select OKAY to force arm...

Страница 22: ...s If you have programmed schedules for your system and a code is entered outside of a schedule and that code does not have authorization to disarm outside of schedules the keypad displays INVALID TIME This lets users know that they are attempting to disarm outside of their authorized time All or Selective Disarming After entering your user code the system allows you to disarm either all of the are...

Страница 23: ... one or more zones that are not in a normal condition the keypad displays SYSTEM NOT READY Pressing any Select key during this display shows the zone number and name allowing you to investigate the problem All Perimeter Shortcut Key Arming Arm Perimeter Press 6 for 2 seconds Arm All Press 1 for 2 seconds Disarming the Area System from the keypad 1 Press the COMMAND key until ARM DISARM displays Du...

Страница 24: ... all zones and make them instant The keypad displays INSTANT When you select INSTANT any entry exit zone that trips immediately activates an alarm and the exit delay countdown immediately stops 9 When the system is fully armed the keypad displays PERIMETER ON for perimeter arming and ALL SYSTEM ON for perimeter and interior arming All Perimeter System Disarming Disarming While the system is armed ...

Страница 25: ...ior devices are assigned to an Interior and Bedroom areas while windows and exterior doors are assigned to a Perimeter area Arming the system When arming a Home Sleep Away system the keypad displays HOME AWAY or HOME SLEEP AWAY If you select AWAY you arm all areas of the system You will want to arm all areas when leaving with nobody staying inside Selecting HOME arms only the Perimeter of the syst...

Страница 26: ...number of seconds remaining for you to exit When the delay expires the exit zones are armed 9 You can select INSTNT while EXIT INSTNT is displayed to immediately arm all exit zones and make them instant The keypad displays INSTANT Home Sleep Away System Disarming Disarming While the system is armed you can only enter the premises through an entry exit delay door without causing an alarm After open...

Страница 27: ...SYSTEM OFF to confirm the system is disarmed OR If the alarm is valid select VERIFY to send a verify message to the Central Station Extending Schedules Depending on your system programming when the open schedule ends you can extend the schedule to a later time The keypad buzzer sounds and the keypad displays area name and LATE or CLOSING TIME This reminds users still on the premises to arm the sys...

Страница 28: ...ass Refer to the Arming Section for detailed arming operation Home Sleep Away Arming Arm Home Press 3 for 2 seconds to arm the perimeter Arm Sleep Press 7 for 2 seconds to arm the perimeter and interior areas and leave the bedroom area off Arm Away Press 1 for 2 seconds All Perimeter Arming Arm Perimeter Press 6 for 2 seconds Arm All Press 1 for 2 seconds Sensor Fire Reset Function System Operatio...

Страница 29: ...OUTPUTS ON OFF Allows you to turn on or off any of the outputs described in the System Setup section of this guide ZONE STATUS Allows you to see if a zone is either armed bypassed in alarm open or shorted BYPASS ZONES Allows you to Bypass a zone or reset an already bypassed zone ZONE MONITOR Allows you to add or remove a zone from the monitor mode SYSTEM STATUS Displays the current condition of th...

Страница 30: ...moved by the system allowing them to reset Make sure all smoke is cleared from around the area of the smoke detectors before performing a Sensor Reset to prevent the alarm from occurring again Sensor Fire Reset Shortcut Key All Systems Press 2 for 2 seconds then enter your user code if required to reset the system Resetting the Sensors 1 Access the User Menu 2 Press COMMAND until SENSOR RESET disp...

Страница 31: ...displays when your user code does not have access to the keypad s areas and the output does not turn on Under certain conditions some outputs cannot be turned on If you select a restricted output the keypad displays CANNOT TURN ON Turning the Outputs ON and OFF 1 Access the User Menu 2 Press COMMAND until OUTPUTS ON OFF displays 3 Press any Select key to display OUTPUTS DOOR 4 Select OUTPUTS or DO...

Страница 32: ...passed BAD the zone is in a bad or faulted condition 9 After displaying the zone status ZONE returns for you to enter another zone number Browser Feature If you are unsure of the zone number or description refer to Appendix B at the back of this guide for a diagram showing you how to use the built in Zone Status browser Bypass Zones Allows you to bypass a zone prior to arming Bypassing is usually ...

Страница 33: ...m Test function place all zones in Zone Monitor Starting at the front door go around and open and then close each door and window You should hear the keypad beep each time The keypad also displays the name of each zone as its device is opened Once the protected doors and windows test is complete walk in front of each motion detector The keypad should beep to confirm the zone has tripped If at any ...

Страница 34: ...system then displays its firmware version the panel mode and then exits the User Menu For example VER_118_1 20 07 MODEL XR500 System Test System Test is used to test the battery alarm bell or siren and communication to a central station The System Test function begins automatically as soon as you select it Note If an area is in an armed state the system test will not operate Using the System Test ...

Страница 35: ...tion to be sent User Profiles Add delete or change User Profiles that define the authority of each user code in the system Several characteristics define the authority of each User Profile within the system Always make sure that at least one administrator in your system has a profile with all authorities and all areas Note User Profiles does not display in the User Menu when your system is program...

Страница 36: ...lays the PROFILE ADDED message for 4 seconds Browser Feature Refer to Appendix B in this guide for a diagram showing you how to use the Add User Profiles browser Changing User Profiles 1 Access the User Menu 2 Press COMMAND until USER PROFILES displays 3 Press any Select key The keypad displays ADD DEL CHG 4 Select CHG to change a user profile 5 At the PROFILE NO option enter a profile number and ...

Страница 37: ...hat the User Code operates for door access and disarming Selecting 1 2 3 and or 4 indicates operation during the S1 S4 shift schedules Selecting ANYTIME from the menu indicates the code operates any time regardless of schedules An asterisk displays next to the shift or Anytime choice You may select all shift schedules for one user Menu access is not affected by this option An UNAUTHORIZED ENTRY me...

Страница 38: ...ne Monitor No No No Yes Yes Yes Yes Yes Yes No No Yes SYS STAT NO YES System Status Yes Yes Yes Yes Yes Yes Yes Yes Yes No No Yes SYS TEST NO YES System Test No No No Yes Yes Yes Yes Yes Yes No No Yes PROFILES NO YES User Profiles No No No No No No No No Yes No No Yes USR CODE NO YES User Codes No No No No No No No No Yes No No Yes SCHEDULS NO YES Schedules No No No No No No Yes Yes Yes No No Yes ...

Страница 39: ...s needed refer to Appendix C for Entering User Names information User Profile The user is also assigned a Profile 1 to 99 by the person administrating the system The profile number determines the areas and functions the user can access Adding User Codes 1 Access the User Menu 2 Press COMMAND until USER CODES displays 3 Press any Select key The keypad displays ADD DEL CHG BAT 4 Select ADD or BAT Ba...

Страница 40: ...ete yourself 5 At the USER NUMBER option enter the user number you want to delete and press COMMAND The display changes to USER DELETED 9 At the PROFILE NO display enter a profile number from 1 to 99 and press COMMAND The displays shows USER ADDED If BAT Batch was chosen in step 4 instead of ADD the next available user number is automatically selected and only steps 6 and 7 repeat The User Profile...

Страница 41: ...UMBER option enter the user number to be forgiven and press COMMAND The User Code Browser described in Appendix B can help find the appropriate user by name if you do not know the number To clear the FAILURE TO EXIT Anti passback violation for all users enter 000 at the USER NUMBER option 4 The keypad displays USER XXXX FORGVN to confirm then returns to step 3 for the next user Press the Back Arro...

Страница 42: ...ic arming you can use the Closing Check Extend feature with Schedules to help ensure your system is armed manually at a specific time This option sounds the keypad buzzer and displays CLOSING TIME or AREA LATE when a schedule expires This reminds users still on the premises to arm the system or extend the schedule to a later time Your system provides you with five different types of schedules Shif...

Страница 43: ...view programmed schedules at any time A schedule entered in HOL holiday activates and overrides SUN MON TUE etc schedules anytime a holiday date occurs 5 If Opening and Closing times display the keypad then displays DELETE KEEP Select DELETE to enter new times 6 The keypad then displays OPENING TIME followed by the display MON AM PM Enter the new opening time and select AM or PM Enter all schedule...

Страница 44: ... and press the COMMAND key 6 The keypad displays SUN MON TUE WED Press the COMMAND key to display THU FRI SAT HOL 7 Select the day you want to program If you select HOL go to Setting Holiday ABC Schedules for more information Note After Selecting the day of the week for the schedule to occur the keypad displays any currently programmed ON OFF times previously set for that day This feature allows y...

Страница 45: ... Press the COMMAND key again to display THU FRI SAT HOL 2 Select HOL to program holiday schedules 3 The keypad displays HOL A B C Select A to set the first of three holiday schedules 4 The keypad displays A AM PM Note After Selecting the schedule the keypad displays any current times previously set for that holiday This feature allows you to review the programmed times 5 If times display the keypa...

Страница 46: ...g holiday schedules for Shift Output and Door see Setting Holiday ABC Schedules Extending Schedules EXT Extending schedules EXT allows the Closing Check operation to delay until the new closing time expires This allows the current shift schedule to ignore its closing time and not send a LATE TO CLOSE message to the central station This function is designed to allow workers to stay later and does n...

Страница 47: ...d on the keypad and used by the system Setting the System s Date and Time 1 Access the User Menu 2 Press COMMAND until TIME displays Press any Select key 3 The keypad displays the current day and time Press the COMMAND key The keypad displays the current date Press the COMMAND key to make any changes 4 The keypad displays TIME DAY DATE 5 Select TIME to change the time The keypad displays AM PM Ent...

Страница 48: ...was sent Fire Drill Fire Drill is used to test the fire bells or fire horns in your system The Fire Drill test turns your system bell circuit on but does not send a message to the central station Starting a Fire Drill test 1 Access the User Menu 2 Press COMMAND until FIRE DRILL displays Press any Select key 3 The keypad displays SURE YES NO 4 Select YES to start the Fire Drill test Ending a Fire D...

Страница 49: ...o Your system sends Ambush reports r Yes r No Your XR500E system uses Card Plus PIN operation r Yes r No System Setup Keypad Record Note XR500 systems support 16 keypad devices XR100 systems support 8 keypad devices Device Name Areas 1________ __________________________ ____________ 2________ __________________________ ____________ 3________ __________________________ ____________ 4________ ______...

Страница 50: ...N A Which keypads provide Door Access reports r 1 r 2 r 3 r 4 r 5 r 6 r 7 r 8 r 9 r 10 r 11 r 12 r 13 r 14 r 15 r 16 r N A Key Fob Button Programming Enter the user name assigned to each key fob and the button action programmed for each button in the table below Refer to the Introduction and Appendix D for more information Key Fob User Name Button Programmed Action TOP BTM LFT RGT TOP BTM LFT RGT ...

Страница 51: ...systems may be divided into 8 separate areas All Perimeter systems are divided into two separate areas Home Sleep Away systems are divided into two or three separate areas Each area can have a name or description that displays at the keypad This can help you easily track events when and wherever they occur in your system Area Name 17 ___________________________________________________ 18 _________...

Страница 52: ...r Access Armed Area Outputs On Off Zone Status Bypass Zones Zone Monitor System Status System Test User Profiles User Codes Schedules Time Display Events Service Request Fire Drill Extend Schedules Temp User Code Anti passback Shift Time Access Re Arm Delay 1 2 3 4 A 1 2 3 4 A 1 2 3 4 A 1 2 3 4 A 1 2 3 4 A 1 2 3 4 A 1 2 3 4 A 1 2 3 4 A 1 2 3 4 A 1 2 3 4 A 1 2 3 4 A 1 2 3 4 A 1 2 3 4 A 1 2 3 4 A 1 ...

Страница 53: ... change current user codes you can keep track of their profile number in the system Use the following table to track custom user codes in your system Only 4 digit user codes can be assigned to All Perimeter or Home Sleep Away system users User User Name Profile User User Name Profile ...

Страница 54: ...M _M _M _M _M _M _M _M _M _M _M _M _M _M _M S1 S2 S3 S4 Area Open Close _M _M _M _M _M _M _M _M _M _M _M _M _M _M _M _M _M _M _M _M S1 S2 S3 S4 Area Open Close _M _M _M _M _M _M _M _M _M _M _M _M _M _M _M _M _M _M _M _M S1 S2 S3 S4 Area Open Close _M _M _M _M _M _M _M _M _M _M _M _M _M _M _M _M _M _M _M _M S1 S2 S3 S4 Area Open Close _M _M _M _M _M _M _M _M _M _M _M _M _M _M _M _M _M _M _M _M Door...

Страница 55: ...o control various functions within the building or access around its perimeter Below is a list of the devices they control Output Output Name ___________ ________________________________ ___________ ________________________________ ___________ ________________________________ ___________ ________________________________ ___________ ________________________________ ___________ _____________________...

Страница 56: ...inning date for the sort Press COMMAND 5 The keypad displays LAST DATE 10 17 Press any Select key and enter a 4 digit ending date for the sort Press COMMAND 6 The keypad displays USER NUMBER To sort events for a particular user enter their user number or press COMMAND to sort for all users To search for a user press any Select key then use the COMMAND and Back Arrow keys to browse through the user...

Страница 57: ...VC Service smoke detector LOW Low battery MIS Missing wireless transmitter Note LOW and MIS are for wireless systems only Supervisory Event Displays This displays the date and time of an automatic test report Keypad Display Description MSG 11 58P 10 17 AUTO RECALL The test report was sent to the central station at the date and time shown User Code Change Event Displays This displays any addition d...

Страница 58: ... the person granted access Keypad Display Description ACC 5 18P 10 17 3 USER 024 User 24 accessed door keypad 3 at 5 18 PM on October 17 Press the first Select key to display the Door name where the access occurred Press the second Select key to display the reason access was denied Press the third Select key for the name of the device or the fourth Select key for the user name About Door Access Do...

Страница 59: ...4 to display the user name Wireless Jamming Event Displays This displays wireless jamming events that have occurred Keypad Display Description ALM 11 41A 10 17 WIRELESS The DMP wireless receiver detected jamming on October 17 at 11 41 AM Wireless Jamming Event Types There are three event types TBL Trouble a jamming event occurred when the panel was disarmed ALM Alarm a jamming event occurred when ...

Страница 60: ...Panic Supervisory etc Press the COMMAND key to scroll through the zone names list EAST DOOR When the correct zone name displays press any SELECT key area ZONE NO 0 1 2 Verify the zone number matches the previously shown name CMD EAST DOOR OKAY The system displays one of these zone status messages OKAY the zone is normal BYPAS the zone is bypassed BAD O the zone is open BAD S the zone is shorted Pr...

Страница 61: ... zone SELECT BYP to Bypass the zone ZONE RST BYP The display returns to the ZONE prompt allowing you to enter another zone number CMD CMD Zone Monitor Browser SELECT ZONE Access the User Menu Press COMMAND until ZONE MONITOR displays Press any SELECT key area SELECT NBR FRONT OFFICE When the area where the zone is located displays press any SELECT key area Press either of the two left SELECT keys ...

Страница 62: ...NUMBER 12 CMD CMD CMD Change User Codes Browser USER CODES ADD DEL CHG USER NUMBER 1 2 4 3 MIKE JONES Access the User Menu Press COMMAND until USER CODES displays SELECT CHG At this prompt you can enter a user number or scroll through the list of user names Enter a user number View current user names Press any SELECT key area CODE NO Press COMMAND Press COMMAND USER NUMBER 013 The first available ...

Страница 63: ... The next available user name displays If this is the user you want to delete press any SELECT key area Verify the user number USER 13 DELETED Press COMMAND CMD CMD CMD Add User Profiles Browser USER PROFILES ADD DEL CHG PROFILE NO 1 2 4 3 PROFILE NO 012 Access the User Menu Press COMMAND until USER PROFILES displays SELECT ADD At this prompt you can enter a new profile number or scroll through th...

Страница 64: ...file CMD CMD CMD Change User Profiles Browser USER PROFILES ADD DEL CHG PROFILE NO 1 2 4 3 SELECT PROFILE Access the User Menu Press COMMAND until PROFILES displays Press any Select key area SELECT CHG At this prompt you can enter a profile number or scroll through the list of profile names Enter a profile number Press any SELECT key area SHIPPING Press COMMAND Press COMMAND PROFILE NO 012 PROFILE...

Страница 65: ...ECT DOOR This prompt allows you to search for a door or an output Press the COMMAND key to scroll through the list of doors or output names OUTPUTS ON OFF DOOR ON OFF OUTPUT 127 ON OFF DOOR 128 ON OFF Output Groups Browser OUTSIDE DOORS Access OUTPUT GROUP in the USER PROFILES menu Press any Select key area At this prompt you can scroll through the list of output group names COMMAND FRONT OFFICE T...

Страница 66: ...7 9 0 3 4 9 The nine and zero keys Y Z space Pressing the 9 key provides you with Y Z and a space to use between names For example BOB SMITH 0 Pressing the 0 zero key provides you with a dash period asterisk and a pound sign With the number displayed press the SELECT key area that matches the letter position See example CMD CMD User Disarm and Entry Use the following steps to disarm your system an...

Страница 67: ...ess if another button is pressed too soon LED Status Operation Depending on the programmed action of a key fob button the Status LED lights to acknowledge a button press or to indicate the armed state of the system When the button is programmed for Panic Panic 2 Emergency Emergency 2 Output or Sensor Reset a 1 2 second Green light displays to acknowledge the button press When the button is program...

Страница 68: ...nce you open the door you have 30 seconds to exit and close the door before the zone 2 Soft Shunt expires and triggers an alarm Arming and Disarming an Area System Press Command the keypad displays ARM DISARM Press the Select key under the desired option The keypad displays ENTER CODE Present your card to the reader Once validated by the system all areas assigned to your code arm or disarm automat...

Страница 69: ...re disarmed and the keypad displays ALL SYSTEM OFF If the system is disarmed when you present your card once the system validates the card HOME SLEEP AWAY displays You can manually press the Select key under the desired option or after short time all areas may be automatically armed in the AWAY mode Disarming with Entry Delay All Systems Once the protected door is opened and the entry delay starts...

Страница 70: ... if you happen to walk through a motion detector space or other armed door inside the premises an alarm activates Q When I arm or disarm my Area system ALL NO YES displays Does this mean all areas in the system A Selecting YES arms or disarms all areas that are authorized for your user code Q How do I create a schedule that starts at 8 00 AM on Monday and ends at 5 00 PM on Friday A In the days of...

Страница 71: ...ttempted a function that is outside of the assigned profile Check the user profile settings INVALID TIME A user code assigned to a specific schedule has entered outside of the valid schedule See Schedules and User Codes ENTER 2ND CODE The area you are attempting to disarm or access is a Two Man Area A second and different user code must be entered CLOSING TIME The scheduled has expired but the are...

Страница 72: ... Quick Arming 15 Selective 13 Shortcut Keys 17 19 System 15 B Back Arrow Key 4 Browser 12 Add User Codes 34 56 Add User Profiles 30 57 Bypass Zones 27 55 Change User Codes 34 56 Change User Profiles 31 58 Delete User Codes 35 57 Delete User Profiles 31 58 Output Group 31 59 Output On Off 25 59 Zone Monitor 28 55 Zone Status 26 54 Bypass Zones 13 26 Browser 55 C Cancel Alarm Inside Front Cover 19 2...

Страница 73: ...Instant Arming 18 Instant Zone 11 K Keypad 2 Button Panic Keys 5 7 0 Panic Function 5 Aqualite 3 Back Arrow Key 4 Clear Touch 3 4 COMMAND CMD key 4 Common Displays 65 Data Entry Keys 4 Displays 9 LEDs 3 4 Multi lingual Display 6 23 Record 43 Security Command 3 Select Areas 4 Select Keys 3 Shortcut Keys 22 Thinline 3 Tones 7 Types 3 User Menu 1 User Options 7 Wireless Displays 9 Key Fob 8 44 61 Arm...

Страница 74: ...ensor Fire Reset Function 22 24 Silence Alarm Inside Front Cover 24 Status 11 Status List 12 System Setup Record 43 System Status 28 System Test 1 28 T TEMP CODE 31 Thinline Keypad 7 0 Panic Function 5 LEDs 3 Panic Keys 5 U User Codes 33 Adding 33 56 Changing 34 56 Deleting 34 57 Names 33 60 Numbers 33 Record 47 User Disarm and Entry 9 60 User Menu Options 23 Alarm Silence 24 Armed Areas Display 2...

Страница 75: ...This page intentionally left blank ...

Страница 76: ...LT 0683 2 07 ...

Отзывы: