Security Chimneys International BIS Tradition BISTRAD Скачать руководство пользователя страница 5

B. Open the doors about 1” and wait 5 seconds 

until the air flow has stabilized.  Then open 

the doors completely, put the logs in and 

close the doors.

C. Set  the  air  control  to  the  desired  burn 

level.

Notes: 

•  For spectacular fire and optimization of  the 

fireplace efficiency, we recommend that the 

wood  load  be  placed  as  far  back  as  pos-

sible.

•  It may be necessary to turn off any blower(s) 

in operation during the refueling process in 

order to minimise smoking in the room.  It 

is recommended to wait 15 to 30 minutes 

before  turning  the  blower(s)  back  on  to 

ensure successful rekindling.

SMOKING – 

CAUSES AND TROUBLESHOOTING

To  reduce  the  likelihood  of  smoke  coming 

into the room when opening the door, set the 

combustion air controls to the left (“Acceler-

ated  Combustion”)  before  opening  the  door.  

Your fireplace has been designed and tested 

to provide smoke free operation.
As  the  fire  burns,  air  goes  up  the  chimney.  

This air must be replaced through the outside 

air  duct.    When  operating  the  BIS  Tradition 

fireplace, open a nearby window temporarily 

to check if there is adequate replacement air 

supply.    Occasionally,  there  may  be  a  small 

amount of smoking upon lighting the fire, until 

the chimney heats up but this should not last.  If 

the fireplace continues to smoke it is probably 

for one of the following reasons:

A. The doors are partially opened - 

 When you 

open the doors, open them completely.

B. Negative pressure in the house - 

As the 

fire burns, air goes up the chimney.  This 

air must be replaced through leakage into 

the house or through the outside air duct 

(optional).    When  operating  the  fireplace, 

open a nearby window temporarily to check if 

there is adequate replacement air supply.

C. Fans operating (e.g.: range hood) - 

These 

fans  draw  air  out  of  the  house  and  may 

actually  cause  a  negative  pressure  in  the 

house.  Turn off all fans and open a nearby 

window to determine if this is the cause of 

the problem.

D. Wet wood - 

Wet or tarred wood will smoulder 

and smoke instead of burn properly. Your 

dealer can help you determine if you have 

properly seasoned wood for burning.

E. Dirty or blocked chimney - 

Check to make 

sure  the  chimney  is  clear  and  clean.    If 

dirty call a certified chimney sweep or use 

a properly sized chimney brush to clean.

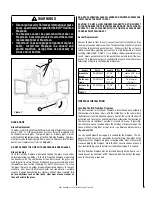
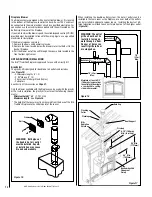
F.  Chimney not long enough - 

The minimum 

chimney height is 12 feet not including the 

fireplace height.  The chimney must extend at 

least three (3) feet (915 mm) above its point 

of contact with the roof and at least two (2) 

feet (610 mm) higher than any roof or wall 

within ten (10) feet (3 m) of it.  When installed 

with offsets, the minimum chimney height is 

15 feet.  Additional height will increase draft 

and will decrease the tendency to smoke.

Building a Fire

A. To start a fire, place several crumpled up 

balls of newspaper in the firebox.  Place small 

dry pieces of kindling on top of the paper, 

criss-crossing the kindling so that there are 

air spaces in between. The kindling should 

be placed at the center of the firebox so as 

to allow for sufficient air circulation. 

B. Adjust the primary air control and start the 

time delayed air-boost system by pushing 

the  register  towards  the  right.  Light  the 

newspaper. Leave the doors partially opened 

to facilitate the start-up.

C. Once kindling fire is well established, cord 

wood can be added. You may set the primary 

air control to the desire level (see 

Primary 

Air Combustion Control

 and 

Air Boost Con-

trols

 section for proper operation of the air 

controls).

D. Set the primary control to the desired burn 

level. The fireplace will automatically go to 

that level after the fire is fully established 

and the air boost is closed.

The unit will burn best with 2-3 pieces of cord 

wood spaced 1 to 2 inches apart and allowing 

air to get under the fuel.  Criss-crossing or ar-

ranging the fuel so that air can get underneath 

will help the fire to get started easily. The unit 

should be operated with the air control fully 

open long enough to get the cord wood well 

ignited.

REFUELING FOR BEST PERFORMANCE

To reload the BIS™ Tradition fireplace at the 

end of a combustion cycle, when no flame is 

visible and there are only ashes left:

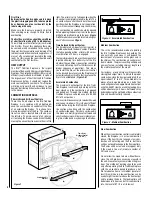
A. Completely open the air control level and the 

T.D.A.B. (Time Delay Air Boost) level.  See 

Figure 1

.

B. Open the doors about 1” and wait 5 seconds 

until the air flow has stabilized.  Then open 

the doors completely, put the logs in and 

close the doors. 

C. Set the air control to the desired burn level. 

The  T.D.A.B  will  close  by  itself  progres-

sively.

To reload the BIS Tradition fireplace when the 

fireplace is still hot with a few visible flames:

A. Open the air control completely. The T.D.A.B 

can  be  set  to  a  lower  setting  in  order  to 

facilitate lighting.

G. Poor chimney draft

  With no fire, there should be sufficient draft 

to exhaust cigarette smoke introduced under 

the baffle.  Chimneys installed against an 

outside wall without protection may gener-

ate  back  draft  problems  which  will  cause 

start-up problems.  To prevent this, open 

a nearby window; roll up a piece of paper, 

light it and hold it in the upper part of the 

firebox to warm up the chimney.  Wait until 

the draft is sufficient, then start the fire.

H. Blower for forced air kit operating - 

Make 

sure that the blower is at the “off” position when 

you open the fireplace door for reloading.

IMPORTANT CAUTIONS

A. Do not block the hot air vents to the fire-

place as this will cause the fireplace to 

overheat.

B. Never use gasoline, gasoline-type lantern 

fuel, kerosene, charcoal lighter fluid, or 

similar liquids to start or ‘freshen up’ a 

fire in this fireplace.  Keep all such liquids 

well away from the fireplace while it is in 

use.

C. Do not burn coal.  The sulphur in coal will 

corrode the firebox.

D. Do not burn driftwood which has been in the 

ocean or salt water.  The salt will corrode 

the firebox and chimney.

E. Do not burn wood in the area in front of the 

grate.

F.  Do not abuse the unit by burning paper, or 

cardboard or construction material such as 

pressed wood, plywood or lumber.  Wood 

protectors, metallic paper, coal, plastic, 

waste, sulphur and/or oil will damage the 

fireplace.

G. Do not allow the wood to smoulder or burn 

without  flame,  since  this  will  produce 

excessive creosote in the unit as well as 

increased particulate emissions.

MAINTAINING  YOUR  BIS  TRADITION 
FIREPLACE

Creosote -  Formation and Need for Removal

When wood is burned slowly, it produces tar 

and  other  organic  vapors,  which  combine 

with expelled moisture to form creosote.  The 

creosote  vapors  condense  in  the  relatively 

cool chimney flue of a slow-burning fire.  As 

a result, creosote residue accumulates on the 

flue lining.  When ignited this creosote makes 

an extremely hot fire.
The chimney shall be inspected at least twice 

a year during the heating season to determine 

when a creosote buildup has occurred. 
When  creosote  has  accumulated  it  shall  be 

removed to reduce the risk of a chimney fire.
When  the  creosote  accumulation  is  large,  a 

creosote fire in the chimney can damage the 

chimney and overheat the surrounding wood 

framing.  Creosote formation in a chimney can 

be minimized by making sure there is always 

visible flame burning, avoid smouldering fires 

and by proper refuelling techniques.
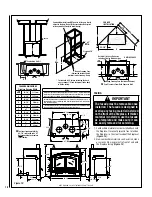
Figure 4 - 

Slow Combustion

5

NOTE: DIAGRAMS & ILLUSTRATIONS ARE NOT TO SCALE.

Содержание BIS Tradition BISTRAD

Страница 1: ...AVE THESE INSTRUCTIONS FOR FUTURE REFERENCE Listed to standards ULC S610 and UL 127 Report No 304 7213 EPA Cert No 609 WARNINGS Hot Do not touch The glass and surfaces of this appliance will be hot during operation and will retain heat for a while after shutting off the appli ance Severe burns may result Carefully supervise children in the same room as appliance If small children are present in th...

Страница 2: ...Neverleavechildrenunattended when there is a fire burning in the fireplace IMPORTANT GENERAL SAFETY PRECAUTIONS READ AND UNDERSTAND THESE SAFETY RULES BEFORE YOUR FIRST FIRE WARNING Never leave your fireplace unat tended while it is burning WARNING THE FIREPLACE MUST BE OPER ATED WITH THE DOORS FULLY OPENEDORDOORSFULLYCLOSED IF THE DOORS ARE LEFT PARTLY OPENED GASANDFLAMEMAYBE DRAWN OUT OF THE FIR...

Страница 3: ...ions will void the certification and the warranty of the fireplace and may result in an unsafe installation These appliances are designed to provide supplementalheattotheimmediateareaonly Therefore it is advisable to have an alternate heat source when installed in a dwelling These appliances are not approved for Manufactured Home installations Parts Required Fireplace model BISTRAD 7 diameterchimn...

Страница 4: ... room For this reason the room should be well ventilated for the first few fires Heat Output The BIS Tradition fireplace is the largest memberoftheSecurityChimneyshighefficiency fireplaces Theheatgeneratedfromitsfireismore efficiently captured and distributed In spite of the large amount of heat that the BIS Tradition fireplace can deliver it should not replace the mainsourceofheatinyourhome Thisf...

Страница 5: ...atically go to that level after the fire is fully established and the air boost is closed The unit will burn best with 2 3 pieces of cord wood spaced 1 to 2 inches apart and allowing air to get under the fuel Criss crossing or ar ranging the fuel so that air can get underneath will help the fire to get started easily The unit should be operated with the air control fully open long enough to get th...

Страница 6: ... door and the combustion air controls this will stifle the fire 2 Alert your family of the possible danger 3 If you require assistance alert your fire department 4 If possible use a dry chemical fire extin guisher baking soda or sand to control the fire Do not use water as it may cause a dangerous steam explosion 5 Ensure that sparks and hot embers com ing out of the chimney are not igniting the r...

Страница 7: ...ce Replace ment glass should be purchased from a Security Chimneys International dealer see Replacement Parts on Page 23 DO NOT OPERATE THE UNIT WITH CRACKED OR BROKEN GLASS Glass Cleaning The BIS Tradition fireplace is designed to keep the glass clean under normal operating conditions If the BIS Tradition fireplace is operated continuously with the combustion air controls closed the glass will te...

Страница 8: ...t position and the direction of the wind are important factor affecting the chimney performance To allow a maximum draft and to reduce wind turbulence the chimney must Penetrate the highest part of the roof Be installed as far as possible of roof offsets trees or any other obstructions that may cause wind turbulence and back drafts in the chimney The least amount of offsets elbows possible NOTE DI...

Страница 9: ...eplace using 2 x 3 or heavier lumber B WARNING Combustible materials can not be used in the space directly above the fireplace except for the studs above the facade that support the facing and mantel This area must remain empty for a height of 80 2 032 mm mea sured from the base of the appliance C Frame the fireplace with vertical studs at the sides of the fireplace running from floor to ceiling s...

Страница 10: ... spacer minus 1 2 inch for drywall to be flush with the facing 7 Min B G 2 x 3 Min K Combustion Air Kit 1 Combustible material must be installed flush with the fireplace It may not project in front of and on the fireplace i e the steel facade of the fireplace Figure 14 2 Non combustible materials such as brick stone or ceramic tile may project in front of and onto the fireplace facing Figure 12 IM...

Страница 11: ...board or other 7 Brick Fireplace Frame Section Top View Figure 12 Mantel Noncombus tible Facing 56 Drywall 2 X 3 Min Spacer Mantel and Facing Side View Only non combustible material should be superposed or project ing over the front of the fireplace Figure 14 50 Min Rock Board or Other Noncombustible Material Noncombustible Facing Drywall SEE NOTE MANTEL and FACING The mantel must be installed at ...

Страница 12: ...he unit located on the bottom right corner of the fireplace If you wish to adjust the blower speed the variable speed control VRUW provided must be installed in line with the wiring Again use a qualified electrician for installation If the blower requires servicing 1 Remove the doors and decorative facade 2 Remove the screw located below the blower motor that holds it to the back of fireplace 3 Pu...

Страница 13: ... flex that goes up to ten 10 feet long 4 Adaptor for fireplace connection Outside Air Installation The outside air assembly may be installed according to the following requirements A Duct length should be kept to a minimum The maximum length of a 4 interiordiameter 100mm insulatedflexibleductis20feet 6 1m The duct can be extended to a maximum of 40 feet 12 m using a 6 interior diameter 150 mm insu...

Страница 14: ...on problems 9 Cut and frame square holes in all floors ceilings and roof that the chimney will go through to provide a 2 51mm clearance between the chimney and any combustible materials At the point of penetra tion through the floors ceilings or roof a 1 25mm clearance is acceptable for AC chimney only see Table 2 Do not fill the required clearance spaces with insulation or any other combustible m...

Страница 15: ...g with roofing pitch see Figures 24 and 25 For sloping roofs place the flashing under the upper shingles and on top of the lower shingles Nail the flashing to the roof using roofing nails 6 Place the storm collar over the flashing and tighten it with the bolt supplied Finally seal the joint between the storm collar and the chimney using silicone caulking 7 Install the chimney cap Once the chimney ...

Страница 16: ...A support XST or XSO must be used on the first 15 section 5 m 7 Continue with the regular installation ACBI Chimney 1 Install the first elbow Turn it in the required direction To lock it in place turn 1 8 of a turn Fastenthestrapsattachedtotheelbow to the surrounding frame using nails or drywall screws Figure 27 2 Install the necessary chimney lengths to achievetherequiredoffset Lockthechimney len...

Страница 17: ...45 21 32 1160 mm 54 1 8 1375 mm B 17 9 16 446 mm 20 7 16 519 mm 24 5 8 625 mm 28 7 8 733mm 37 3 8 949 mm 42 1067 mm 44 3 4 1137 mm 49 1245 mm 59 9 32 1353 mm 61 3 4 1568 mm Chimney Elbow Offset Height One Length Between Elbows Two Lengths Between Elbows 12 18 36 48 12 48 18 48 36 48 48 48 ACBI 7 15º A 5 1 2 140 mm 7 178 mm 11 1 2 292 mm 14 3 4 375 mm 17 1 2 445 mm 19 483 mm 23 5 8 600 mm 26 3 4 67...

Страница 18: ... protect the chimney in a insulated chase Straps Chimney ACBI ACBI Starter Section Straps Outside Wall OFFSET CHIMNEY INSTALLATION WITH WALL PENETRATION Support Note This illustration is not to scale It represents how the chimney must be supported A 30 degree offset only is allowed in the USA and a 45 degree maximum offset is allowed in Canada NOTE DIAGRAMS ILLUSTRATIONS ARE NOT TO SCALE 18 ...

Страница 19: ...height of supported chimney NOTE For the ACBI chimney a support section ACBI7SL must be used every 30 feet 9m or an universal support every 20 feet 6m instead of the universal roof support ST CHIMNEY MAXIMUM HEIGHT OF SUPPORTED CHIMNEY 7 Diameter Offset Support RoofSupport Secure TempS2100 Nova Temp HT6000 Secure Temp GX 16 feet 5 49 m 18feet 6 1m ACBI 40 feet 12 19 m 50 feet 15 20m Table 6 CHIMNE...

Страница 20: ...er the masonry chimney 2 In the middle of the oval drill a hole in the masonry chimney at 30º 3 Increase the size of the hole until a 30º TUBINOX liner elbow can be easily slipped through 4 Slide the liner down from the top of the masonry chimney until you reach the hole level 5 Slip through the hole a 30º liner elbow and connect it to the liner 6 Add a small liner section to the liner elbow which...

Страница 21: ...stable length 8 dia I D 2 5 7B26ZL2A 7B26ZL2A Length five 5 feet 8KL5 8KL5 Length four 4 feet 8KL4 8KL4 Length three 3 feet 8KL3 8KL3 Length two 2 feet 8KL2 8KL2 Length one 1 feet 8KL1 8KL1 Optional installation accessories Fireplace Kits Description Cat Part No Rigid firescreen BTZN BTZN Masonry Chimney Adaptor 45º BISTMA forusewithTUBINOXliner notapprovedforuseinU S A BISTMA Masonry Chimney Adap...

Страница 22: ...ar 7XFB 7XFB Storm Collar spacer included 7XFC 7XFC Firestops and Braces Firestop 7XBF 7XBF Radiation shield 7XRS 7XRS Insulated attic radiation shield 7XRSA 7XRSA2 30º Insulated wall radiation shield 7XRSMI30 7XRSMI30 Wall Band XBM XBM Fireplace Model BISTRAD Approved Venting Components manufac tured by Security Chimneys International only 7 diameter chimney ACBI air cooled Secure Temp GX U S onl...

Страница 23: ...d collar ACBI7FBR H3277 Misc Firestop ACBI7BF H3268 Radiation Shield ACBI7RS H3269 Attic Radiation Shield ACBI7RSA H3270 Telescopic Attic Radiation Shield ACBI7RST H3271 Insulated Wall Radiation Shield 30º AC10RSMI30 H3272 Storm Collar AC10FC H3278 Chimney PARTS AND COMPONENTS LISTs TUBINOX LL Chimney Lining System Rigid Stainless Steel Liner For Relining A Masonry Chimney 7 Diameter Listed to ULC...

Страница 24: ...422 Wooden Door Handle PR SR1787 Bottom Door Lock PR SR2543 Top Door Lock PR SR2405 Hinge Assembly Fireplace and Door PR SR1800T Decorative Screw Caps Black 2 PR SACMEFBK Decorative Screw Caps Brushed Nickel 2 PR SACMEFBN Timer PR SR2425 Ceramic Glass Left PR SR2356G Ceramic Glass Right PR SR2356D Secondary Air Tube 4 PR SR2379 Log Retainers 2 PR B2CH Around the Glass Gasket 61 3 4 PR SR1685C On t...

Страница 25: ...NOTES 25 ...

Страница 26: ...lacement parts See Page 23 for a complete replacement parts list Use only parts sup plied from the manufacturer Normally all parts should be ordered through your Security Chimneys International distributor or dealer Parts will be shipped at prevailing prices at time of order When ordering repair parts always give the following information 1 The model number of the appliance 2 The serial number of ...

Отзывы: