Rev. 8/00
Page- 5
triggering from the outside. You can experiment with this. Alternately, Securitron has developed
a simple filter circuit which will absorb the interference from the reader. This requires a 22,000
Micro Henry inductor (DigiKey part # M7223-ND, JD Miller part # 70F222AI). You can purchase
this part at a local electronics parts supply house or from Securitron. To install the inductor,
identify the ring terminal with brown wire which connects the “antenna” screw on the back side of
the aluminum handle to the circuit board. Clip this wire and splice in the inductor. As the inductor
is an insulated part, it can lay in the cavity in the plastic base on top of the circuit board.
3.5 CAUTION WITH SWITCHING POWER SUPPLIES
The TSH is capable of being operated by a wide variety
of power supplies and does not require regulated power
but a certain class of power supplies called "switching"
can sometimes interfere with operation. Switching
supplies are unusual in the security industry. Most
regulated power supplies are of the "linear" type. Some
switching supplies can produce line noise which will affect
the TSH by rendering it hard to adjust. If you find that a
TSH is hard to adjust, check the power supply. If it is a switcher, the power supply can be
replaced with a linear Securitron unit or addition of two capacitors generally solves the problem.
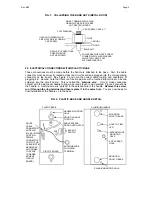
Connect one .01 mF capacitor between power and earth ground. Connect a second .01
mF capacitor between power supply negative and earth ground. See the drawing to the right.
3.6 ADJUSTING SENSITIVITY
With wiring completed, sensor adjustment should be set. Note that the sensor board has a
potentiometer on it accessible through a “pot access hole” from the top of the aluminum handle
before the plaque has been installed (see Figure 2). The potentiometer will increase sensitivity
when turned clockwise and decrease it when turned counterclockwise. Note the
LED
on the
sensor circuit board which is visible through an access hole in the aluminum handle (see Figure
2). This LED “follows” the sensor. It is on when the sensor is releasing the door. Turn the pot
clockwise
without touching the handle
until the LED just turns on. In this condition, sensitivity
is so high that the unit is on all of the time. Slowly rotate the pot counter-clockwise until you see
the LED turn off and then another 15 degrees counter-clockwise. This is generally a good
setting. Then, experiment by touching the handle and observe that the LED comes on.
Experiment with gloves if you expect that they will be used. You may want to increase the
sensitivity somewhat, but if you leave it just below the point where the LED comes on, you risk a
condition where the unit will fail by being on all the time.
3.7 USE OF REDUNDANT (BACKUP) SWITCH
A red push switch is mounted on the side of the plastic base. The purpose of this switch is to
provide backup in case of any malfunction or misadjustment of the sensor. Pushing the button
breaks the connection between the white (COM1) and green (NC1) wires just the same way as if
the handle was touched. It therefore provides a "hard" backup circuit break which will release the
controlled fail safe lock. It does not however affect the COM2 and NO2 circuit (blue and orange).
If these NO contacts are being used, for example, to provide REX input to an access control
system, pushing the backup button will not achieve this, but egress safety is maintained as with
the switch mounted, there are two independent controls which can release the door. In the event
that the sensor fails, the button will still work.
3.8 INSTALLATION OF PLAQUE
After wiring is complete, you will install a plastic plaque in the slot in the aluminum handle to
cover up the mounting holes and access holes to the circuit board. Note that the two supplied
plaques give you four choices. You can select a legend- either
“PULL” or “PUSH”,
depending
on which way the door swings. Alternately you can select the back side of either plaque which
will yield a plain finish in either a matching or contrasting color to the color of the handle
depending on your esthetic preference. To install the plaque, note that we have supplied a
choice of screw colors to match the plaque color that you select.
4. ELECTRIC LOCK SELECTION
Electric lock selection is important to obtain best results from the TSH. The product allows silent
and immediate egress without the mechanical action of traditional exit devices which require
periodic maintenance and replacement. Having no moving parts, the TSH possesses an
extended operating life. The product was designed for use with Securitron's
Magnalock
. The
SWITCHING
POWER
SUPPLY
.01 mF
.01 mF
EARTH GROUND
Содержание TSH
Страница 8: ...Rev 8 00 Page 8...


