


V-5012B INSTALLATION GUIDE | DIGITAL MONITORING PRODUCTS
3
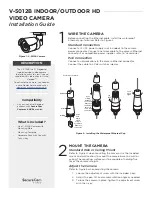
ACTIVATE THE CAMERA
After you’ve connected the camera to the network, activate it in Dealer Admin.
1. Log in to Dealer Admin.
2. Find the customer and select the relevant account number. Select
Edit
.
3. In
Video
, enable
SecureCom Cameras & NVR
, then press
Save
.
4. On the
System Information
page, press the Add Camera button and enter the camera’s 12‑digit MAC
Address. Press
Next
.
5. Enter a name for the camera.
6. Select the camera’s time zone.
7. If the camera image needs to be inverted due to mounting position, toggle
Flip Image
.
8. To configure clip recording options, select
Clips
.
a. If you don’t want this camera to record video clips any time it detects motion, choose
Never Record
Motion
.
b. If you want this camera to record video clips any time it detects motion, choose
Always Record on
Motion
.
c. If you want the camera to record motion‑triggered clips only when the system is armed, choose
Record Motion When Armed
.
d. To record video clips continuously during the first minute after the system triggers an alarm, select
Record on Alarm
.
9. Press
Save
.
3
ADDITIONAL INFORMATION
Enable Email Clips
If the user would like to be emailed video clips, enable
Email Video Clips
in Dealer Admin. When this feature is enabled,
video clips are emailed to the app user.
1. Find the customer and select their name.
2. In
App Users
, find the user’s row, select the More icon, then select
Edit
.
3. Select
Email Video Clips
, then press
Save
.
Add the Camera to an NVR
1. Change the desired channel to
Manual
.
2. Enter the IP address.
3. Set the protocol to
ONVIF
.
4. Set the
Management Port
to
80
. Leave
Channel Port
set to
1
and the
Transfer Protocol
set to
Auto
.
5. The default username is
scwuser
and the password is
scw12345user
.