2
Montage
1.
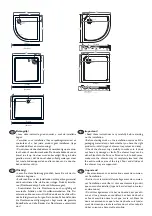
Draai de bak weer om en zet deze op de plaats. Het is
aan te bevelen om de douchebak goed af te dekken om te
voorkomen dat deze wordt beschadigd tijdens het plaat-
sen van de tegels en andere bouwwerkzaamheden.
2.
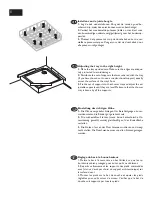
Trek een streep op de muur om de onderkant van de
douchebakrand te markeren.
3.
Haal de bak weg en bevestig een hardhouten lat of
een aluminium L-profiel waterpas op de muur als extra
ondersteuning voor de rand.
4.
Breng een ruime hoeveelheid acrylkit aan op de buiten-
rand van die zijden van de bak die tegen een muur worden
geplaatst. Zet de bak weer op zijn uiteindelijke plaats: druk
hem stevig tegen de muur. Controleer tevens of de poten
nog in de juiste positie staan.
5.
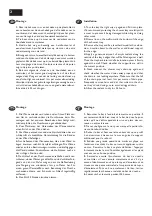
Sluit vervolgens de afvoer van de douchebak aan en
controleer of het water goed wegloopt en of de afvoer
nergens lekt. Zorg ervoor dat de leiding van de afvoer op
een afschot ligt van minimaal 1cm per meter afvoerleiding.
Verwijder tijdens het gebruik regelmatig aanwezig haar en
vuil uit de douchebakafvoer, voor een goede waterafvoer.
6.
Laat de kit 24 uur drogen.
Installation
1.
Turn the tray the right way up again and fit it into place.
We recommend protecting the shower tray carefully with
a cover to prevent it being damaged while tiling or doing
other work.
2.
Draw a line on the wall to mark the bottom of the edge
of the shower tray.
3.
Remove the tray and fix a level hardwood lath or alumi
-
nium L-section beam to the wall as an additional support
for the edge.
4.
Apply a generous amount of acrylic sealant along the
outside of the tray’s edges that will be fitted against a wall.
Move the tray back into its definite location: press it firmly
against the wall. Check whether the supports are still in
the correct position.
5.
Next, connect the shower tray’s drain up again and
check whether the water drains away properly and that
the drain is not leaking anywhere. Make sure that the fall
of the drain pipe is at least 1cm per metre of drain pipe.
Frequently remove hairs and dirt that collect in the sho-
wer tray’s drain during use to avoid a clogged drain.
6.
Allow the sealant to dry for 24 hours.
GB
NL
Montage
1.
Die Wanne wieder umdrehen und auf ihren Platz set-
zen. Um zu verhindern, dass die Duschwanne beim Flie-
senlegen und bei anderen Bauarbeiten beschädigt wird,
wird empfohlen, die Duschwanne gut abzudecken.
2.
Zum Markieren der Unterseiten der Wannenränder
einen Strich an der Wand ziehen.
3.
Die Wanne entnehmen und eine Hartholzlatte oder ein
L-Aluprofil als zusätzliche Unterstützung für die Ränder
an der Wand befestigen.
4.
Am Außenrand der Wannenseiten, die an der Wand zu
liegen kommen, reichlich Acrylkitt aufbringen. Die Wanne
wieder an ihren Bestimmungsort setzen und kräftig gegen
die Wand drücken. Kontrollieren, ob die Stützen noch an
der richtigen Position sind.
5.
Den Ablauf an der Duschwanne anschließen und kont-
rollieren, ob das Wasser gut abläuft und ob der Ablauf nir-
gends un dicht ist. Dafür sorgen, dass die Abflussleitung
eine Neigung von mindestens 1cm pro Meter hat. Für
einen guten Wasserabfluss nach Benutzung der Dusche
vorhandene Haare und Schmutz im Ablauf regelmäßig
entfernen.
6.
Den Kitt 24 Stunden trocknen lassen.
DE
FR
Montage
1.
Retourner le bac à l’endroit et le mettre en position. Il
est recommandé de bien couvrir le bac de douche pour
éviter qu’il ne s’abîme pendant la mise en place des car-
reaux ou autres travaux.
2.
Tracer une ligne sur le mur pour marquer la partie infé-
rieure du rebord du bac.
3.
Retirer le bac et fixer une latte en bois dur ou un profil
L en aluminium à niveau sur le mur en guise de support
additionnel pour le rebord.
4.
Enduire une grande quantité de mastic acrylique sur
l’extérieur des côtés du bac qui seront appliqués contre
un mur. Remettre le bac à sa place définitive : l’appuyer
fortement contre le mur. Contrôler également si les pieds
sont encore en bonne position.
5.
Raccorder ensuite l’écoulement du bac de douche
et contrôler si l’eau s’écoule correctement et s’il n’y a
aucune fuite. Assurez-vous que le tuyau d’écoulement se
trouve sur une pente minimale de 1cm par mètre de tuyau
d’écoulement. Pour un bon écoulement de l’eau, retirer
régulièrement les cheveux et saletés du bac de douche.
6.
Laisser sécher le mastic pendant 24 heures.
Содержание Get Wet Fusion
Страница 8: ...www sealskin com getwet ...


