background image

ReefMaster

D

DIIG

GIIT

TA

AL

L

Quick Guide 

Taking underwater pictures

1. Turn Mode Dial to 

SET-UP.

3. Push

4

NAV button to

enter LAND/SEA/FLASH
menu. Select SEA mode.

(select 

FLASH

mode only if

using external flash.) 

2. Push 

6

NAV button to 

highlight LAND/SEA/FLASH

4. Turn mode dial to 

Record.

5. The fish icon      will appear

if you are in SEA mode.

A camera/flash icon appears
when in Flash mode.

7. IMPORTANT: Clean O-ring

with brush. Carefully
inspect O-ring for cuts or
damage.

6. Open the housing. Use the

tab under the latch. Keep
lid pushed down to release
the latch.

8. Insert Moisture Muncher

drying agent to prevent
fogging.

q

q

q

q

q

q

5

Содержание ReefMaster DC300

Страница 1: ...Driver MGI Photosuite Instruction Manual SL13130 USB Cable SL13131 Video Cable SL14190 Camera carry case and strap Warranty Registration Card or register warranty online at www sealife cameras com SL250 Care Kit contains O ring cleaning brush lens cleaning cloth and Moisture Muncher anti fog desiccant SL96051 Flash deflector Allows the DC300 DC310 to work with your SeaLife External Flash ...

Страница 2: ...t Mode Dial RECORD mode REVIEW mode MOVIE mode SET UP menu Inner Camera Indicator Light Green Camera Ready Green Blinking Processing Image Red Blinking Charging Flash Mode Dial Record Review Movie Set Up Menu Tripod Mount Camera Serial Connections To PC USB DC In from 110 220V transformer Menu Navigation Button Easily Navigate through menu see inset LCD Monitor ON OFF Quick Review Push for 3 secon...

Страница 3: ...ored Body Soft Rubber Grips Closing Latch LCD Monitor ON OFF turn off to save power Quick Review Push for 3 seconds Lid Hinge Monitor Frame Attach Sunshade to frame DC300 Easy Dive Underwater Housing DC310 Advanced Underwater Housing Menu Navigation Button same as inner camera Mode Dial Select between Record Playback Movie and Set up modes Menu Button includes all features above plus LCD Monitor O...

Страница 4: ...atteries 5 Push camera power ON button 1 Insert CD in your computer for Instruction Manual Read MUST DO and WARNINGS 7 Set Language and Time 3 Insert SD memory card 128mb card takes 144 hi res pictures 4 Slide open lens cover and set focus to seascape land scape See previous page for shooting distance 6 Turn mode dial to SET UP 8 Turn mode dial to Record q q q q q q 3 ...

Страница 5: ...appear on LCD Push LCD button for next picture 11 When DELETE THIS appears on LCD push the shutter button to DELETE picture 12 Wait for green indicator light 14 Push and hold the LCD button for 3 seconds to activate Quick Review 16 Push and hold the LCD button for 3 seconds to exit Quick Review q q q q q q DELETE THIS 4 DC300 DC310 Camera ...

Страница 6: ... Push 6 NAV button to highlight LAND SEA FLASH 4 Turn mode dial to Record 5 The fish icon will appear if you are in SEA mode A camera flash icon appears when in Flash mode 7 IMPORTANT Clean O ring with brush Carefully inspect O ring for cuts or damage 6 Open the housing Use the tab under the latch Keep lid pushed down to release the latch 8 Insert Moisture Muncher drying agent to prevent fogging q...

Страница 7: ...sealed 10 Close the housing tightly Do this in a dry air condi tioned room to prevent fogging 12 Attach accessories to housing External Flash and optional lenses 13 Test camera operations before diving 17 Rinse housing in fresh water immediately after use 16 Dry off housing with towel before opening 14 Keep power turned off to save battery power q q q q q q ...

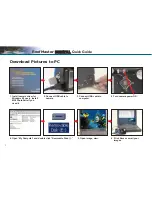
Страница 8: ...ra driver for Windows 98 users Install MGI PhotoSuite if you need it 4 Open My Computer and double click Removable Disk 5 Open image view 6 Print Save or email your images Download Pictures to PC ReefMaster D DI IG GI IT TA AL L Quick Guide 4 Turn camera power ON q q q q q q 7 ...

Страница 9: ...ide Show 3 Set to Review mode Viewing Pictures on TV 6 View pictures or video IMPORTANT 1 Read warnings and warranty in CD instruction manual before using this digital camera 2 Find important updates on our website www sealife cameras com 3 Trouble shooting guide is located in instruction manual 4 Always follow safe diving practices q q q q 8 DC300 DC310 Camera ...

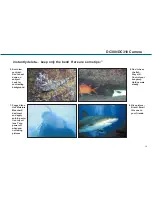
Страница 10: ...ng LCD button See pg 2 2 Too close Keep 3 5 feet 102 cm distance or use Macro lenses 1 Backscatter caused by poor visibility Use External Flash 4 Overflash Too close with External Flash Use diffuser optional Set Flash Mode to MACRO FLASH by pushing LCD buttom See pg 2 It really is fun to take pictures Instantly review Tips for Great Pictures 9 ...

Страница 11: ...d lens Use Moisture Muncher desiccant and apply anti fog solu tion to port lens Turn power off whenever not taking pictures 8 Nice picture Bravo Email this one to your friends 6 Don t chase the fish Stay still Control your buoyancy Hold camera steady instantly delete keep only the best Here are some tips 10 ...

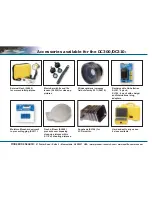
Страница 12: ...oisture Muncher desiccant to prevent fogging SL911 External Flash SL960 for more colorful pictures Sunshade SL194 for LCD monitor Wide angle lens increases field of view by 50 SL970 Rechargeable AA batteries SL191 4 pack SL190 4 pack with charger and International plug adapters Flash diffuser SL968 prevents over exposing close up pictures within 2 1 2 of shooting distance Hard and soft carry cases...

Отзывы: