4. OPERATION
4.1.
BATTERY CHARGING
4.1.1.
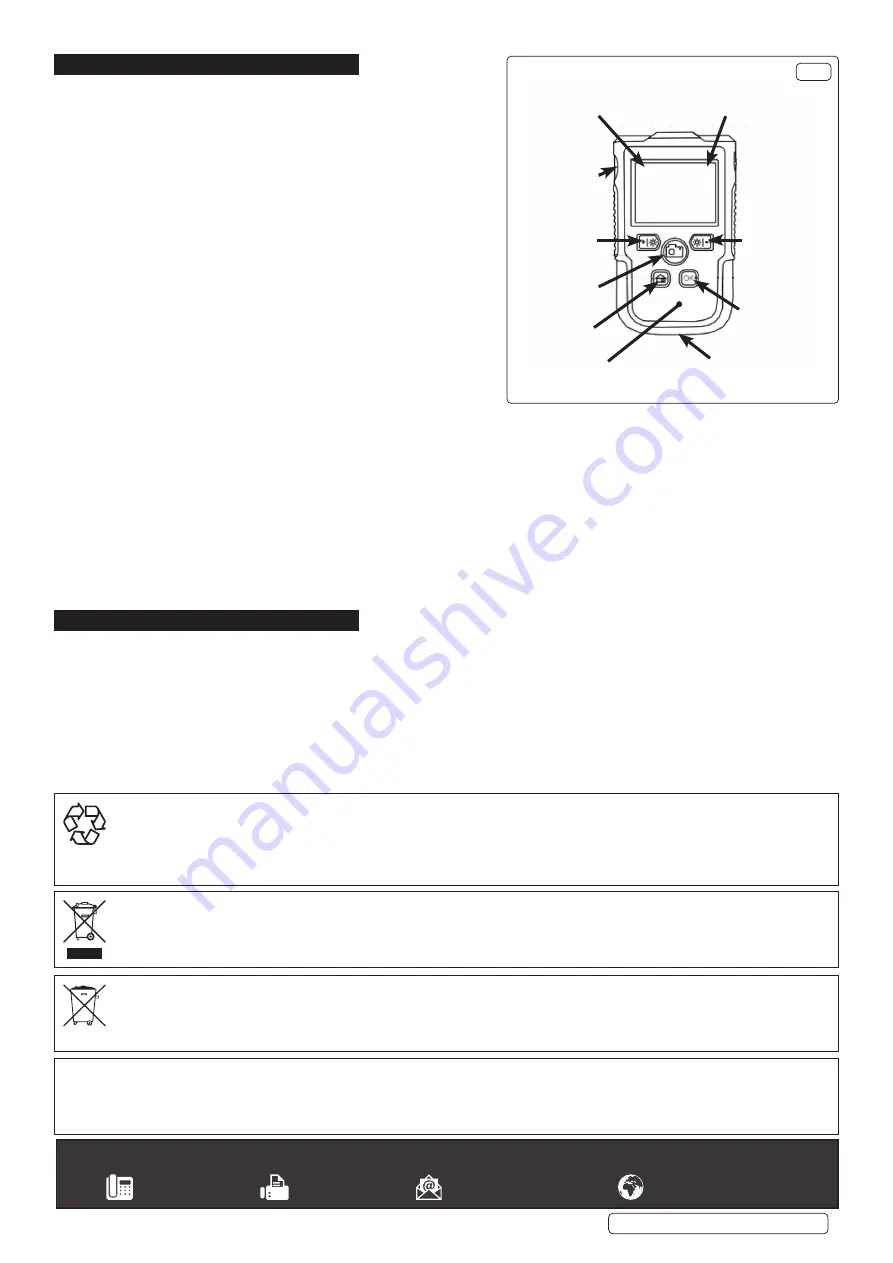
Insert the USB plug into the charging port (fig.1), then plug the other
end into a suitable power socket.
4.1.2.
When charging commences, the battery charging indicator (fig.1)
will light red.
4.1.3.
When the charge is complete, the charging indicator will turn off.
4.1.4.
When charging is complete, disconnect the charging lead from the
power supply and from the charging port.
4.1.5.
The charge state of the battery is shown in the top left corner of the
viewing screen.
4.2.
FUNCTIONS
4.2.1.
Photo/video: To take a photograph, press the Photo/Video button once.
If the button is held down for three seconds the unit will start recording.
To stop recording press the button once.
4.2.2.
To alter the LED illumination level, press the Increase/Decrease LED
buttons. There are three LED levels, (Full, Half, or Off).
4.3.
MENU FUNCTIONS
4.3.1.
Press Menu button to display options. Cycle through the options (below)
using the Menu Select UP/DOWN buttons. Press Accept (OK) to enter.
4.3.2.
To exit from the Menu display, press the Menu button once.
4.3.3.
Photo:
To review stored photos, use the Menu Select UP/DOWN buttons
to highlight this option and press OK.
4.3.4.
Video:
To review stored videos, use the Menu Select UP/DOWN buttons to highlight this option and press OK.
4.3.5.
Resolution:
To select one of the three resolution modes, use the UP/DOWN buttons to highlight this option. Use the UP/DOWN
buttons to highlight the required value and press OK to select.
4.3.6.
Language:
To select a different language use the UP/DOWN buttons to highlight this option and press OK.
4.3.7.
Screen rotation:
To rotate the image being recorded, use the UP/DOWN buttons to highlight this option and press OK.
4.3.8.
Time stamp:
To time stamp your recordings, select this option.
4.3.9.
Time setting:
To set current time/date, use the OK and UP/DOWN buttons to set date and current time.
4.3.10. Formatting:
To reformat a SD card use this option.
4.3.11. Reset system:
To reset the system, use this option by selecting Confirm.
4.3.12. Storage:
Displays the current volume of data stored on the SD card.
4.3.13. Software version:
Displays the version number of the installed software.
5. MAINTENANCE
5.1.
CLEANING
8
DO NOT
use abrasive or solvent cleaners. Use a mild detergent on a soft cloth, taking care not to put excessive pressure on the
display screen.
Battery State
I
ndicator
A
ccept (OK)
Charge Port
Menu
Photo / Video
Decrease LED
M
enu Select Down
SD Card Slot
O
n Charge
LED
M
emory Card
I
ndicator
I
ncrease LED
M
enu Select Up
F
Fig.1
ig.1
Sealey Group, Kempson Way, Suffolk Business Park, Bury St Edmunds, Suffolk. IP32 7AR
01284 757500
01284 703534
www.sealey.co.uk
ENVIRONMENT PROTECTION
Recycle unwanted materials instead of disposing of them as waste. All tools, accessories and packaging should be sorted, taken to
a recycling centre and disposed of in a manner which is compatible with the environment. When the product becomes completely
unserviceable and requires disposal, drain any fluids (if applicable) into approved containers and dispose of the product and fluids
according to local regulations.
WEEE REGULATIONS
Dispose of this product at the end of its working life in compliance with the EU Directive on Waste Electrical and Electronic Equipment
(WEEE). When the product is no longer required, it must be disposed of in an environmentally protective way. Contact your local solid
waste authority for recycling information.
BATTERY REMOVAL
Under the Waste Batteries and Accumulators Regulations 2009, Jack Sealey Ltd are required to inform potential purchasers of products
containing batteries (as defined within these regulations), that they are registered with Valpak’s registered compliance scheme. Jack
Sealey Ltd Batteries Producer Registration Number (BPRN) is BPRN00705.
Note
: It is our policy to continually improve products and as such we reserve the right to alter data, specifications and component parts without prior
notice.
Important
: No Liability is accepted for incorrect use of this product.
Warranty
: Guarantee is 12 months from purchase date, proof of which is required for any claim.
VS8111, VS8112 Issue 1 11/08/21
Original Language Version
© Jack Sealey Limited


