4. OPERATION
WARNING!
Before use, ensure that you have read and understood Section 1 Safety Instructions.
4.1.
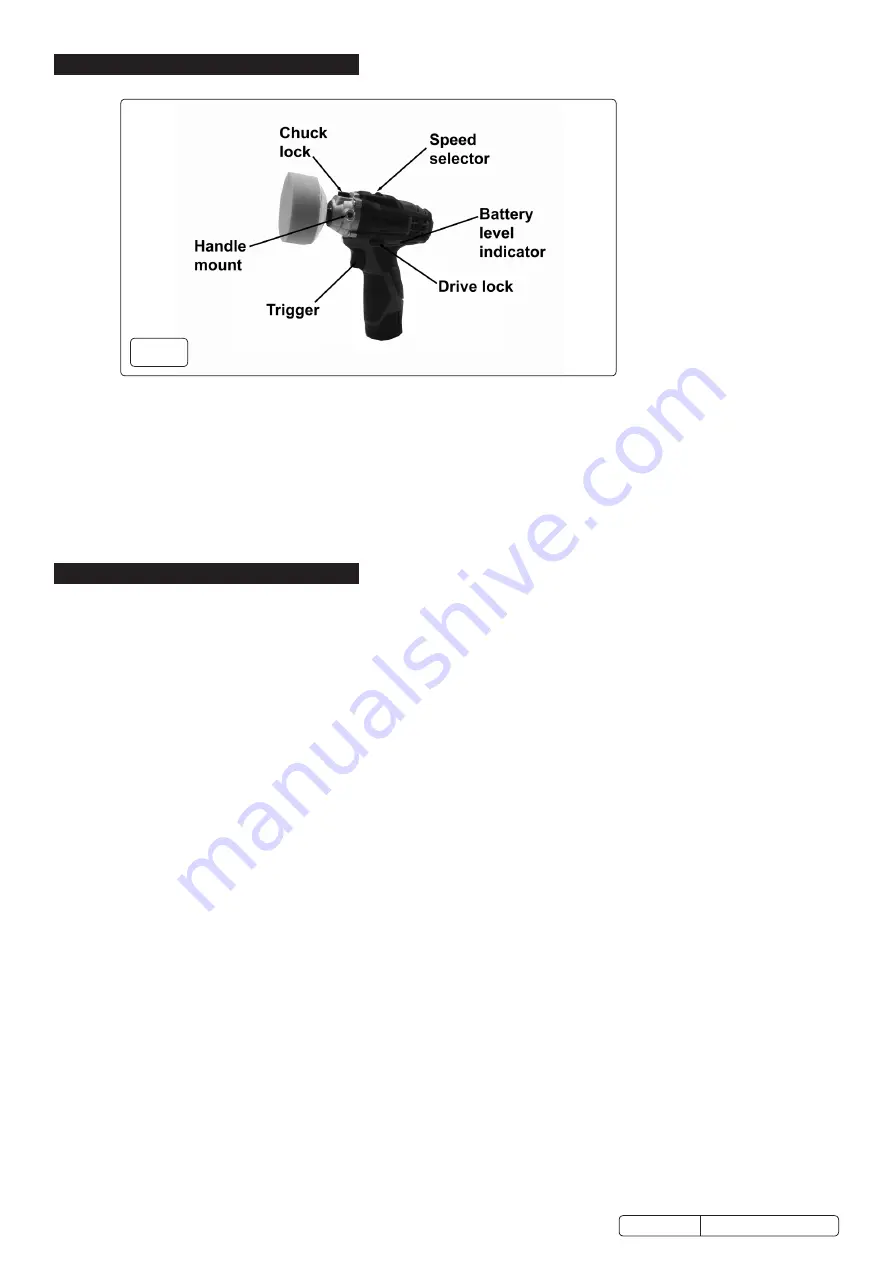
To attach/remove the applicator pad depress the chuck lock button behind the chuck (fig.1) and screw/unscrew the applicator pad.
4.2.
Release the chuck lock button and check that applicator pad is locked into chuck before switching on.
4.3.
Attach the battery to the sander. The battery charge level indicator LEDs (fig.1) show charge (three green lights indicate full charge).
4.4.
Set the required speed by use of the speed selector switch (fig.1).
4.5.
Unlock the drive mechanism by use of the slide switch (fig.1).
4.6.
Grip the side handle (not shown) and start the polisher by gentle and slow application of pressure on the trigger (fig.1).
4.7.
Increase/decrease the speed of the polisher using the variable speed control trigger (fig.1) to suit the task in hand.
4.8.
Ensure that the above features are working correctly prior to use.
5. MAINTENANCE
WARNING:
Always disconnect the battery before carrying out any inspection, maintenance or cleaning.
5.1.
General inspection
5.1.1.
Regularly check that all the fixing screws are tight.
5.1.2.
Repairs should only be carried out by an authorised service centre.
5.2.
Cleaning
WARNING:
Always wear protective equipment including eye protection and gloves when cleaning this tool.
5.2.1.
Keep your tool clean at all times. Dirt and dust will cause internal parts to wear quickly, and shorten the device’s service life.
5.2.2.
Clean the body of your machine with a soft brush, or dry cloth.
5.2.3.
Never use caustic agents to clean plastic parts. If dry cleaning is not sufficient, a mild detergent on a mildly damp cloth is
recommended.
5.2.4.
Water must never come into contact with the tool. Ensure the tool is thoroughly dry before using it.
5.2.5.
If available, use clean, dry, compressed air to blow through the ventilation holes (where applicable).
Original Language Version
© Jack Sealey Limited
CP1205 Issue 1 23/04/18
fig.1


