


7. MAINTENANCE
7.1
Before each use, check the vehicle lift to ensure it is not damaged or worn. If in any doubt
DO NOT
use the unit.
Remove it from service immediately and contact your local Sealey dealer for advice/repairs.
7.2
Refilling the hydraulic system with oil is rarely necessary but the level should be checked in the event of a loss of
performance. To check oil level, ensure the ram is fully lowered, remove filler plug and check that level is within10mm
of filler hole. Add
a good quality jack oil, such as SEALEY HYDRAULIC JACK OIL.
WARNING: DO NOT use brake fluid, or any fluid other than hydraulic jack oil as this will cause serious damage
to the jack and will invalidate the warranty!
6.6.
Test run
6.6.1 Before each use, check the vehicle lift is functioning correctly and ensure it is not damaged or worn.
6.6.2 With the air line connected operate the lift valve to trial elevate, close the valve to stop. Lower the lift by operating the
hydraulic release valve pedal. If there is no air line, elevate by pumping the foot pedal. Lower the lift by operating the
hydraulic release valve pedal.
6.7
Lifting the vehicle
6.7.1 Lock, chock and handbrake vehicle wheels as required. Remove any objects left on the boot lid, bonnet and roof.
6.7.2 The vehicle lift assembly is mounted on four castors, two of which are swivel to enable precise alignment with the area
to be lifted. Handlebars mounted at shoulder height on the vertical pillar offers the assembly manouevrability.
6.7.3 Always start with the lift at its lowest position and decide whether a wheel or body lift is required. Fit the wheel cradle
adaptor or the body lift adaptor.
6.8.
The wheel cradle adaptor
6.8.1 Check the tyres on the vehicle are correctly inflated.
6.8.2 With the wheel cradle adaptor hooked on to the elevator carriage, guide the cradle arms centrally and squarely toward
the target wheel.
6.8.3 The closer to the car body the better, provided the wheel registers fully on the parallel portion of the cradle arms.
6.8.4 With the air line connected operate the lift valve to trial elevate and then to the required height, close the valve to stop.
Alternatively if there is no air supply use the foot pump situated at the rear of the unit. Insert the safety stop bar at the
nearest position below the adaptor hook up block on the carriage and lower the lift by operating the hydraulic release
valve pedal until the load is taken by the stop bar.
6.9.
The body lift adaptor
6.9.1 Check the tyres on the vehicle are correctly inflated.
6.9.2 An assessment must be made of the structural integrity of the vehicle jacking point. The body lift adaptor is designed
for body sill and seam engagement and a trial fitting by hand to the area to be lifted is recommended.
6.9.3 With the lift adaptor hooked on to the elevator carriage, guide the adaptor groove centrally and squarely toward the
vehicle jacking point seam.
6.9.4 With the air line connected operate the lift valve to trial elevate and then to the required height, close the valve to stop.
Alternatively if there is no air supply use the foot pump situated at the rear of the unit. Insert the safety stop bar at the
nearest position below the adaptor hook up block on the carriage and lower the lift by operating the hydraulic release
valve pedal until the load is taken by the stop bar.
6.1.
Ensure the air supply valve (fig.2) is in the "Off" position before connecting to the air supply. The air/hydraulic lift
requires a working air pressure of 123psi (8.5bar) to operate.
WARNING! Ensure air supply is clean and does not exceed 174psi (12bar). Too high an air pressure and
unclean air will shorten the life of the unit due
to excessive wear, and may be dangerous causing possible
damage and/or personal injury.
6.2.
Drain the air supply tank daily and clean the air
inlet filter screen weekly.
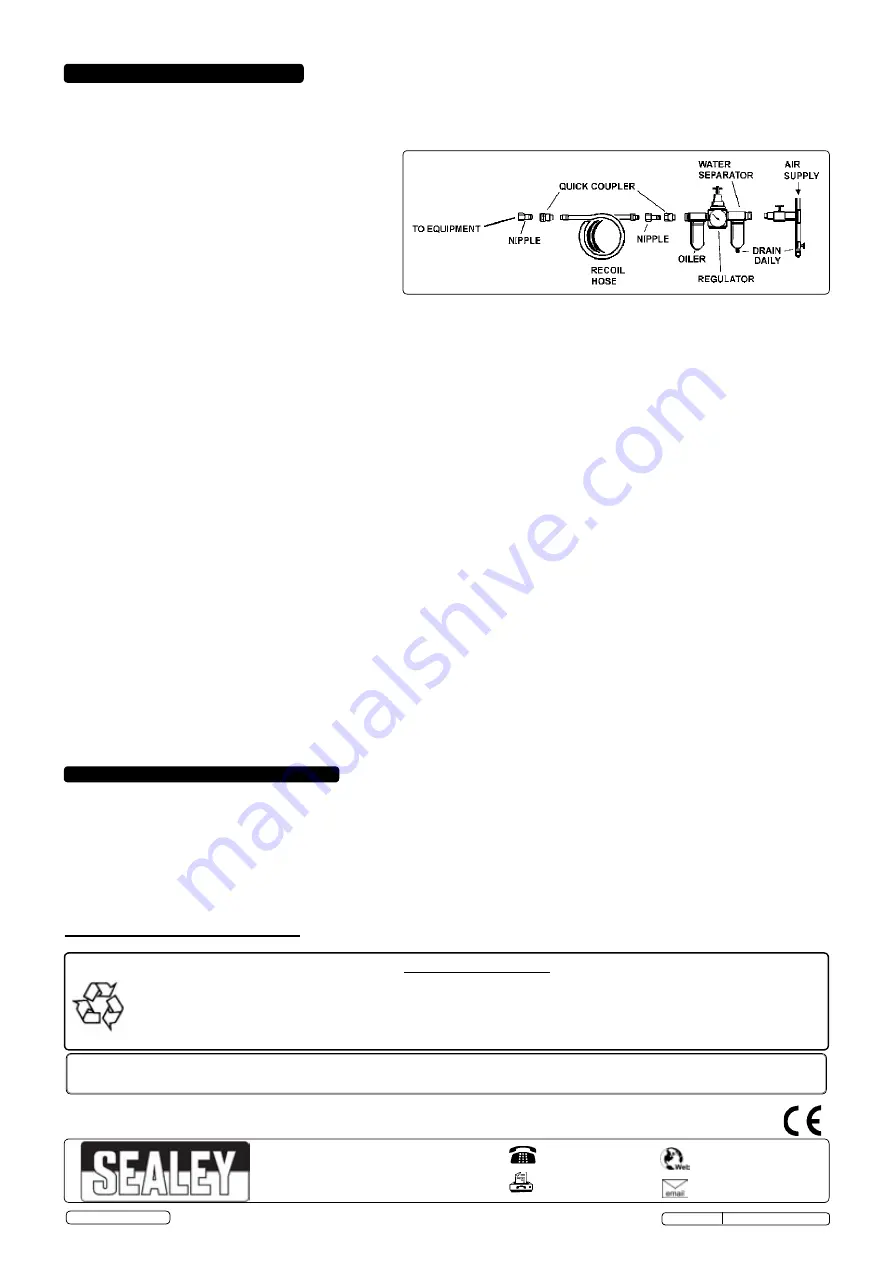
6.3.
For recommended supply, see diagram to right.
6.4.
Line pressure should be increased to
compensate for unusually long air hoses (over
8 metres).
6.5.
Keep hose away from heat, oil and sharp edges.
Check hoses for wear and make certain that all
connections are secure.
IMPORTANT: NO RESPONSIBILITY IS ACCEPTED FOR INCORRECT USE OF THIS PRODUCT.
Hydraulic products are only repaired by local service agents. We have service/repair agents in all parts of the UK.
DO NOT RETURN THE PRODUCT TO US. Please telephone us on 01284 757500 to obtain the address and phone number of your local
agent. If product is under guarantee please contact your dealer.
Parts support is available for this product. To obtain a parts listing and/or diagram, please log on to
www.sealey.co.uk, email [email protected] or phone 01284 757500.
6. OPERATION
NOTE: It is our policy to continually improve products and as such we reserve the right to alter data, specifications and component parts without prior notice.
IMPORTANT:
No liability is accepted for incorrect use of this product.
WARRANTY:
Guarantee is 12 months from purchase date, proof of which will be required for any claim.
01284 757500
01284 703534
Sole UK Distributor, Sealey Group,
Kempson Way, Suffolk Business Park
,
Bury St. Edmunds, Suffolk,
IP32 7AR
www.sealey.co.uk
Environmental Protection
Recycle unwanted materials instead of disposing of them as waste. All tools, accessories and packaging should be
sorted, taken to a recycling centre and disposed of in a manner which is compatible with the environment.
When the product becomes completely unserviceable and requires disposal, drain off any fluids (if applicable)
into approved containers and dispose of the product and the fluids according to local regulations.
Original Language Version
AVR1500FP Issue: 2 (SP) - 18/11/14
© Jack Sealey Limited


