12
© Sealevel Systems, Inc. 1102 Manual | SL9135 6/2021
Once the software
installation is complete, the port must be configured for ‘RTS Enable’. This is
accomplished by using the Device Manager in Windows (except NT). The port that the IC485+ is attached
must be selected under
Ports (COM & LPT). Access the ‘RTS Enable’ checkbox via the ‘Advanced’ dialog.
In Windows NT, Sealevel’s’ ‘Advanced Ports’ applet should be used for configuration.
Other Operating Systems
Linux includes a full-
featured serial driver that includes support not found in Microsoft’s serial driver.
Most serial drivers offer a mechanism to control RTS from the application layer. While this is not as
efficient and normally means using ‘Echo’ to know when to
turn off the transmitter, for most applications
this is adequate. The
‘Auto Enable’
and ‘Data Enable’ modes can also be used. Refer to your operating
system documentation for specifics.
Physical Installation
The IC485+ can be connected to any existing RS-
232 port. A cable such as Sealevel’s’
CA-177 can be used
to attach the IC485+ DB-
25F to the PC’s DB
-9M connector.
1.
Locate an existing RS-232 COM: port and connect the IC485+.
2.
With the IC485+ case open, configure DIP-switches SW1 and SW2 for your application.
3.
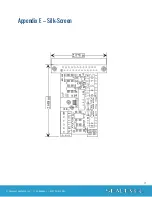
Connect the wiring to your external device via the provided 6-position screw terminal. The
signals are labeled on the board’s silkscreen. From the included hardware, select the strain
relief clamp that best fits your cable.
4.
Make sure all connections are secure and that strain relief is correctly installed.
5.
Close the IC485+ case and connect the included AC adaptor.
6.
If the IC485+ is in RS-422 mode, the EN led should now be on since the transmitter is always
enabled.
Installation is complete.


