Installation Guide
© Copyright 2012, Seal Shield, LLC, All Rights Reserved
www.sealshield.com
Before You Begin
Plug in the USB charging station and fully charge the mouse. The LED light
on the charging station will turn from red to green when the mouse is fully
charged.
Note:
The internal rechargeable battery in the mouse should last several days
between charges. The mouse should be returned to the charger every 2-3
days or when the LED light indicates that it needs to be charged, but should
not be charged daily as this is unnecessary and may degrade the battery life.
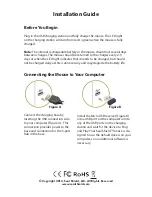
Install the Micro USB receiver (Figure B)
into a USB port on the computer or into
any of the USB ports on the charging
station and wait for the device to Plug
and Play. Your Seal Shield™ mouse is de-
signed to use the default drivers on your
computer, so no additional software is
necessary.
Figure A
Figure B
Connect the charging base by
inserting the USB connection wire
to your computer (Figure A). This
connection provides power to the
base and connection for the 3-port
hub in the base.
Connecting the Mouse to Your Computer


