
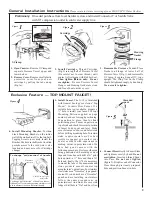


2. Install Cartridge.
Thread Cartridge
(Fig.2) into top half of Pressure Vessel
(Be careful not to cross thread.) until
contact is first made with Rubber Seal.
Then tighten
4
4
4
4
4
turn only. Do not
overtighten.
Be sure Pressure Vessel
Flanges and Housing Gasket are clean
and free of dents, nicks or cuts.
3. Reassemble Pressure Vessel.
Place
Gasket on Flange of lower half of
Pressure Vessel (Fig.3) and reassemble
V-Clamp, keeping Seagull
IV
logo
upright. The Wing Nut on the Clamp
should be tightened snugly, by hand only.
Use no tools to tighten.
General Installation Instructions
Please retain for future servicing of your SEAGULL
®
IV Water Purifier
Exclusive Feature — TOP MOUNT FAUCET!
6. Connect Hose
directly to Faucet Stem
and tighten securely by hand.
Do not
overtighten.
Insert and thread Spout
into base,
Do not over tighten
(figure 5)
.
Drop free end of Connector
Hose through previously prepared
hole and position Faucet in hole.
Figure
4
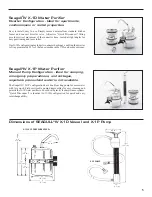
4. Install Mounting Bracket.
Position
black Mounting Bracket on the inside
wall of the sink cabinet. Use the two Self-
Tapping Screws to securely install the
Bracket. Make sure the Bracket location
permits access to the cold water valve
location and easy access for Cartridge
changes.
To change “pull direction” of handle
To change “pull direction” of handle on faucet,
lift handle off stem and reposition stainless steel
pin to alternate location. Reinstall handle.
Stainless
steel pin
Place Pin on right
or left side
5. Install Faucet.
The X-1F is furnished
with General Ecology’s exclusive “Top
Mount” Ceramic Disc Faucet. If a
suitable hole isn’t available, prepare a
¾" hole to install your faucet. Cut out
Mounting Pattern supplied on page
number 6 and use for rough positioning.
Tape pattern in place, then for final
positioning place Faucet on pattern on
top of sink and check for correct position
of faucet body, spout and lever. Make
sure of clearance, above and below sink
before drilling mounting hole. Porcelain
sinks require special care. For best
results we suggest you contact your
dealer or others with experience in
making cutout in porcelain sinks. We
have had good success with the
following procedure. First cover the area
being penetrated with masking or duct
tape and from beneath drill a
d
" pilot
hole upward...a ¼" hole and then a
g
"
hole and finally the ¾" hole necessary
to mount the faucet. For man-made and
stone products consult counter top
manufacturer’s guidelines. For stainless
steel sinks use a “Greenlee” type punch/
die tool. If you do not have a “Greenlee”
punch and are installing on stainless,
follow the same procedure as on
porcelain/cast iron sinks. Be sure sink
ledge at drill hole is “flat” and burr free.
2
Housing
Gasket
Flange
Figure
3
Cartridge
Figure
2
Figure
5
threaded
spout
Figure
1
1. Open Canister.
Remove V-Clamp and
separate Pressure Vessel upper and
lower halves.
2. Remove Cover.
Remove small plastic
protective cover from your new
cartridge by pulling the tab end up
(Fig.1a)
.
V-Clamp
1a
Preliminary:
If needed purchase from local hardware store and install Connector T or Saddle Valve
with
a
" compression outlet in cold water supply line.


