


Service and Installation Manual
7
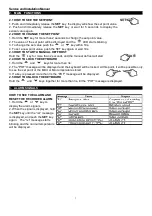
2. MAIN FUNCTIONS
2.1 HOW TO SEE THE SETPOINT
1. Push and immediately release the
SET
key: the display will show the set point value.
2. Push and immediately release the
SET
key or wait for 5 seconds to display the
sensor value again.
2.2 HOW TO CHANGE THE SETPOINT
1. Hold the
SET
key for more than 2 seconds to change the set point value.
2. The value of the set point will be displayed and the
LED starts blinking.
3. To change the set value push the
or
key within 10s.
4. To set a new point value, push the SET key again or wait 10s.
2.3 HOW TO START A MANUAL DEFFROST
Hold the
key for more than 2 seconds and the manual defrost will start
2.4 HOW TO LOCK THE KEYBOARD
1. Hold the
and
keys for more than 3s.
2. The “POF” message will be displayed and the keyboard will be locked. At this point, it will be possible only
to see the set point or the MAX or Min temperature stored.
3. If a key is pressed more than 3s the ”POF” message will be displayed.
2.5 HOW TO UNLOCK THE KEYBOARD
Hold the
and
keys together for more than 3s, till the “POF” message is displayed.
3. ALARM SIGNALS
HOW TO SEE THE ALARM AND
RESET THE RECORDED ALARM
1. Hold the
or
key to
display the alarm signals.
2. When the signal is displayed, hold
the
SET
key until the “rst” message
is displayed, and push the
SET
key
again. The “rst” message starts
blinking and the normal temperature
will be displayed.
Содержание SBC-49
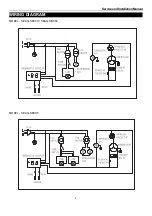
Страница 8: ...Service and Installation Manual 8 WIRING DIAGRAM MODEL SEAG SBC49 SEAG SBC64 MODEL SEAG SBC95...
Страница 9: ...Service and Installation Manual 9 WIRING DIAGRAM MODEL SEAG SBC49 SEAG SBC64 POWER SUPPLY L N 1 2...
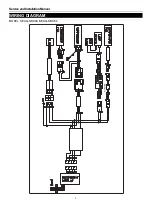
Страница 10: ...Service and Installation Manual 10 WIRING DIAGRAM MODEL SEAG SBC95 L N 1 2...
Страница 12: ...Service and Installation Manual 11...