


Reviewer’s Guide: Seagate BlackArmor NAS 440
7
any computer and no memory on any computer is ever used for this service. BlackArmor
NAS can be configured to install updates automatically or to notify the administrator that
an update is available.
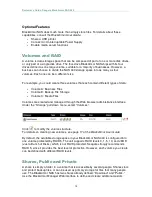
What Can You Do With BlackArmor NAS?
The BlackArmor NAS is highly a versatile device that can be used to store, backup, and
share data. You can also stream music, videos, and movies. Uses include:
•
Store files by using BlackArmor NAS as a central primary-storage repository.
•
Share with colleagues and customers on a local network or over the Internet.
•
Create automatic backup copies of files, including the operating system.
•
Recover from a disaster, such as the accidental deletion of important files, failure
of a drive, or the loss or theft of a computer.
•
Access the BlackArmor NAS via the Internet from anywhere in the world to
download or upload files using the Seagate Global Access service.
•
Share a USB printer with others on the local network.
•
Create a media server so that anyone on the local network can leverage
downloaded photos, videos, and music for use in presentations, meeting or event
materials.
•
Enable the Apple® iTunes® service on the server so that users can stream
music directly to a network computer that has the iTunes application installed for
use in web trainings, presentations or demonstrations.
•
Set up scheduled downloads with sites with password validated accounts.
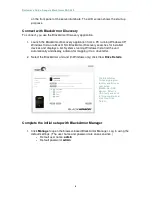
Part 2: Installation and Use
Installation
Installing the Seagate BlackArmor NAS 440 should take about 15 minutes, not including
creating of individual user accounts. Consult the
BlackArmor User Guide
for step-by-step
instructions for installing and configuring the BlackArmor NAS. This section highlights
several key operating features. The tasks that need to be performed follow, with
overview instructions. Additional detail can be found in the
BlackArmor User Guide for
Windows.
Install the BlackArmor NAS and software
1. Plug the included Ethernet cable into Port 1 and connect the other end to the
network (switch, router, etc.). Connect a second cable to Port 2 and the network
for failover capability.
2. Use the power adapter included in the kit to connect the BlackArmor server to a
grounded power outlet. The server powers on automatically and the LED lights


