background image

Step 1—Switching the system on

Plug in the transducer cable to the control box; look for 

a blinking red LED light. Red light indicates the system 

is on and outputting depths. The transducer MUST be in 

water to output depths.

Step 2—Connect to Bluetooth

When the system is powered on and the red light is 

blinking, a Bluetooth connection can now be connected 

using instructions from your collection device of choice 

(refer to your data collector manual). When the Bluetooth 

connection is enabled, a solid blue LED light will appear.

Step 3—Connecting the serial cable

A serial cable is included to output data from the 

SonarMite.  The transducer must be connected and a 

red LED light blinking to output data.

Step 4—Data Collection

The SonarMite has eight output formats, depending on 

the software used for data collection. Instructions for 

changing the format and sound velocity is covered in 

Step X. Please visit our website support section for the 

specific setup guides for your system: 

http://www.seafloorsystems.com/support.html

Step 5—Bar checking

Bar checking is calibrating the system for the sound 

velocity of the water being surveyed. There are two 

methods of doing this:

5a. digital bar check (example Odom Digibar Pro)

5b. build a bar check consisting of a flat, large base at 

a fixed distance from the transducer. For shallow water, 

sound velocity tables can be used to set the SonarMite 

to a desired setting. To do this, obtain water temperature 

from mid-water column, and refer to proper sound 

velocity table for fresh or salt water. For questions, call 

our support line.

Note: using the seabed for calibration is not acceptable; 

this should only be used for rough check.

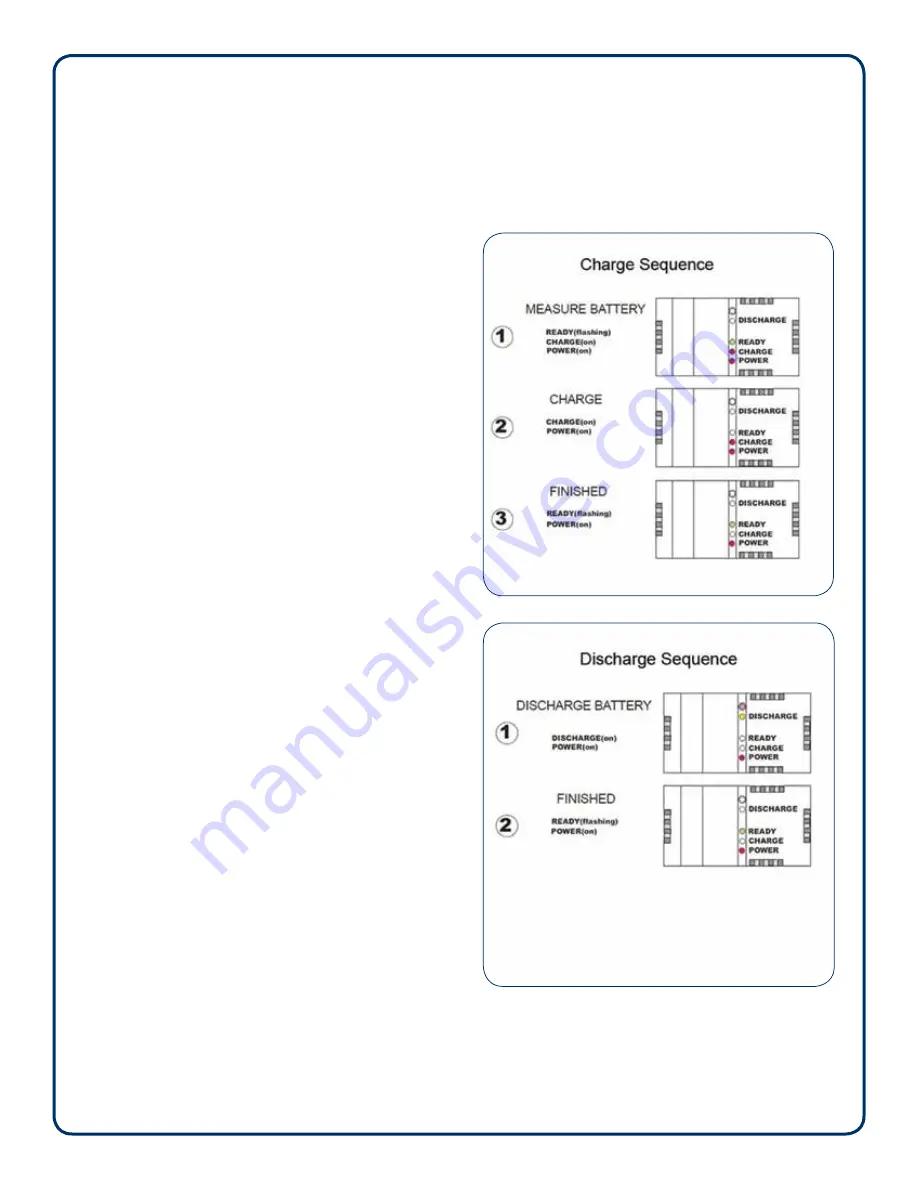
Step 6—Internal battery charging

Fully charge the battery, overnight, prior to using 

the system. A full discharge and recharge should be 

conducted every six months. Refer to the charge/

discharge illustrations.

Page 2  

 SonarMite MILSpec/M8 User Manual | Rev 07/22/2016

Содержание HydroLite-TM

Страница 1: ...ying in lake using a GPS antenna and hand held data collector Above Right Singlebeam images courtesy cbec Inc eco engineering Sacramento CA Singlebeam survey image courtesy of Rice Associates Manassas...

Страница 2: ...al Support 3 Appendices List of Reference Tools HydroLite TM Schematic SonarMite MILSpec SonarM8 User Manual Sound Velocity Chart of Freshwater Seawater SonarMite Adroid Bluetooth App Trimble Survey C...

Страница 3: ...oduction The HydroLite TM Transom Mount Survey Pole Kit provides an integrated survey solution allowing easy mounting of the SonarMite echosounder The YouTube setup video demonstrates how to assemble...

Страница 4: ...guide for that specific system i e if using Trimble Access refer to the Trimble Survey Controller Access appendix 5 Things to check before calling technical support 5 1 Position of HydroLite TM Pole...

Страница 5: ...use these tools 6 1 PC Download Troubleshooting Tools can be found in the wcom32 exe app www seafloorsystems com support software support 6 2 Android Basic troubleshooting 90 of issues can be solved...

Страница 6: ...th Quick Start Manual SonarMite MILSpec singlebeam echosounder Transom Mount Survey Point Pole Transducer Mounting Bracket HydroLite TM Schematic GPS Antenna optional SonarMite Echosounder in Velcro P...

Страница 7: ...0 kHz echosounder transducer digital smart transducer 7 degree beam bottom tracking technology QA sonar strength signal breakaway design 12 volt power supply charge rapid charge discharge feature char...

Страница 8: ...velocity is covered in Step X Please visit our website support section for the specific setup guides for your system http www seafloorsystems com support html Step 5 Bar checking Bar checking is cali...

Страница 9: ...48 0 0 0 8 9 115 0 1 0 48 0 0 0 17 8 116 0 1 0 48 0 0 0 8 9 115 0 1 0 48 0 0 0 8 9 115 0 Old SonarMite format is the defaul format used by Trimble Carlson SM Mobile and HYPACK 0 48 represents the dept...

Страница 10: ...n the field The HydroLite TM pole kit provides an integrated survey solution alowing easy mounting of the SonarMite echosounder The YouTube setup video demonstrates how to assemble the HydroLite TM po...

Страница 11: ...taining the transducer from the remaining pole kit At a 45 degree angle place the transducer head on a protective pad and press firmly until it releases A Place transducer on a protective pad B Press...

Страница 12: ...parameters that effect speed of sound in water also varied with location The accepted solution was a barcheck where a large plate was lowered in a specified sequence where the depth measured by the ec...

Страница 13: ...the bottom surface bottom type and fish in the water column As with the beamwidth discussion the electronics of a leisure fishfinders are not designed for a survey application In particular the depth...

Страница 14: ...the amount of substance normally salt dissolved in the water temperature the temperature of the water sample temperature sum of water depth and barometric pressure All of the these parameters can var...

Страница 15: ...Speed of Sound Freshwater Pg 1 of 2 Source UNESCO equation provided by National Physical Laboratory...

Страница 16: ...Speed of Sound Seawater Pg 2 of 2 Source UNESCO equation provided by National Physical Laboratory...

Страница 17: ...Pg 1 of 5 SeafloorTM quick start guide SonarMite Android Bluetooth App Ver 2 1...

Страница 18: ...Pg 2 of 5...

Страница 19: ...Pg 3 of 5...

Страница 20: ...Pg 4 of 5...

Страница 21: ...Pg 5 of 5...

Страница 22: ...Trimble Survey Controller Access SeafloorTM quick start guide Pg 1 of 4...

Страница 23: ...Pg 2 of 4...

Страница 24: ...Pg 3 of 4...

Страница 25: ...Pg 4 of 4 Data Collection Tip When starting Data Collection it should be configured as follows Continuous Topo by Time...

Страница 26: ...licited 5 Be sure to select ALL for point line area feature and Not in feature 6 Change data destination to As Attribute 7 Name attribute this named attribute is where your soundings are stored in eac...

Страница 27: ...SeafloorTM quick start guide Pg 1 of 6 Trimble SCS900 with SonarMite...

Страница 28: ...Pg 2 of 6...

Страница 29: ...Pg 3 of 6...

Страница 30: ...Pg 4 of 6...

Страница 31: ...Pg 5 of 6...

Страница 32: ...Pg 6 of 6...

Страница 33: ...SeafloorTM quick start guide Pg 1 of 3 Trimble Access Drivers for SonarMite DFX...

Страница 34: ...3 In the Settings Menu screen choose SURVEY STYLES 4 in the Styles screen select a style 5 Within the Style properties select ECHO SOUNDER Pg 2 of 3...

Страница 35: ...Pg 3 of 3...

Страница 36: ...Pg 1 of 1 SeafloorTM quick start guide SonarMite with Carlson SurvCE Data Collection Tip When starting Data Collection it should be configured as follows Auto by Interval by Time...

Страница 37: ...Connecting Viva controller to SonarMite Echosounder CS1O CS15 Settings I when it has to be right feic Geosystems Pg 2 of 13 Pg 1 of 13...

Страница 38: ...Pg 4 of 13 Pg 3 of 13...

Страница 39: ...Pg 6 of 13 Pg 5 of 13...

Страница 40: ...Pg 8 of 13 Pg 7 of 13...

Страница 41: ...Pg 10 of 13 Pg 9 of 13...

Страница 42: ...Pg 12 of 13 Pg 11 of 13...

Страница 43: ...Pg 13 of 13 Tips on Data Collection Surveys must be performed using the following setting AUTO tab stores shots at intervals AUTO POINTS log every 1 or 5 seconds...

Страница 44: ...Pg 1 of 3 SeafloorTM quick start guide SonarMite with Leica 1200 GPS System...

Страница 45: ...Pg 2 of 3...

Страница 46: ...Pg 3 of 3...

Страница 47: ...Pg 1 of 1 SeafloorTM quick start guide Topcon Magnet...

Страница 48: ...Seafloor Systems Incorporated 4415 Commodity Way Shingle Springs CA 95682 USA 530 677 1019 info seafloorsystems com www seafloorsystems com 2016 Seafloor Systems Inc All rights reserved...

Отзывы: