background image

4

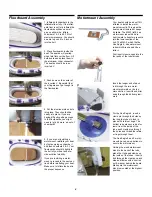
Floorboard Assembly

1. Inflate both chambers in the
inflatable floor fully. If the inflat-
able floor is not fully inflated the
floorboards will have a small
gap on either side. Inflate
chambers 1 & 3 to 60-75% of
maximum pressure. You should
be able to push 4 to 5 inches
into the hull. 

2. Place floorboards inside the
boat. The boards will overlap
when laid flat over the floor. Lift
both boards and place them in
the aluminum H-bar connector.
The boards should be in an
inverted V.

3. Push down on the center of
the inverted V. Be careful that
your fingers don’t get caught in
the floorboards. 

4. Put the aluminum side struts
into place. They should slide
neatly into place. If you are
having difficulty getting access
to the floorboards, you might
need to let a bit more  air out of
chamber #3.

5. If you are not installing a
motormount, reinflate your boat
by first pumping up chamber 1
and then chambers 2 & 3. Your
floorboards should fit tightly to
the hull of your boat and pro-
vide excellent stability. 

If you are installing a motor-
mount, proceed to the next sec-
tion before reinflating your boat.
Make sure to inflate the boat in 
the proper sequence.

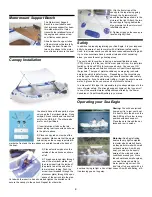
Motormount Assembly

Your boat should be about 75%
inflated to install the motor-
mount correctly. This gives the
boat some structure but keeps
it pliable. The MM-3 (left), has
motormount rods which are
bent inward to transfer pressure
into the lower section of the
hull. The MM-2, which fits the
Sea Eagle 6, has motormount
rods which Are shaped like a
letter J.

First insert closure caps into the
four ends of the tubular rods. 

Insert the longer end of each
rod through the two motor-
mount grommets on the top
stern section. Insert the shorter
ends through the bottom grom-
mets.

For the Sea Eagle 6, insert a
clevis pin through the holes on
the long top tubes to lock in
place with retainer rings. The
bottom rods are secured as fol-
lows: from the inside of the
tube, push clevis pins through
the holes and thread the retain-
er rings through them. 

The Sea Eagle 8 and 9 motor-
mounts have pop-up buttons to 
secure the motormount.

Holding the wood motormount
block to the back of the rods,
place the U shaped clamps on
the inside of the tubes.  Insert a
bolt through the clamp on each
side and fasten with a knurled
nut & washer behind the board.
Make sure the motormount
block is mounted at the highest
position.

Содержание SE-8

Страница 1: ...1 Motormount Fishing Boats Instructions and Owner s Manual SE 6 SE 8 SE 9 October 2003 ...

Страница 2: ...our boat Your registration numbers must be affixed to your hull to be legal You can apply adhe sive numbers to a small piece of wood or plastic for a neat look Warranty Card Please fill out and mail in the yellow colored Warranty Registration Card supplied in your order right away You will void your warranty by not mailing it to us Be sure to enter the Hull Identification Number Valves Pipe Valve ...

Страница 3: ...ial will stretch so that the printed diagram will expand to match the clear plastic strip included with your boat Hold the clear plastic strip over the boat so the patterns match Inflation Hull material and working pressure The Motormount Boats are designed to have a moderate working pressure of approximately 0 75 psi When properly inflated you should be able to push your thumb into the hull about...

Страница 4: ...einflating your boat Make sure to inflate the boat in the proper sequence Motormount Assembly Your boat should be about 75 inflated to install the motor mount correctly This gives the boat some structure but keeps it pliable The MM 3 left has motormount rods which are bent inward to transfer pressure into the lower section of the hull The MM 2 which fits the Sea Eagle 6 has motormount rods which A...

Страница 5: ... addition to properly registering your Sea Eagle it is your responsi bility to be aware of and to comply with all relevant safety regula tions In all water sports you should have reasonable swimming abil ity Just as swimmers have a cardinal rule about not swimming alone you should never go boating alone The next point to consider is having a personal floatation device PFD Not only is it the law bu...

Страница 6: ... you ll appreciate your Sea Eagle s ability to get to difficult places River Running With a Sea Eagle Fishing Boat you can safely run up to class III white water based on a 1 6 scale However before doing so you should read some books on the basics of white water rafting In particular you must become aware of the danger posed by up and downstream eddies drops falls rocks trees branches shredded alu...

Страница 7: ...of the leak Check your valves Look listen and if necessary spray soapy water around your valve and the valve base Leaky valves have sev eral causes 1 Crossed threads Make sure that both the inner valve and the outer cap are firmly screwed together If threads are crossed on either item a slow leak could result A good way to avoid this is to first turn the outer cap back 1 4 turn 2 Sand in Diaphragm...

Страница 8: ...19 N Columbia St Port Jefferson NY 11777 Phone 631 473 7308 Fax 631 473 7398 staff seaeagle com 8 ...

Отзывы: