background image

H

IGH

 P

RE

SSU

RE

 PU

MP

 R

EP

A

IR

For more information about the High Pressure Pump, please visit http://www.arnorthamerica.com.

Sea Clear Watermakers™ Manual - Version 1.1-G 

Page 36

Содержание G-20

Страница 1: ...Manual For Electric Generator Driven Models G 20 G 40 Installation Operation and Maintenance 401 400 2226 info seaclearwatermakers com 36 Harrison Street Bristol RI 02809 www seaclearwatermakers com Version 1 1 G ...

Страница 2: ...ters Page 17 High Pressure Pump Page 17 Installation Manual Page 22 System Diagram Page 23 What s Included InYour Kit Page 24 Control Panel Installation Page 25 Pre filter Installation Page 26 High Pressure Pump Installation Page 27 Membrane Installation Page 29 Seawater Lift Pump Installation Page 29 RunningTubing and Hoses Page 30 Initial System Start up Page 33 Appendices Page 35 High Pressure ...

Страница 3: ...ce you to the system and will walk you through its installation operation and maintenance By taking proper care of your watermaker you ll not only extend the life of your investment but you should also be able to easily diagnose any issues that may arise If you have any questions about the installation operation or maintenance of your Sea Clear Watermaker please feel free to contact us any time Se...

Страница 4: ...t SeaWaterValve FreshWater Valve Pressure Adjustment NeedleValve Membrane Pressure Gauge SeaWater Lift Pump Switch High Pressure Pump Switch Pre filter Pressure Gauge Fuses ProductWater Gauge Sea ClearWatermakers Manual Version 1 1 G Page 4 ...

Страница 5: ...Control Panel Back Pre filter Pressure Gauge Sea ClearWatermakers Manual Version 1 1 G Page 5 ...

Страница 6: ...e 6 Dipstick Pressure Relief Valve To Second Brine Discharge Port on Control Panel Output to Membrane Input from Pre filter Housing End Cap High PressureTubing to Pressure Adjustment Needle Valve on Control Panel ProductWater Hose Electric Motor Pump shown is for G 40 model ...

Страница 7: ...MANUAL Quick Guide to Operation Page 8 StartingYour Watermaker Page 10 Shutting DownYour Watermaker Page 13 LongTerm Storage more than 5 7 days without use Page 14 Sea ClearWatermakers Manual Version 1 1 G Page 7 ...

Страница 8: ...ing pressure of 800 psi Start generator bringing it up to operating temperature and steady RPM Turn Seawater valve to Seawater intake position Turn FreshWater valve to Flush tank position Place hose labeled To flush tank into 5 gallon bucket Turn Pressure Adjustment NeedleValve counterclockwise 2 times Sea ClearWatermakers Manual Version 1 1 G Page 8 QUICK GUIDETO OPERATION ...

Страница 9: ...dleValve counterclockwise until pressure drops to zero psi Place Flush water intake hose into bucket of product water Turn Seawater valve to Flush water intake position Turn off Seawater Lift Pump Let water flow through system until bucket is almost empty Turn off High Pressure Pump Return Seawater valve to Seawater intake position and FreshWater valve to To flush tank position Sea ClearWatermakers ...

Страница 10: ... labeled To flush tank into a clean 5 gallon bucket Before starting your watermaker Oil chlorine and other chemicals will do permanent damage to your watermaker membrane Always confirm that your feed water source is free of chemicals before starting the system If the watermaker has been in storage and this is the first start up since pickling the unit follow the normal start up procedure but disca...

Страница 11: ... clockwise direction until the pressure increases to 700 psi Let the system stabilize Product water should now be flowing into your bucket Verify that everything is running properly and that the pressure is being maintained at 700 psi Now turn the Pressure Adjustment NeedleValve in a clockwise direction again to increase the pressure to its final rate the actual pressure will depend upon water tem...

Страница 12: ...lve should be vertical Remove and coil the hose and put the full bucket aside for use during shut down Check the Membrane Pressure Gauge on the right side of the panel occasionally to verify that the pressure is constant Monitor the level of water in your tank When the tank is full or when you are finished making water proceed to the shut down process on the following page Sea ClearWatermakers Man...

Страница 13: ...m let it run until the bucket is almost empty Turn off the High Pressure Pump using the switch on the panel labeled H P Clutch Do not let the pump run dry for more than a few seconds as this will damage your system Upon shut down organic matter will remain in the system which will cause microorganisms to grow that can clog damage your membrane Flushing the system with product water after shut down ...

Страница 14: ... position valve should be horizontal Turn off the Seawater Lift Pump using the switch on the panel labeled Seawater Lift Pump The pickling solution will flow from the bucket back through the system When the bucket is empty let the watermaker run for an additional 5 seconds before shutting down Turn off the High Pressure Pump using the switch on the panel labeled H P Clutch Do not let the pump run dr...

Страница 15: ...ake into the bucket and turn the SeaWater valve to the Flush water intake position valve should be horizontal With the generator at operating RPM turn on the High Pressure Pump by using the switch on the panel labeled H P Clutch Watch the brine dump and turn off the High Pressure Pump as soon as you see antifreeze Keep a close watch on the 5 gallon bucket to be sure it does not run dry Depending up...

Страница 16: ...MAINTENANCE MANUAL Pre filters Page 17 High Pressure Pump Page 17 Sea ClearWatermakers Manual Version 1 1 G Page 16 ...

Страница 17: ...d remove the Pre filter element Discard the used element and install a new 5 micron polyester element Reassemble by securely screwing the Pre filter Housing back together When restarting the system be sure to check the Pre filter Housing for leaks HIGH PRESSURE PUMP Your watermaker system includes an AR North America High Pressure Pump Designed for long life the pump should provide years of troubl...

Страница 18: ...d 1725 RPM Full load amps 13 6 7 5 6 8 A Duty cycle Continuous Service factor 1 15 Insulation class F Base type C Face Removable Shaft Keyed DE bearing 6205 ODE bearing 6203 Mounting F1 Rotation Clockwise Counterclockwise Overload Manual Start capacitor Ø42 x 80mm2 300 uF 125V Run capacitor Wire type LooseWire Wire housing Junction Box Connection diagram 115 208 230V 6 Lead Approx weight 34 lbs FL...

Страница 19: ...del G 20 All dimensions are in inches MOUNTING E 2F1 2F2 H BA A B C D G J L P AA AB 2 44 3 5 0 34 2 75 6 5 6 5 13 4 3 5 0 12 1 73 8 07 6 9 1 2 5 35 KEY KEYSEAT FLANGE SHAFT TERMINAL BOX BC ES S R AJ AK BB BF N W U XB XC XD XE 0 19 1 41 0 188 0 517 5 875 4 5 0 16 8 16 1 88 0 625 1 65 3 7 3 23 285 ...

Страница 20: ...ll load amps 20 0 11 1 10 0 A Duty cycle Continuous Service factor 1 15 Insulation class F Base type C Face Removable Shaft Keyed DE bearing 6205 ODE bearing 6203 Mounting F1 Rotation Clockwise Counterclockwise Overload Manual Start capacitor Ø42 x 80mm2 400 uF 165V Run capacitor Ø45 x 90mm2 40 uF 450V Wire type LooseWire Wire housing Junction Box Connection diagram 115 208 230V 6 Lead Approx weig...

Страница 21: ...del G 40 All dimensions are in inches MOUNTING E 2F1 2F2 H BA A B C D G J L P AA AB 2 44 3 5 0 34 2 75 6 5 6 5 14 88 3 5 0 12 1 73 8 5 6 9 1 2 5 35 KEY KEYSEAT FLANGE SHAFT TERMINAL BOX BC ES S R AJ AK BB BF N W U XB XC XD XE 0 19 1 41 0 188 0 517 5 875 4 5 0 16 8 16 1 88 0 625 1 65 3 7 3 23 285 ...

Страница 22: ...ol Panel Installation Page 25 Pre filter Installation Page 26 High Pressure Pump Installation Page 27 Membrane Installation Page 29 Seawater Lift Pump Installation Page 29 RunningTubing and Hoses Page 30 Initial System Start up Page 33 Sea ClearWatermakers Manual Version 1 1 G Page 22 ...

Страница 23: ...SYSTEM DIAGRAM Sea ClearWatermakers Manual Version 1 1 G Page 23 ...

Страница 24: ... 1 Pre filter 25 of high pressure tubing 10 of 1 4 low pressure hose 50 of 1 2 low pressure hose 10 of 3 4 low pressure hose Sodium metabisulfite pickling chemical Optional Features Other membrane options Water tester Pump repair kit O ring kit for membrane housing ItemsYou Will Need Minimum 4000 watt generator 5000 watt preferred or larger Intake through hull Brine discharge through hull Stainles...

Страница 25: ...the watermaker It should be as close as possible to the Membrane and to the High Pressure Pump Make sure the panel is mounted securely to a solid surface Mount theWiring Harness near the Control Panel but not below the panel as it will be obscured by hoses Run 12 gauge wire from a dedicated 10 amp breaker to the red wire on the barrier strip Sea ClearWatermakers Manual Version 1 1 G Page 25 On man...

Страница 26: ...back of the Control Panel and left it loose Connect this hose to the 1 4 hose barb on the output side of the Pre filter Housing Run a 1 2 hose from the output side of the Pre filter Housing to the input hose barb on the High Pressure Pump Place the 5 micron Pre filter that was included with your kit into the Pre filter Housing Screw the Pre filter Housing back into place The first time the Seawate...

Страница 27: ...or future reference Sea ClearWatermakers Manual Version 1 1 G Page 27 Bracket Requirements Before installing the high pressure pump you ll need a bracket to mount it to the generator The pump must be mounted as level as possible with the oil dipstick on top of the unit The pump can be turned in either direction The bracket should be made of mild steel and painted prior to installation The bracket ...

Страница 28: ...t the wire from the magnetic clutch to the wiring harness on the Control Panel using 12 gauge tinned wire If the generator is not grounded to the terminal of the battery you will need to run an additional wire from the pump to your battery buss In most cases this will not be required High Pressure Pump Fittings See Swagelok High Pressure Fitting Installation on page 29 Sea ClearWatermakers Manual ...

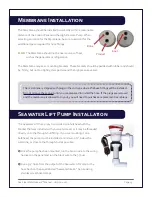
Страница 29: ...ith your watermaker or it may be threaded directly onto the through hull fitting If you are mounting it on a bulkhead the pump must be installed a minimum of 2 below the waterline as close to the through hull as possible Once the pump has been mounted run the brown wire to the wiring harness on the panel and run the black wire to the buss Run a 3 4 hose from the output of the Seawater Lift Pump to...

Страница 30: ...high pressure tubing from the output port on the High Pressure Pump to the inlet port on the membrane see Figure 2 Be sure when cutting the tubing to length to leave some extra Install end fittings per the Swagelok High Pressure Fitting Installation instructions When cutting the tubing make sure the ends are square and clean A plastic tubing cutter with scoring action which can be found in most ha...

Страница 31: ...ten fittings Swagelok High Pressure Fitting Installation Fully insert the tube into the fitting and against the shoulder rotate the nut finger tight Fig 1 High Pressure Applications and High Safety Factor Systems Further tighten the nut until the tube will not turn by hand or move axially in the fitting Mark the nut at the 6 o clock position Fig 2 While holding the fitting body steady tighten the ...

Страница 32: ...boat is used under normal running conditions This through hull must not be located near discharge lines that could introduce foreign materials such as head or generator exhaust Because it is important that the product water line never become blocked we discourage the use of shut off valves in the product water tubing We recommend that the product water from your watermaker be connected to its own f...

Страница 33: ...eled H P Clutch Take a moment to check for leaks again and verify additional flow through the system Let the system run for 5 minutes and then increase the pressure by turning the Pressure Adjustment NeedleValve clockwise until it reaches 700 psi Do another quick check for leaks Pre Start up Checklist All hose fittings are secured with hose clamps Through hulls are open All wiring connections are ...

Страница 34: ... the Membrane Pressure Gauge Reduce pressure by turning the Pressure Adjustment NeedleValve counterclockwise to operating pressure of 850 psi Verify output flow to 5 gallon bucket Let system operate discarding water for 15 minutes before testing checking one last time for leaks At the end of 15 minutes fill 5 gallon bucket with product water WARNING Be sure that the High Pressure Pump needle valve...

Страница 35: ...APPENDICES High Pressure Pump Repair Page 36 Troubleshooting Guide Page 37 Sea ClearWatermakers Manual Version 1 1 G Page 35 ...

Страница 36: ...HIGH PRESSURE PUMP REPAIR For more information about the High Pressure Pump please visit http www arnorthamerica com Sea ClearWatermakers Manual Version 1 1 G Page 36 ...

Страница 37: ...ct water output Run system unpressurized for 15 30 minutes Check operating pressure Poor quality high salinity product water Check O ring seal Replace Membrane Product water smells bad Check Pre filter Run system unpressurized for 15 minutes High pressure fittings are leaking Remove fittings and apply thread sealant Unable to obtain pressure Check all hose connections Make sure air is purged from ...

Страница 38: ...system Verify that through hull is open Make sure Seawater valve on Control Panel is in the Seawater intake position Check Pre filter Verify that Seawater Lift Pump is working Make sure brine discharge is not blocked Check all hose connections If you are still having difficulty with your watermaker please contact us at 401 400 2226 or info seaclearwatermakers com Sea ClearWatermakers Manual Version ...

Отзывы: