background image

Chiller wired controller


1.1.4 Installation instruction 


Circuit of wired controller is the low voltage circuit. Never connect it with a standard 220V/380V circuit 

or put it into a same Wiring Tube with the circuit. 


The shield cable must be connected stable to the ground, or transmission may fail. 


Do not attempt to extend the shield cable by cutting, if it is necessary, use Terminal Connection Block 

to connect. 


After finishing connection, do not use Megger to have the insulation check to the signal wire. 

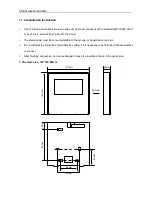
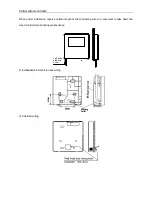
1. Structure size: 120*120*20mm 


1

9

m

m

8

4

m

m

4

4

m

m

46mm

60mm

120mm

20mm

1

2

0

m

m

Figure A

Содержание KJR-120F

Страница 1: ...WIRED CONTROLLER MINI CHILLER USER MANUAL KJR 120F AIR CONDITIONING...

Страница 2: ...Original instructions...

Страница 3: ...chiller wired controller KJR 120F 1 1 1Specifications Model Description power adapter 230 240V 50Hz KJR 120F Touch key and backlight function Input Voltage 10V AC Operating environment temperature 15...

Страница 4: ...ction key 6 On line unit qty indication 14 Add reduce key 7 Reserved 15 Cancel key 8 Clock 16 Mode key 1 Operation icon Indicate the ON and OFF status when it is ON it will display when it is OFF it w...

Страница 5: ...ncel the icon and timing will restart until next maintenance 4 Cycle The reserved icon 5 E heating The reserved icon 6 Check Display when check function is operated 7 Anti freezing Displays when ambie...

Страница 6: ...s display water temperature during water temperature setting it displays the setting numerical value under spot check status display spot check parameter 10 ON OFF key On and Off functions 11 Right Le...

Страница 7: ...f key to control On and Off status of the main unit 2 Under Off status press the On Off key to operate the main unit at that time the LCD of wired controller will display the operation icon The main u...

Страница 8: ...ing Press MODE key to choose operation mode The setting mode will change as the following order each time the key is pressed Press OK key or wait for 7 seconds to confirm During the setting process pr...

Страница 9: ...ing interface Press the or to adjust the water temperature Press OK key or wait for 7 seconds to confirm Water temperature setting check To check the water temperature setting value press the or key u...

Страница 10: ...ur of Timer 1 On press the or to adjust press key when finished and then the minute of the clock will flash which means the current setting is the minute of Timer 1 On press the or to adjust press key...

Страница 11: ...perature press the or to adjust press key when finished the LCD will display as the following 6 At this time the hour of the clock will flash it means the current setting is the hour of the Timer 2 On...

Страница 12: ...to set the hour number of Timing 1 On to be 07 Press key to enter minute setting interface of Timer 1 Off adjust the minute number to be 30 The setting steps of Timer 2 and Timer 3 are the same as Tim...

Страница 13: ...t the same time wire control execution timing off Clock setting Press the FUNCTIONS key 3 times to enter clock setting The hour of the clock will flash which means the current setting is the hour of t...

Страница 14: ...open the water pump The water pump icon will flash Press OK key to confirm During the setting process pressing the CANCEL key to return to the main interface and log off the forced water pump mode Not...

Страница 15: ...pump function cannot be activated under forcing heating in stand by mode the function will be automatically stopped if it is not activated within 5 minutes Check function 1 Check function allows the...

Страница 16: ...7 Fan speed 3 Total capacity requirements 4 The revised capacity requirements 5 Cooling heating temperature setting 6 Condenser temp Value T3 7 Outdoor ambient temp Value T4 8 Comp Discharge temp Valu...

Страница 17: ...ion Eb Two times of E6 protection in 10 minutes P1 High pressure protection E4 T3 T4 temperature sensor malfunction P2 Low pressure protection E5 Voltage protection P3 Outdoor units current protection...

Страница 18: ...Tube with the circuit The shield cable must be connected stable to the ground or transmission may fail Do not attempt to extend the shield cable by cutting if it is necessary use Terminal Connection...

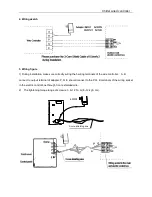
Страница 19: ...the 5 wiring terminals of the wire controller A B connect to output terminal of adapter P Q E should connect to the P Q E terminals of the wiring socket in the electric control box through 3 core shi...

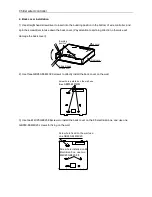
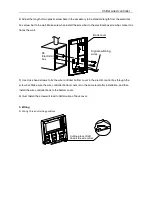
Страница 20: ...k cover 2 Use three GB950 86 M4X20 screws to directly install the back cover on the wall 3 Use two M4X25 GB823 88screws to install the back cover on the 86 electrician box and use one GB950 86 M4X20 s...

Страница 21: ...cross head screws to fix the wire controller bottom cover in the electric control box through the screw bar Make sure the wire controller bottom cover is on the same level after installation and then...

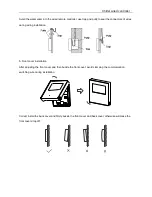
Страница 22: ...When under installation reserve certain length of the connecting wire for convenient to take down the wired controller while during maintenance 2 Embedded 86 electrician box wiring 3 Shielded wiring L...

Страница 23: ...of wires during wiring installation 5 Front cover installation After adjusting the front cover and then buckle the front cover avoid clamping the communication switching wire during installation Corr...

Страница 24: ...ces you are making an important contribution to the protection of our environment Please ask your local council where your nearest disposal station is located In case of quality problem or other pleas...

Отзывы: