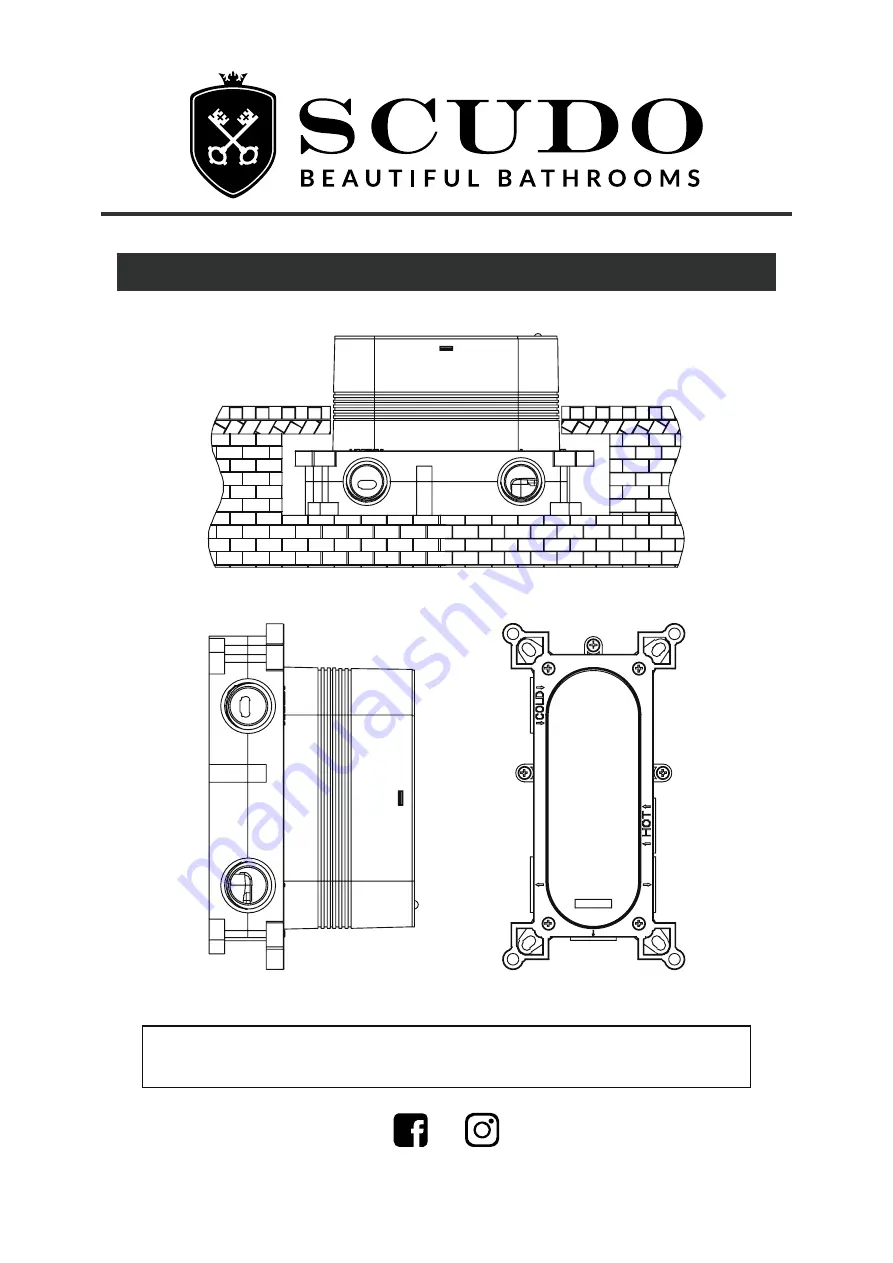
Installation Instructions & User Guide
Thermostatic Recessed Dual Control Shower Valve
Models Covered: NU-022 / NU-023 / NU-024
NU-028 / NU-029 / NU-030
IMPORTANT: Please keep these instructions for future reference.
Страница 1: ...nstallation Instructions User Guide Thermostatic Recessed Dual Control Shower Valve Models Covered NU 022 NU 023 NU 024 NU 028 NU 029 NU 030 IMPORTANT Please keep these instructions for future reference ...
Страница 2: ...l These fitting instructions give you all of the information you need for installation Do not hesitate to call our customer service team on 0330 124 7290 for assistance Important Safety Information General Information Prior to Installation Installation Shower Valve Wall Outlet Operating the Shower Maintenance Adjusting the Temperature Troubleshooting 1 2 3 4 5 6 7 8 9 10 ...
Страница 3: ...ter supply pipes This can be checked with a electronic detector When using power tools do not forget to Wear appropriate PPE Unplug equipment after use Warning Before installing the new shower valve it is essential that you thoroughly flush through the pipework in order to remove any remaining swarf solder etc Failure to carry out this procedure could cause problems or damage to the workings of th...
Страница 4: ... areas If the shower valve is installed at low pressure tank fed then the minimum distance from the highest installed position of the showerhead to the underside of the cold tank should be at least 1 metre to ensure adequate performance It is recommended low pressure systems are pumped to ensure minimum 0 5 bar of pressure Note Nominally equal balanced inlet supply pressures are recommended for op...
Страница 5: ...Plate 1x 5 Valve Body Fixings x4 6 Handle x2 7 Insert x1 8 Temperature Control x1 9 Wall Bracket fixings x1 10 Slider Bracket x1 11 Wall Outlet Riser Support x1 12 Riser Rail x1 13 Handset x1 14 Drench Head x1 15 1 2 inch Washer x3 16 Ball Fixings Washer x1 17 Hose x1 1 2 3 4 5 6 7 8 9 10 11 12 13 14 16 15 15 15 17 ...
Страница 6: ...rm x1 3 Handle Shrouds x2 4 Concealed Plate 1x 5 Valve Body Fixings x4 6 Handle x2 7 Insert x1 8 Temperature Control x1 9 Wall Outlet Handset mount x1 10 Handset x1 11 Drench Head 12 1 2 inch Washer x3 13 Ball Fixings Washer x1 14 1 2 Hose x1 4 1 6 5 2 11 13 12 10 12 8 3 7 12 9 ...
Страница 7: ...heck for any hidden pipes and cables before drilling holes in the wall Drill suitable holes and insert the wall plugs Securely attach the shower valve to the wall using the screws supplied 2 Connect water supply pipes Insert 15mm hot and cold water supply pipes into the inlet connections and tighten nuts ensuring the olives are fitted 3 Plumb in outlets Insert 15mm pipework into the top outlet and...
Страница 8: ... a bead of waterproof silicon sealant around the inner edge of the concealing plate Slide the concealing plate onto the shower valve control handles and apply firm pressure to ensure to silicon sealant spreads 6 Fit handles Push the spline adaptors onto the valve spindles Push the handles onto the spline adaptors and secure by tightening the grub screw and push fit the cap into position Fit Plaste...
Страница 9: ...1 Two outlet diverter This outlet allows the user to divert the flow of water from one product to another Turn the handle one way or the other to turn the flow of water on to your chosen product To turn the flow of water off turn the handle back to the centre 2 Temperature control Adjustable temperature control Turn the handle clockwise for a cooler temperature Turn the handle anti clockwise for a...
Страница 10: ...removed using washing up liquid All bath cleaning powders and liquids will damage the surface of your fitting even the non scratch cleaners Cartridge Maintenance We advise that the shower valve is regularly serviced in hard water areas to maintain the flow of water Isolate both hot and cold water supplies to the shower valve by either Turning the water supply off at the mains stopcock or Turning o...
Страница 11: ...fer from the factory setting If required the shower valve can be re calibrated to suit your own temperature requirements Set the temperature control to the maximum setting and check the temperature of the water with a thermometer If the temperature is not correct re calibrate the shower valve 1 Remove the temperature handle but do not remove the plastic temperature stop 2 Turn the spline clockwise...
Страница 12: ...or cold water from the shower valve outlet Partically closed stop or service valve in water supply pipework to the shower valve Open stop or service valve Inlet filter is partially blocked Clean or replace flush through pipe work before refitting Inlet water supplies are reversed hot to cold supply Check the connections are correct way round Hot on the left and cold on the right when viewed from R...
Страница 13: ...0ºC above the required blend temperature Adjust hot water temperature or wait for water to reheat if stored system is used Instantaneous water heater not igniting because water flow rate is too low Increase water flow rate through the system Check inlet filters and clean or replace Refer to Maintenance section Contact the boiler manufacturer ...
Страница 14: ...Notes Please use this space to add any notes you or your installer may have regarding the plumbing system or installation of this product ...
Страница 15: ...Notes Please use this space to add any notes you or your installer may have regarding the plumbing system or installation of this product ...