Scott Living 1200FM-26-201 Скачать руководство пользователя страница 22

22

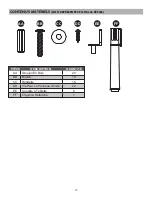
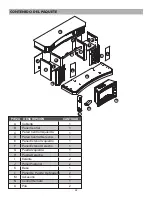
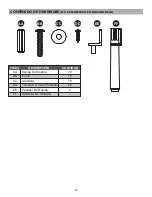
CONTENIDO DEL PAQUETE

PIEZA DESCRIPCIÓN

CANTIDAD

A

Cubierta

1

B

Panel Central

1

C

Pared Central Izquierda

1

D

Pared Central Derecha

1

E

Panel Exterior Izquierdo

1

F

Panel Exterior Derecho

1

G

Puerta Izquierda

1

H

Puerta Derecha

1

I

Estante

2

J

Panel Posterior

2

K

Base

1

L

Panel De Puerta De Madera

2

M

Accesorio

1

N

Control Remoto

1

O

Pila

2

A

J

E

I

C

B

J

D

I

F

G

L

K

M

L

H

N

O

Содержание 1200FM-26-201

Страница 1: ...ASSEMBLY CARE USE INSTRUCTIONS 60 Fireplace Media Console MODEL 1200FM 26 201 Fran ais p 11 Espa ol p 21 Date Purchased _______________________ www greentouchhome com...

Страница 2: ...nter Panel 1 C Left Middle Wall 1 D Right Middle Wall 1 E Left Outer Wall 1 F Right Outer Wall 1 G Left Door 1 H Right Door 1 I Shelf 2 J Back Panel 2 K Base 1 L Wood Door Panel 2 M Insert 1 N Remote...

Страница 3: ...3 HARDWARE CONTENTS NOT SHOWN ACTUAL SIZE PART DESCRIPTION QUANTITY AA Wooden Dowel 20 20 BB Bolt 18 CC Washer 18 DD Back Panel Screw 22 EE Shelf Pin 8 FF Touch up Pen 1 AA BB CC DD EE FF...

Страница 4: ...ntents list and hardware contents list If any part is missing or damaged do not attempt to assemble the product Tools Required for Assembly not included Phillips screwdriver 1 Insert two wooden dowels...

Страница 5: ...A CC BB 3 Insert four wooden dowels AA into base K 4 Place assembly from step 2 onto base K securing with four washers CC and four bolts BB 5 Insert two wooden dowels AA into outer holes on right side...

Страница 6: ...0 AA BB Wooden Dowel x 8 CC 6 Insert two wooden dowels AA into the top outer holes on left outer wall E left middle wall C right middle wall D and right outer wall F Attach top A securing from underne...

Страница 7: ...d the door and align the hinge body with the hinge plate mounted to the fireplace wall Align and slide the hooks catches on the hinge body into the recesses on the mounting plate while lightly pushing...

Страница 8: ...h the help of another person position insert M into middle opening of mantel assembly Note DO NOT plug insert M into power outlet yet CAUTION DO NOT slide insert on top of wood to avoid scratching woo...

Страница 9: ...to decrease the height Note The pre installed glass door panels can be switched out with the included wood door panels L 1 Remove the silicone trim along the outer edges of the glass panel on the insi...

Страница 10: ...nding the wholesale price of the defective part s Any installation labor construction transportation or other related costs expenses arising from defective part s repair replacement or otherwise of sa...

Страница 11: ...d achat _______________________ www greentouchhome com English p 1 Espa ol p 21 INSTRUCTIONS D UTILISATION D ASSEMBLAGE ET DE MAINTENANCE Console m dia de 152 4 cm 60 po pour foyer MOD LE 1200FM 26 20...

Страница 12: ...on Centrale Droite 1 E Paroi Ext rieure Gauche 1 F Paroi Ext rieure Droite 1 G Porte Gauche 1 H Porte Droite 1 I Tablette 2 J Panneau Arri re 2 K Base 1 L Panneau De Porte En Bois 2 M Foyer Encastrabl...

Страница 13: ...AT RIELS NON REPR SENT S EN TAILLE R ELLE PI CE DESCRIPTION QUANTIT AA Groujon En Bois 20 BB Boulon 18 CC Rondelle 18 DD Vis Pour Le Panneau Arri re 22 EE Goupille Tablette 8 FF Crayon Retouche 1 AA B...

Страница 14: ...ie incluse S il y a des pi ces manquantes ou endommag es ne tentez pas d assembler l article Temps d assemblage approximatif 45 minutes Outil n cessaire pour l assemblage non inclus tournevis crucifor...

Страница 15: ...eux chevilles en bois AA dans les trous ext rieurs du c t droit de la base K Attachez la paroi ext rieure droite F fixez avec deux rondelles CC et deux boulons BB R p tez l op ration pr c dente pour l...

Страница 16: ...is 6 Ins rez deux chevilles en bois AA dans les trous ext rieurs sup rieurs de la paroi ext rieure gauche E la paroi gauche centrale C la paroi droite centrale D et la paroi ext rieure droite F Attach...

Страница 17: ...l entendiez faire clic R p tez pour les autres pentures Pour retirer appuyez sur le bouton carr l arri re du corps de la penture pour d gager la penture du support d assemblage D verrouillez les deux...

Страница 18: ...place et utilisez les vis retir es pr c demment pour fixer le foyer encastrable M L assemblage est maintenant termin Avec l aide d une autre personne d placez l assemblage vers l emplacement final vo...

Страница 19: ...garniture en silicone car elle sera utilis e pour fixer le panneau neuf 2 Retirer le panneau de verre du cadre de la porte et ins rez le panneau de porte en bois inclus L 3 l aide de vos doigts appuy...

Страница 20: ...ence dudit d faut confirm par le processus d inspection du fabricant Les frais de transport de construction de main d uvre et les frais connexes d coulant de la r paration du remplacement des pi ces d...

Страница 21: ...Fecha de compra _______________________ www greentouchhome com English p 1 Fran ais p 11 MODELO 1200FM 26 201 Chimenea con consola multimedia de 60 INSTRUCCIONES DE ENSAMBLAJE CUIDADO Y USO 21...

Страница 22: ...Central Izquierda 1 D Pared Central Derecha 1 E Panel Exterior Izquierdo 1 F Panel Exterior Derecho 1 G Puerta Izquierda 1 H Puerta Derecha 1 I Estante 2 J Panel Posterior 2 K Base 1 L Panel De Puerta...

Страница 23: ...adera 20 BB Perno 18 CC Arandela 18 DD Tornillo Del Panel Posterior 22 EE Pasador De Repisa 8 FF Aplicador De Retoque 1 CONTENIDO DE HARDWARE NO SE MUESTRAN EN TAMA O REAL PIEZA DESCRIPCI N CANTIDAD A...

Страница 24: ...al B al panel izquierdo central C y el panel central derecho D Inserte los taquetes en los orificios perforados y presione firmemente 1 Inserte dos taquetes AA en cada lado del panel central B Antes d...

Страница 25: ...ZADOS ADITAMENTOS UTILIZADOS Perno Arandela Perno Arandela 3 Inserte cuatro taquetes AA en la base K 4 Coloque el ensamble del Paso 2 en la base K y aseg relo con cuatro arandelas CC y cuatro pernos B...

Страница 26: ...Perno Arandela 6 Inserte dos taquetes AA en los orificios externos superiores en el panel exterior izquierdo E el panel central izquierdo C el panel central derecho D y el Panel exterior derecho F Un...

Страница 27: ...la chimenea A continuaci n presione en la parte posterior del cuerpo de la bisagra hasta que escuche que haga clic y quede en su lugar Repita estos pasos para las otras bisagras Para retirar la puerta...

Страница 28: ...bertura central del ensamble de la repisa Nota NO enchufe el accesorio M en el tomacorriente a n PRECAUCI N NO deslice el accesorio en la parte superior de la madera para evitar rayar la superficie de...

Страница 29: ...de silicona ya que se utilizar para asegurar el nuevo panel 2 Retire el panel de cristal del marco de la puerta y luego inserte el panel de puerta de madera incluido L 3 Presione el borde de silicona...

Страница 30: ...eparaci n reemplazo piezas defectuosas u otra situaci n y el fabricante no asume ninguna responsabilidad por las mismas El fabricante podr bajo su criterio eximirse de toda obligaci n respecto de esta...

Отзывы: