Scosche ITCGM01B Скачать руководство пользователя страница 9

9

MENU NAVIGATION 

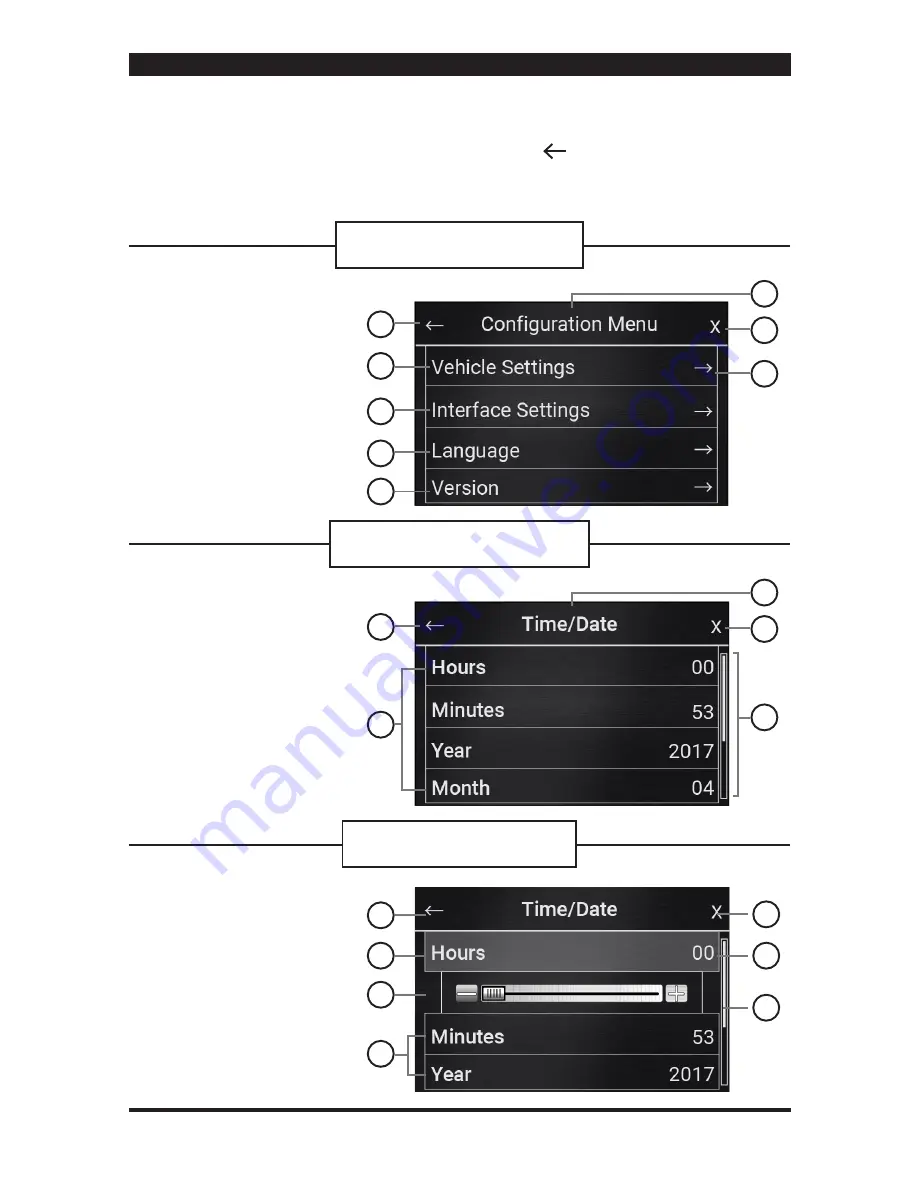
MENU Settings Legend

1.  Return to Previous menu
2. Enter 

Vehicle Settings menu

3. Enter 

Interface Settings menu

4. Enter 

Language selection menu

5.  Enter module 

Version menu

6. Menu title header
7. Close menu settings
8. Arrow indicates more sub-menus 

    for  selected setting

Sub-menu Settings Legend

1.  Return to Previous menu
2.  Sub-menu configuration options
3.  Sub-menu title header display
4.  Close menu 
5. Scrollbar [Scroll Up/Down for more   
    options (Only when displayed)]

Configure Options Legend

1. Return to previous menu
2. Setting highlighted when selected.
3. Setting Scrollbar 


 (Use to customize setting)

4. Options not selected 


(Press to select)

5. Close menu
6. Set setting 


(Use slidebar to customize setting)

7. Scrollbar (when available)

1

2

2

1

6

7

5

3

4

1

5

7

4

6

3

8

2

3

4

5

FIGURE 4 

Navigation of MENU Settings

FIGURE 5 

Navigation of Sub-menu Settings

FIGURE 6 

Configure Setting for Options

The following figures (4-6) are sample menu screen displays to help you navigate and 
understand the menu user interface of the module. Use the        (Return arrow) to go back to 
the previous menu. Press the X to close the menu window and return to the TFT color touch 
screen home screen (see fig. 3 on page 8). For further setting options refer to the 

Vehicle 

Settings Chart on Page 

10,


Interface Settings Chart on page 

11

 & 

Language Setting Chart 

on page 12.


MENU

Press the MENU button (Page 8 Fig.3, #8) to access 

Configuration Menu 

Vehicle/Interface/Language/Version Settings

©2017 SCOSCHE INDUSTRIES, INC.

ITCGM01B     05/17

Содержание ITCGM01B

Страница 1: ...all the parts you need to mount your car stereo or CD player into your vehicle s dash Refer to the individual instruction in this manual to remove your vehicle s factory radio and assemble the kit Da...

Страница 2: ...e of center console s rear panel lift and pull back to remove 9 Extract 3 Phillips head screws behind center console s armrest 10 Extract 1 Phillips head screw in front of beverage holder 11 Use PRT t...

Страница 3: ...s shown below 2 3 Connect and mount the stereo in the dash 3A The main kit panel pocket assembly mounts to the dash over the stereo 3B KIT PANEL HAZARD WARNING FLASHERS Press the Hazard button page 1...

Страница 4: ...trouble Press again to turn the flashers off Located top center of face panel 7147 LEFT MOUNTING BRACKET 7148 RIGHT MOUNTING BRACKET 1 Seek Track UP click SRC button upward 2 Short Press Pick Up Long...

Страница 5: ...Illumination 12V Yellow 12V Constant Power Blue White 12V Amp remote Red 12V Accessory R A P output 3A MAX Lt Blue Yellow Steering Wheel Control output Kenwood 3 5mm Male connector Steering Wheel Con...

Страница 6: ...ouch Screen Interface replaces the factory climate convenience and personalization controls built into the OEM Factory GM Radio system This solution provides improved ergonomics while adding touch scr...

Страница 7: ...de vent outlets Air is directed to the instrument panel vent outlets Air is directed to the instrument panel outlets and the floor vent outlets AIR CONDITIONING To turn the air conditioning ON or OFF...

Страница 8: ...Fig 3 5 button on the color TFT touch screen to turn on the Passenger s seat heater The engine must be running to use heated seats A button graphic will show the level of heat selected Two lights hig...

Страница 9: ...t 5 Close menu 6 Set setting Use slidebar to customize setting 7 Scrollbar when available 1 2 2 1 6 7 5 3 4 1 5 7 4 6 3 8 2 3 4 5 FIGURE 4 Navigation of MENU Settings FIGURE 5 Navigation of Sub menu S...

Страница 10: ...d into Park Auto trans or when Key is removed Manual Trans Delayed Door Lock Delays door locking Remote Lock Unlock Start Unlock Feedback Lights Enable or Disable vehicle s Light Flash when Unlocking...

Страница 11: ...st the Brightness of the Color TFT touch screen PREVIEW WINDOW Provides a quick preview of DAY NIGHT setting changes PREFERENCES Onstar setting options RADIO TYPE Aftermarket Radio Type Steering Wheel...

Страница 12: ...options to select from include English Fran ais Espa ol See page 9 for navigation inquiry VERSION Displays module device version description To return to previous menu simply touch the screen one more...

Отзывы: