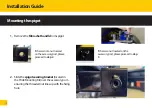
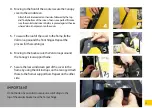
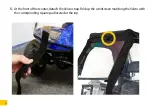
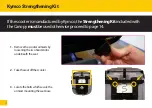
Scooterpac Canopy Скачать руководство пользователя страница 19

8. 

Slide the 

toolless arm bracket

 over 

the arm so that it aligns with the arm 

support on the Canopy.
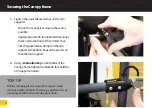
9. 

Slide the 

toolless arm bracket

 into 

the arm support on Canopy.
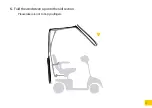
10. 

Tighten the adjustable strap so that 

it is secure on the armrest.

This should be mounted as near 
to the top of the arm as possible.

19

Содержание Canopy

Страница 1: ...UserManual scooterpac canopy EN ...

Страница 2: ...warm and dry Yourtickettostaying allyearround ...

Страница 3: ...fetyNotices BoxContents IntroductiontotheCanopy QuickStartGuide KymcoStrengtheningKit InstallationGuide FoldingtheCanopyaway CaringforyourScooterpacCanopy FAQ Notes Contents Brighten your day 4 5 6 7 9 12 14 28 36 37 38 ...

Страница 4: ...lesecuringpoints Scooterpaccannotacceptliabilityforanyinjurywhichiscausedbythemisuseorfailuretofollowthis manual Scooterpaccannotacceptliabilityforanyloss damageorpersonalinjurytoyourselforotherswhich occursduetousingunsuitablesecuringpointsonthescooterorduetotheCanopynotbeingsecurely andsafelysecuredtothescooter Itisstronglyrecommendedthatyoureadthissectioncarefullybeforeusingthe ScooterpacCanopy...

Страница 5: ...haveallthenecessaryfixingpoints Whenmakinguseofthesidedoorspleaseensurethatthezipsarecompletelyclosed TheCanopyshouldonlybeusedinthefullyunfoldedorfullyclosedpositionwiththeprotective bagcoveringit DonottrytofoldorunfoldtheCanopywhilesittingonthescooter ItisadvisablenottousetheCanopyinwindsabove40mph TheCanopyisdesignedforpavementandroaduseonly Checkallfixingsaresecureanddonotusewithdamagedorfault...

Страница 6: ...BoxContents Frame Cover Doors Bag Spigotx1 M8handwheelx2 M6rachethandlex1 Boltedarmbracketsx2 Locatedontheframe ToollessarmBracketsx2 M8x45mmboltsx3 M10x45mmboltx1 M8nylocnutx1 Velcrosquarepadsx2 6 ...

Страница 7: ...theningplatesx2 Allenkey s 4mm Socketspanner 13mm Spanner 13mm Scissors Includedandtobeuseddependingonthescootermanufacturer ManufacturerToolKits Toolsrequired KymcoStrengtheningKit PrideMountingKit Spigotsecuringbracket 7 ...

Страница 8: ...IntroductiontotheCanopy Luxurywindscreen Easyaccesswindow Basketfixingaccess ColourcodedVelcro Largeaccesszips 8 ...

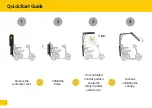
Страница 9: ...Lockingmechanism Universalarmbrackets Mountingspigot Installation 20 minutes Unfolding 30 seconds 9 ...

Страница 10: ...QuickStartGuide Removethe protectivecover Unfoldthe frame Onceunfolded intothisposition ensurethe safetyclipclicks andissecure Continue unfoldingthe Canopy 1 2 3 4 Click 10 ...

Страница 11: ...Zipthedoor fromtheback towardsthe front Repeaton theotherside Unfoldthesidedoorsandmoveintoposition 5 6 7 8 8 simple steps to mobility freedom 11 ...

Страница 12: ...eningKitincludedwith theCanopymustbeusedotherwiseproceedtopage14 KymcoStrengtheningKit 3 Locatetheboltswhichsecurethe armrestmountingtheseatbase 2 Taketheseatoffthescooter 1 Removethescooterarmrestsby looseningthetwohandknobs underneaththeseat 12 ...

Страница 13: ...nandremoveoneofthese bolts 5 Insertthestrengtheningplateand Replacetheboltsandretighten Repeattheprocessontheother sideoftheseat 6 Replacetheseatandarmrests TheKymcoscooterisnowreadyforyourScooterpacCanopy 13 ...

Страница 14: ...spigot 2 Slidethespigotsecuringbracket locatedin thePrideMountingKit overtheaccessoryport ensuringthethreadednutlinesupwiththefixing hole Ifthereisnotanutlocated ontheaccessoryport please proceedtostep2 Ifthereisanutlocatedonthe accessoryport pleaseproceedtostep 3 14 ...

Страница 15: ...matchingsocket spanner Youmayhavetoadjustthealignmentofthe spigottoensuretheM8 M10boltpasses throughthenearestholelocatednearestthe faceofthespigot 3 Insertthespigotintotheaccessoryport underneaththebackofthescooter asfaras itwillgoin Beforeinsertingthespigot ensurethe holesonthespigotmatchuptothehole ontheaccessoryport 15 ...

Страница 16: ... scooter sseat 1 Onthefaceofthespigot equallyloosenoffthetwo M8handwheelswithsix fullturns 2 Ensurethatbothwashes arespacedawayfromthe faceofthespigotandare positionedagainsttheM8 handwheels 3 OntheCanopyframeturn thearmsupportssothat theyarepointingawayto thesidesinrelationtothe frame 4 SlidethemainCanopy frameontothespigotin betweenthewashersand thefaceofthespigot s plate 16 ...

Страница 17: ...ecuringthearmrestonthe seat 3 Removethenutsandboltsonthescooter armrests Toinstalltheboltedarmbracketsproceedtostep2 Toinstallthetoollessarmbracketsproceedstep6 TOP TIP Iftheboltedarmbracketsdonotfitsecurelyaroundthe scooter sarmrestse g thereareplasticshroudssurrounding seatarmsortherearenotthenecessaryfixingpointsto securetheboltedbracket pleaseusethetoollessarm brackets TOP TIP Ifthearmrestsare...

Страница 18: ...armbracket 5 SecurethenutsontheM8boltswithasocketwrenchandspanner TOP TIP Pleasedonotovertightenthenutstoensurethearmrestscanstillberaisedandlowered Toollessarmbrackets 6 Removetheboltedarm bracketfromarmsupports locatedonthesideofthe Canopy 7 Onthetoollessarm bracket unwindthe adjustablestrapsothatit caneasilypassoverthearm 18 ...

Страница 19: ...ketover thearmsothatitalignswiththearm supportontheCanopy 9 Slidethetoollessarmbracketinto thearmsupportonCanopy 10 Tightentheadjustablestrapsothat itissecureonthearmrest Thisshouldbemountedasnear tothetopofthearmaspossible 19 ...

Страница 20: ...TOP TIP Pleasepositionsothatthearmrestscanstillberaisedandlowered Repeatsteps6 10ontheotherarmrest More than halfway there to mobility freedom 20 ...

Страница 21: ...bleandresponsible Alwaysaccountableforouractions Excellence Doourbestandexceedexpectations Surpassordinarystandards Innovation Creatingvalueanddrivingefficiency Pioneersinthemarketplace Integrity Everythingwedoisfair honestandtrustworthy WestandbyourproductsandservicesbecausewefollowTheScooterpacPromise The Scooterpac Promise 21 ...

Страница 22: ...thefrontofthearmrest Then lockthequickreleaseclampsonthearm supportintoposition Repeattheprocesson theotherarmsupport 2 Usinga4mmallenkey onbothsidesofthe Canopyframe tightenthebracketsthatholdthe armsupportsinplace TOP TIP BeforecontinuingpleaseensuretheCanopyisvertical whenviewedfrombehind Ifnecessary adjustthearmsby looseningtheallenboltsandslidingupordown 22 ...

Страница 23: ...ewhenunfolding 4 InserttheM6rachethandleintothespigot Usetheleverasaspannertohelpyousecurethe boltastightlyaspossible Pushtheleverroundto tightenandthenpullitout rotateit allowingitto resettowardsthespigotandthentightenmore Repeatuntiltheboltisfullysecure Click 23 ...

Страница 24: ...Pleasedonotremovethefoamsupportlocatedontheframehinge thisprovidessupporttotheCanopytomaintainsafeoperation ThemainCanopycoverandsidedoorsarelocatedinthefabricbag 2 RemovethemainCanopycoverandsidedoorsfromthebag 3 Workingfromthebackofthescootertowardsthefront laythemainCanopycoverovertheframeensuringthe Scooterpaclogoisattherearofthescooter behindtheseatandfitssquarely 24 ...

Страница 25: ...hecover 5 Tosecuretheroofofthecovertotheframe fixthe Velcrolooparoundthefronthinges Repeatthe processfortherearhinges 6 Movingtotheback securetheVelcroloopsaround theCanopy srearsupportframe 7 Securetherearwindscreenpartofthecovertothe framebyusingtheVelcrostrapsontheCanopy Attach thesetotheframe ssupportbars Repeatontheother side IMPORTANT Onbothsidesitisessentialtosecureonesetofstrapstothe topof...

Страница 26: ...rbothsidedoorsreadyforfitting Repeatsteps2 3fortheothersidedoor 2 EnsurethezippullonthemainCanopycoverisatthe rearofthescooter seearrowdisplayedbelow 3 Lineuptherearofthesidedoorwiththezippull Zip tofullyattachthedoortoCanopy 26 ...

Страница 27: ... pads Thesecanbeadheredtobothsidesofthefront shroudinlinewiththeVelcrosquarepadswhichare stitchedtothemainCanopycover Usingscissors itis importanttotrimoffanyexcessstrap TOP TIP WhenfollowingthesestepspleaseensurethatyoudonotfullytrimtheVelcrostripmentionedabove AsectionofthisVelcroisusedwhenfoldingtheCanopyup seepage32 Scooterswithafrontbumper Scooterswithoutafrontbumper 27 ...

Страница 28: ...FoldingtheCanopyaway 1 AtthefrontoftheCanopyunzipfromthebottom Pleaseensureyouonlyunziphalfwaydownthe backofthedoor 28 ...

Страница 29: ...2 HoldingtheCanopyatthemiddlepoint foldthesidepaneldownbymatchingtheyellowVelcro striplocatedatthetopandbottomofthedoor 29 ...

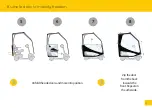
Страница 30: ...3 FoldthedoorpanelstomatchthetwogreyVelcrostrips 30 ...

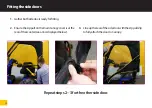
Страница 31: ...4 FoldeachdoorpanelbehindthescootersothatthetworedVelcrostripscanbeattached Repeatsteps1 4fortheotherside 31 ...

Страница 32: ...5 Atthefrontofthescooter detachtheVelcrostrap FoldupthewindscreenmatchingtheVelcrowith thecorrespondingsquarepadlocatedatthetop 32 ...

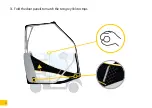
Страница 33: ...6 Foldthewindscreenupontotheroofsection Pleasetakecarenottotrapyoufingers 33 ...

Страница 34: ...7 Pullthesafetyplungerandcarefullyfoldtheframedowntotherearofthescooter 34 ...

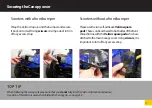
Страница 35: ...8 SlidethebagovertheCanopy 35 ...

Страница 36: ...chiswaterprooftoo Unfortunately this willnotstoptheusualdepositsfindingtheirwayontoit WerecommendcleaningtheCanopywithasmallamountofwashingupliquid mixedwithwateranda sponge PLEASEDONOTUSEBLEACH BeforefoldingupyourCanopyagainpleaseleaveitfullyunfoldedandinawell ventilatedplacetodry 36 ...

Страница 37: ...spushingontheinsideofthe coverremovethebasketfixingaccessstrip see page8 Youcannowfixthebaskettothefrontof yourscooterontheoutsideoftheCanopy WhatshouldIdoifmymirrorsarecatchingthe insideoftheCanopy Switchtheleftandrightmirrorswitheachother Youcanthentwistyourmirrorstoavertical positioninsteadofhorizontal Thiswillensureyour mirrorsarenowclearoftheCanopy WhatisthefullheightoftheCanopyoncefully unfo...

Страница 38: ...Notes 38 ...

Страница 39: ...39 ...

Страница 40: ...Designed in Great Britain NouvotechHouse HarbourRoad OultonBroad Suffolk NR330RU UK tel03301241733emailinfo scooterpac comwebwww scooterpac com SPCA M EN 2020 ...

Отзывы: