


2.34
SEL-351A Relay
Instruction Manual
Date Code 20080213
Installation
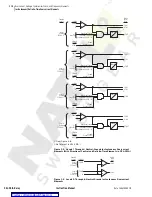
Circuit Board Connections
Circuit Board Connections
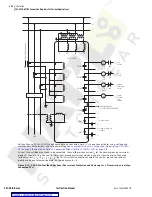
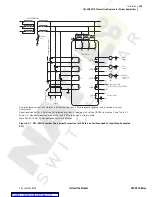
Accessing the Relay
Circuit Boards
To change circuit board jumpers or replace the clock battery on the relay main
board, refer to
and take the following steps:
Step 1. De-energize the relay.
On Connectorized versions this can be easily accomplished by
removing the connector at rear-panel terminals
Z25
and
Z26.
Step 2. Remove any cables connected to serial ports on the front and
rear panels.
Step 3. Loosen the six front-panel screws (they remain attached to the
front panel), and remove the relay front panel.
Step 4. The circuit board corresponds to the top (
A01
to
A28
) row of
rear-panel terminal blocks or connectors and is affixed to a
drawout tray.
On Connectorized versions, remove the rear-panel connectors
by loosening the screws on either end of each connector.
Step 5. Disconnect circuit board cables as necessary to allow the board
and drawout tray to be removed.
a. The ribbon cables can be removed by carefully pulling
the cable away from the connector.
b. The six-conductor power cable can be removed by
grasping the power connector wires and pulling away
from the circuit board.
Step 6. Grasp the drawout assembly of the board and pull the assembly
from the relay chassis.
Step 7. Locate the jumper(s) or battery to be changed (refer to
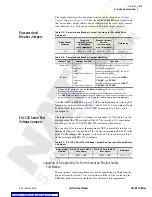
Step 8. Make the desired changes.
Note that the output contact jumpers are soldered in place.
Step 9. When finished, slide the drawout assembly into the relay
chassis.
Step 10. Reconnect the cables removed in
. Replace the relay
front-panel cover.
Step 11. Replace any cables previously connected to serial ports.
Step 12. Replace any rear-panel connectors removed in
Step 13. Reenergize the relay. On Connectorized versions, replace the
power connector at rear-panel terminals
Z25
and
Z26
.
The relay contains devices sensitive
to Electrostatic Discharge (ESD).
When working on the relay with the
front panel removed, work surfaces
and personnel must be properly
grounded or equipment damage may
result.
!
CAUTION
Содержание SEL-351A
Страница 10: ...This page intentionally left blank Courtesy of NationalSwitchgear com ...
Страница 16: ...This page intentionally left blank Courtesy of NationalSwitchgear com ...
Страница 34: ...This page intentionally left blank Courtesy of NationalSwitchgear com ...
Страница 126: ...This page intentionally left blank Courtesy of NationalSwitchgear com ...
Страница 184: ...This page intentionally left blank Courtesy of NationalSwitchgear com ...
Страница 198: ...This page intentionally left blank Courtesy of NationalSwitchgear com ...
Страница 228: ...This page intentionally left blank Courtesy of NationalSwitchgear com ...
Страница 278: ...This page intentionally left blank Courtesy of NationalSwitchgear com ...
Страница 384: ...This page intentionally left blank Courtesy of NationalSwitchgear com ...
Страница 410: ...This page intentionally left blank Courtesy of NationalSwitchgear com ...
Страница 450: ...This page intentionally left blank Courtesy of NationalSwitchgear com ...
Страница 454: ...This page intentionally left blank Courtesy of NationalSwitchgear com ...
Страница 472: ...This page intentionally left blank Courtesy of NationalSwitchgear com ...
Страница 504: ...This page intentionally left blank Courtesy of NationalSwitchgear com ...
Страница 558: ...This page intentionally left blank Courtesy of NationalSwitchgear com ...
Страница 562: ...This page intentionally left blank Courtesy of NationalSwitchgear com ...
Страница 586: ...This page intentionally left blank Courtesy of NationalSwitchgear com ...
Страница 608: ...This page intentionally left blank Courtesy of NationalSwitchgear com ...
Страница 666: ...This page intentionally left blank Courtesy of NationalSwitchgear com ...


