background image

• 22 •

12.  INSTRUCCIONES DE OPERACIÓN

IMPORTANTE: No arranque el vehículo con el cargador conectado a la toma de 

CA, o puede dañar el cargador y su vehículo.

NOTA: Este cargador está equipado con un auto-rectificador. La corriente no 

llegará a las pinzas de la batería hasta que la batería esté apropiadamente 

conectada. Significado, las pinzas no harán corto si se juntan una con otra. 
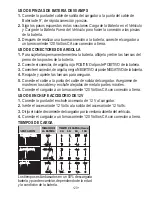
CARGA DE LA BATERÍA EN EL VEHÍCULO

1.  Apague todos los accesorios del vehículo.

2.  Mantenga el cofre abierto.

3.  Limpie las terminales de la batería.

4.  Coloque el cargador sobre una superficie seca y no inflamable.

5.  Coloque los cables de CA / CC lejos de las aspas del ventilador, bandas, 

poleas y otras partes móviles.

6.  Conectar la batería según las instrucciones que indicadas en las secciones 6 y 7.

7.  Conecte el cargador a la toma de corriente.

8.  Cuando la carga está completa, desconecte el cargador de la alimentación de CA, 

retire la pinza del chasis del vehículo y quite la pinza de la terminal de la batería.

CARGA DE LA BATERÍA FUERA DEL VEHÍCULO

1.  Coloque la batería un área bien ventilada.

2.  Limpie las terminales de la batería.

3.  Conectar la batería según las instrucciones que indicadas en las secciones 6 y 7.

4.  Conecte el cargador a la toma de corriente.

5.  Cuando la carga está completa, desconecte el cargador de la corriente AC, 

desconecte la pinza negativa, y por último la pinza positiva.

6.  Una batería marina (de barco) se debe retirar y cargar en tierra.
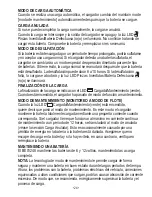
USO DE CONECTORES DE CABLES DE CONEXIÓN RÁPIDA

Conecte cualquiera de los tres (3) puntas de cable de salida al cargador. Asegúrese 

de colocar el cargador sobre una superficie seca y no inflamable.

ADVERTENCIA: Nunca conecte la pinza y las terminales de los conectores de 

argolla juntos, para aplicarlo de otra forma, tal como batería externa u otra fuente 

de poder de carga, o para alargar el cable de salida, esto ocasionará polaridad 

invertida o sobrecarga. 

Содержание BATTERY EXTENDER BE01248

Страница 1: ...AD BEFORE EACH USE This manual will explain how to use the charger safely and effectively Please read and follow these instructions and precautions carefully POR FAVOR CONSERVE ESTE MANUAL DEL USUARIO Y LEALO ANTES DE CADA USO En este manual le explica cómo utilizar el cargador de manera segurayconfiable Porfavor leaysigalassiguientesinstruccionesyprecauciones ...

Страница 2: ...WHEN BATTERY IS INSTALLED IN VEHICLE 6 FOLLOW THESE STEPS WHEN BATTERY IS OUTSIDE VEHICLE 7 GROUNDING AND AC POWER CORD CONNECTIONS 7 ASSEMBLY INSTRUCTIONS 8 FEATURES 8 CONTROL PANEL 8 OPERATING INSTRUCTIONS 9 MAINTENANCE AND CARE 12 TROUBLESHOOTING 12 BEFORE RETURNING FOR REPAIRS 14 SPECIFICATIONS 14 REPLACEMENT PARTS 14 LIMITED WARRANTY 14 WARRANTY CARD 31 ...

Страница 3: ... ESTÉ COLOCADA EN EL VEHÍCULO 19 SIGA ESTOS PASOS CUANDO LA BATERÍA SE ENCUENTRE FUERA DEL VEHÍCULO 20 CONEXIONES ATIERRAY ENERGÍA DE CA 20 INSTRUCCIONES DE MONTAJE 21 CARACTERÍSTICAS 21 PANEL DE CONTROL 21 INSTRUCCIONES DE OPERACIÓN 22 MANTENIMIENTO Y CUIDADO 25 LOCALIZACIÓN Y SOLUCIÓN DE PROBLEMAS 25 ANTES DE DEVOLVER A REPARACIONES 28 ESPECIFICACIONES 28 REPUESTOS 28 GARANTÍA LIMITADA 28 TARJET...

Страница 4: ...re rating of charger as specified in section 8 1 7 Do not operate charger with damaged cord or plug replace the cord or plug immediately 1 8 Do not operate charger if it has received a sharp blow been dropped or otherwise damaged in any way take it to a qualified serviceman 1 9 Do not disassemble charger take it to a qualified serviceman when service or repair is required Incorrect reassembly may ...

Страница 5: ... to weld a ring or the like to metal causing a severe burn 2 8 Use the charger for charging only 6V and 12V LEAD ACID STD GEL orAGM rechargeable batteries It is not recommended for batteries smaller than 7Ah It is not intended to supply power to a low voltage electrical system other than in a starter motor application Do not use battery charger for charging dry cell batteries that are commonly use...

Страница 6: ...c outlet Never allow clips to touch each other 5 2 Attach clips to battery and chassis as indicated in sections 6 and 7 6 FOLLOW THESE STEPS WHEN BATTERY IS INSTALLED IN VEHICLE WARNING A SPARK NEAR THE BATTERY MAY CAUSE A BATTERY EXPLOSION TO REDUCE THE RISK OF A SPARK NEAR THE BATTERY 6 1 Position AC and DC cords to reduce risk of damage by hood door or moving engine part 6 2 Stay clear of fan b...

Страница 7: ...7 4 Position yourself and free end of cable as far away from battery as possible then connect NEGATIVE BLACK charger clip to free end of cable 7 5 Do not face battery when making final connection 7 6 When disconnecting charger always do so in reverse sequence of connecting procedure and break first connection while as far away from battery as practical 7 7 A marine boat battery must be removed and...

Страница 8: ...IONS 9 1 Remove all cord wraps and uncoil the cables prior to using the battery charger 10 FEATURES 4 2 3 1 1 Charging status LEDs 2 Ring connectors quick connect 3 12V accessory plug quick connect 4 Battery clamps quick connect 11 CONTROL PANEL LED INDICATORS CLAMPS REVERSED BAD BATTERY red LED flashing The connections are reversed CLAMPS REVERSED BAD BATTERY red LED lit The charger has detected ...

Страница 9: ...the charger from the AC power remove the clamps from the vehicle s chassis and then remove the clamp from the battery terminal CHARGING A BATTERY OUTSIDE OF THE VEHICLE 1 Place battery in a well ventilated area 2 Clean the battery terminals 3 Connect the battery following the precautions listed in sections 6 and 7 4 Connect the charger to the electrical outlet 5 When charging is complete disconnec...

Страница 10: ...d tighten the nuts to secure 5 Connect the cable to the end of the charger output cord Take care to keep the wires and plug away from metal and moving parts 6 Plug the charger power cord into a grounded 120V AC electrical wall outlet USING THE 12V ACCESSORY PLUG 1 Connect the end of the 12V accessory plug to the charger 2 Insert the 12V accessory plug into the 12V accessory outlet 3 Route the powe...

Страница 11: ...cated by the Charged Maintaining green LED When lit the charger has switched to the maintain mode of operation MAINTAIN MODE FLOAT MODE MONITORING When the Charged Maintaining green LED is lit the charger has started maintain mode In this mode the charger keeps the battery fully charged by delivering a small current when necessary If the charger has to provide its maximum maintain current for a co...

Страница 12: ... clipped to the cables 14 TROUBLESHOOTING PROBLEM POSSIBLE CAUSE SOLUTION Battery clamps do not spark when touched together The charger is equipped with an auto start feature It will not supply current to the battery clamps until a battery is properly connected The clamps will not spark if touched together No problem this is a normal condition All three LEDs come on for 2 seconds then turn off The...

Страница 13: ...6V battery and the total input is less than 1 5 Ah The battery voltage drops to below 12 2V for a 12V battery or 6 1V for a 6V battery in Maintain Mode The battery may be defective Make sure there are no loads on the battery If there are remove them If there are none have the battery checked or replaced The battery may be defective Have battery checked or replaced The battery may be overheated If ...

Страница 14: ...d 12V 17 REPLACEMENT PARTS Ring connectors quick connect 2299002042Z 12V accessory plug quick connect 3899001401Z Battery clamps quick connect 3899001404Z 18 LIMITED WARRANTY WARRANTY NOT VALID IN MEXICO SCHUMACHER ELECTRIC CORPORATION 801 BUSINESS CENTER DRIVE MOUNT PROSPECT IL 60056 2179 MAKES THIS LIMITED WARRANTY TO THE ORIGINAL RETAIL PURCHASER OF THIS PRODUCT THIS LIMITED WARRANTY IS NOT TRA...

Страница 15: ...tness for a particular purpose Further Manufacturer shall not be liable for any incidental special or consequential damage claims incurred by purchasers users or others associated with this product including but not limited to lost profits revenues anticipated sales business opportunities goodwill business interruption and any other injury or damage Any and all such warranties other than the limit...

Страница 16: ...rrectamente conectado y en buenas condiciones eléctricas El tamaño del cable sea lo suficientemente extenso para el amperaje en CA del cargador como se especifica en sección 8 1 7 No utilice el cargador si el mismo posee un enchufe o cable dañado substituya el cable o el enchufe inmediatamente por una persona calificada en el ramo 1 8 No utilice el cargador si el mismo recibió un golpe fuerte si s...

Страница 17: ...ble corriente por al menos 10 minutos y obtenga atención médica en forma inmediata 2 5 NUNCA fume o permita la presencia de chispas o llamas en la proximidad de una batería o motor 2 6 Tenga especial cuidado para reducir el riesgo de dejar caer una herramienta de metal sobre la batería Esto podría provocar chispas o un cortocircuito en la batería o en cualquier otra pieza eléctrica que podría prov...

Страница 18: ...nda y siga todas las instrucciones para el cargador la batería el vehículo y cualquier equipo que se utilice cerca de la batería y el cargador Controle todas las precauciones específicas establecidas por el fabricante de la batería al realizar la carga así también como los índices de carga recomendados 3 6 Determine la tensión de la batería al consultar el manual del usuario del vehículo y asegúre...

Страница 19: ...ectado con el chasis Si el borne negativo hace descarga a tierra con el chasis como en la mayor parte de los vehículos ver el paso 6 5 Si el borne positivo hace descarga a tierra con el chasis ver el paso 6 6 6 5 En un vehículo con descarga a tierra por borne negativo conecte el gancho POSITIVO ROJO del cargador de batería al borne POSITIVO POS P sin descarga a tierra de la batería Conecte el ganc...

Страница 20: ...ría como sea posible 7 7 Una batería marina para barcos se debe retirar y cargar en tierra Para realizar una carga a bordo se necesitan equipamientos especialmente diseñados para uso marino 8 CONEXIONES A TIERRA Y ENERGÍA DE CA 8 1 Este cargador de batería está destinado a un uso en un circuito con tensión nominal de 120 V El enchufe se debe conectar a un tomacorriente adecuadamente instalado y qu...

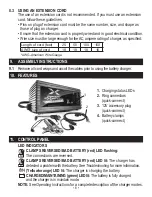
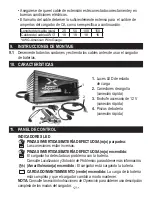
Страница 21: ...rga 2 Conectores de argolla conexión rápida 3 Enchufe accesorio de 12 V conexión rápida 4 Pinzas de batería conexión rápida 11 PANEL DE CONTROL INDICADORES LED PINZAS INVERTIDAS BATERÍA DEFECTUOSA rojo parpadea Las conexiones están inversas PINZAS INVERTIDAS BATERÍA DEFECTUOSA rojo encendido El cargador ha detectado un problema con la batería Consulte Localización y Solución de Problemas para obte...

Страница 22: ...mpleta desconecte el cargador de la alimentación de CA retire la pinza del chasis del vehículo y quite la pinza de la terminal de la batería CARGA DE LA BATERÍA FUERA DEL VEHÍCULO 1 Coloque la batería un área bien ventilada 2 Limpie las terminales de la batería 3 Conectar la batería según las instrucciones que indicadas en las secciones 6 y 7 4 Conecte el cargador a la toma de corriente 5 Cuando l...

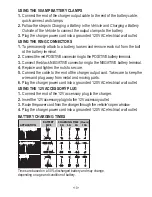
Страница 23: ...de la batería 4 Reajuste y apriete las tuercas para asegurar 5 Conecte el cable a la punta del cable de salida del cargador Asegúrese de mantener los cables y enchufe alejados de metal o partes móviles 6 Conecte el cargador a un tomacorriente 120 Voltios CA con conexión a tierra USO DE ENCHUFE ACCESORIO DE 12V 1 Conecte la punta del enchufe accesorio de 12 V al cargador 2 Isérte el accesorio de 12...

Страница 24: ...argado Mantenimiento verde Cuando está encendido el cargador ha pasado de modo de función a mantenimiento MODO DE MANTENIMIENTO MONITOREO A MODO DE FLOTE Cuando la luz LED Cargado Mantenimiento verde está encendido quiere decir que pasó al modo de mantenimiento En este modo el cargador mantiene la batería totalmente cargada mediante una pequeña corriente cuando corresponda Si el cargador tiene que...

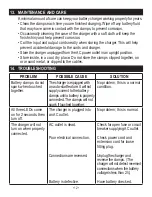
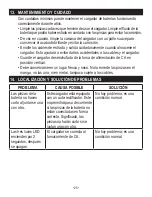
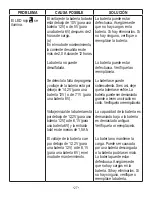
Страница 25: ...gador Guarde el cargador desenchufado de la toma de alimentación de CA en posición vertical Debe conservarse en un lugar fresco y seco No lo enrede las pinzas en el mango no las una ni en metal tampoco sujete a los cables 14 LOCALIZACIÓN Y SOLUCIÓN DE PROBLEMAS PROBLEMA CAUSA POSIBLE SOLUCIÓN Las pinzas de la batería no hacen corto al juntarse una con otra Este cargador está equipado con un auto r...

Страница 26: ...uministren energía al tomacorriente de CA Controle la posible pérdida del enchufe perteneciente a los cables de alimentación o al alargador Desenchufe el cargador y alicates inversa El cargador no detecta conexión inversa cuando el voltaje de la batería está por debajo de 2V Haga revisar la batería No puedo seleccionar los 6 o 12 Voltios El cargador está equipado con Detección de Auto Voltaje que ...

Страница 27: ...o de 12 2V para una batería 12V o de 6 1V para una batería 6V en el modo de mantenimiento La batería puede estar defectuosa Asegúrese de que no hay cargas en la batería Si hay eliminarlos Si no hay ninguno verifíque o reempláce la batería La batería puede estar defectuosa Verifíquela o reemplácela La batería se puede sobrecalienta Si es así deje que la batería se enfríe La batería puede ser demasi...

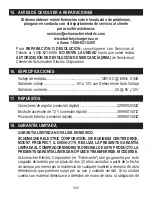
Страница 28: ...6V y 12V 17 REPUESTOS Conectores de argolla conexión rápida 2299002042Z Enchufe accesorio de 12 V conexión rápida 3899001401Z Pinzas de batería conexión rápida 3899001404Z 18 GARANTÍA LIMITADA GARANTIA LIMITADA NO VALIDA EN MEXICO SCHUMACHER ELECTRIC CORPORATION 801 BUSINESS CENTER DRIVE MOUNT PROSPECT IL 60056 2179 REALIZA LA PRESENTE GARANTÍA LIMITADAAL COMPRADOR MINORISTAORIGINAL DE ESTE PRODUC...

Страница 29: ...esponsable ante reclamos por daños accidentales especiales ni directos en los que incurran los compradores usuarios u otras personas asociadas al producto incluidas a título enunciativo los ingresos y ganancias no percibidos ventas anticipadas oportunidades comerciales el buen nombre la interrupción de la actividad comercial o cualquier otro daño que haya provocado Todas las garantías excepto la g...

Страница 30: ... 30 ...
Страница 31: ...ration 801 Business Center Drive Mount Prospect IL 60056 2179 Name_______________________________________________________________ Street Address________________________________________________________ City_________________________________ State__________ Zip Code__________ Phone______________________ Email____________________________________ Store Name Where Purchased____________________ Date of P...

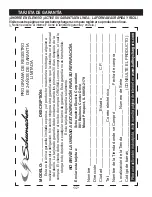
Страница 32: ... Corporation 801 Business Center Drive Mount Prospect IL 60056 2179 Nombre_____________________________________________________________ Dirección____________________________________________________________ Ciudad___________________________Estado_____________ C P ______________ Tel _________________________ Correo electrónico_ _ ________________________ Nombre de la Tienda donde se Compró__________...

Отзывы: