Schuchmann freddy Скачать руководство пользователя страница 17

17

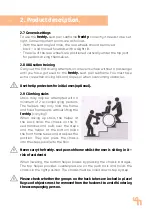
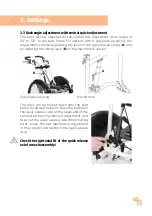
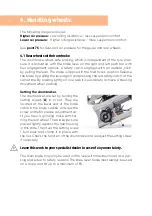
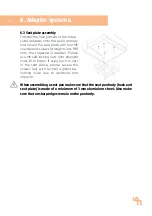
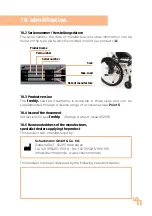
5.3 Knee lever brake

The knee lever brake serves as a parking bra-
ke. Check that the brakes are in perfect wor-
king order and check the air pressure in the 
rear wheels before each use. The brake is ap-
plied in the direction of travel by swinging the 
brake lever. The correct distance between the 
tyres and brake is important for the correct 
function of the brake. It should be approx. 2 
cm with the brake released. This size can vary 
somewhat depending on the tyre pressured or 
the type of tyre used.

Guide: 

The tyres should always be pressed 

in lightly by the applied brake. It is possible 
to adjust the brake by release the two Allen 
screws on the clamping block (

A

). Firmly tighten the screws again.
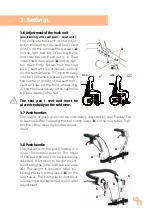
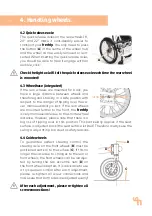
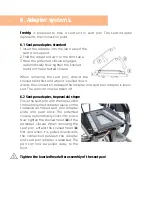
5.4 Footrests

There are different footrest variants for the 

freddy.

, which are fixed to the seat frame at 

the base plate for external adapters. After in-
serting the knee angle in the footboard ad-
apter under the base plate and setting the 
depth, the footrest is tightened with the two 
wind screws (

B

). The knee angle can be ad-

justed and the lower leg length individually 
adapted. Foot benches can be folded up and 
the angle adjusted depending on the variant. 
Tighten the corresponding screw connections 
after all adjustments. In addition, there are 
two further footrest versions. The first can be 
adjusted in height and width and can be pi-
voted. The second has additional knee angle 
adjustment and is equipped with calf plates. 
The pivot point of the angle adjustment has 
been adapted to the physiological knee joint.
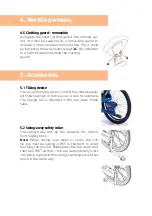
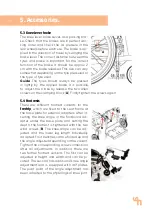
5. Accessories.

A

B

B

Содержание freddy

Страница 1: ...Instructions for use freddy The compact seat pan subframe freddy...

Страница 2: ...for use carefully prior to initial commissioning of the product and to observe them Please note that gui delines and representations in these Instructions for use may deviate from your product due to...

Страница 3: ...9 2 8 Utilisation training 09 2 9 Climbing stairs 09 3 Settings 10 3 1 Seat tilt 10 3 2 Back angle adjustment with snap joint 10 3 3 Back angle adjustment with central quick adjustment 11 3 4 Seat hei...

Страница 4: ...repairing the tyres 21 7 6 Wheel sizes recommended air pressure 21 8 Technical data 22 9 Guarantee 23 10 Identification 24 10 1 EC declaration of conformity 24 10 2 Seriennummer Herstellungsdatum 25 1...

Страница 5: ...ironment to prevent environmental pollution and to improve the recycling of raw materials please note the dis posal instructions in points 1 3 1 and 1 3 2 1 3 1 Packaging The product packaging should...

Страница 6: ...ip it on the left and right of the frame and carry it to the required loca tion To transport the upright trainer reduce all adjustments to their most compact size fold up foot bench remove rear wheels...

Страница 7: ...it by fixed frame parts The clamp lever on the push bars and the quick release on the back must always be tightened freddy may not be used as a showering chair and may not be subjected to sea water an...

Страница 8: ...ake with bracket 2 7 Product overview The Fig below is intended to show you the designation of the most import ant components as well as the terms which you will find in these Instructions for use Ant...

Страница 9: ...only be attempted with a minimum of 2 accompanying persons The helpers may only hold the frame and fixed frame parts without lifting the freddy carrying When driving up stairs the helper at the back h...

Страница 10: ...ist by lightly pulling or pushing Once the required seat angle has been achie ved the gas pressure spring is blocked again by releasing the trigger lever There is an increased risk of tipping over wit...

Страница 11: ...and by releasing the clamp lever B for the mechanical version The back can be folded down onto the seat frame for easier transport Press the button on the quick release axle on the lower end of the ce...

Страница 12: ...e adjusted Loosen the screw connections B for this and aligned to the corresponding hole dis tance in the same way as the horizon tal tubes have been adjusted Tighten the screw connections again after...

Страница 13: ...ig 2 the manoeuvrability of the subframe will be adversely affected The seat pan seat unit must be placed centrally on the subframe 3 7 Push handles The height of push grips can be individually adjust...

Страница 14: ...the same time By braking lightly on one side it is possible to achieve a steering movement when pushing Setting the drum brakes The drum brakes are set by turning the setting screws A in or out They a...

Страница 15: ...wheels are mounted further to the front the freddy is very manoeuvrable due to the shorter wheel distance However please note that there is a big risk of tipping over in this position This particular...

Страница 16: ...The accompanying person can tilt the chassis easier with the tipping bar to drive over a curb for example The tipping bar is mounted in the rear lower frame tube 5 2 Swing away safety roller The swing...

Страница 17: ...A Firmly tighten the screws again 5 4 Footrests There are different footrest variants for the freddy which are fixed to the seat frame at the base plate for external adapters After in serting the knee...

Страница 18: ...on between the adapter and seat pan adapter is relea sed The pan can now be taken off 6 2 Seat pan adapter trapezoidal shape Place the seat pan with the trapezoidal shaped mounted adapter piece on the...

Страница 19: ...pter Please use M6 self locking nuts min strength class 8 to fasten If using push in nuts in the seat place please secure the screws e g with Loctite against be coming loose due to vibrations and impa...

Страница 20: ...r who supplied you with the product stating the serial number of the seat pan subframe see point 10 5 7 4 Duration of use and re use The expected duration of use of our product dependent on the usage...

Страница 21: ...reign particles Check the tyre pressure after mounting or repair Tyre pressure in line with the regulations and tyres in perfect condition are important requirements for safety and way the seat pan su...

Страница 22: ...n rear wheels with clothing guard max outer width of seat pan 39 cm 44 cm 49 cm 54 cm D Frame width innen 28 cm 33 cm 38 cm 43 cm au en 35 cm 40 cm 45 cm 50 cm E Seat frame width 25 cm 30 cm 35 cm 35...

Страница 23: ...antee period shall begin with the delivery or handover of the goods Should a verifiable material or manufacturing fault occur within this time pe riod we shall after carriage paid return to us view th...

Страница 24: ...ication of risk management on medical products DIN EN 12183 Wheelchairs powered through muscle force requirements and test procedures ISO 7176 1 Wheelchairs Determination of the static strength ISO 71...

Страница 25: ...erse range of accessories see Point 5 10 4 Issue of the document Instructions for use freddy Change status H Issue 09 2018 10 5 Name and address of the manufacturer specialist dealer supplying the pro...

Страница 26: ...schuchmann de...

Отзывы: