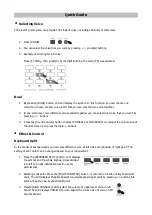
Schubert Subi88P2 Скачать руководство пользователя страница 23


Sound Console 

Press [SOUND CONSOLE] button, the piano enters the selection state of the sound console Menu. You can 
choose your required function by the loop choice or exit the sound console status if you press the SOUND  
[CONSOLE] button continuously. You can adjust your required parameter by the DIGIT+/-] Buttons after the 
piano has entered into one certain status of the sound console. The adjustment parameter as follows. 
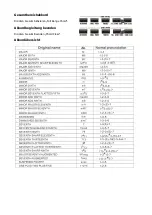
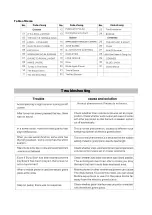
Adjustment content 

LCD display 

Adjustment range 

Default value 

The Volume of upper layer voice in right hand. 

VOICER1V 

0…31 

30 

The Volume of lower layer voice in right hand. 

VOICER2V 

0…31 

25 

The Volume of upper layer voice in left hand. 

VOICELV 

0…31


12 

The volume of the drums. 

DRUM VOL 

0…31


25 

The volume of the bass. 

BASS VOL 

0…31


28 

The volume of the chord. 

CHORDVOL 

0…31


28 


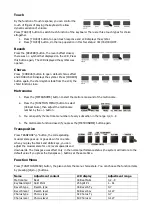
Style & Function of style 

Selecting Style 

This electric grand piano provides dynamic style and accompaniment model that suitable for many popular 
voice, there are 118 kinds of style altogether. (Please refer the table of style in the appendix). 

1.


Press [STYLE] button to enter the status of selecting style.  

2.


Select the style you require by pr/- and digit buttons.  
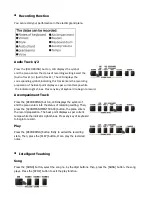
Intro/Ending 

In default setting, press the button to play rhythm. Press 
“START/STOP” button to exit other functions. 
 

Sync 

Press “SYNC” button to start sync accompaniment function and press any key of 19 keys in left hand to start 
rhythm synchronously. If chord function is started, press any key 
of19 keys in chord area to start auto chord synchronously. If a 
rhythm is being played. Press “SYNC” button to stop rhythm and 
start sync accompaniment function. If sync function has been 
started, press “SYNC” button to exit sync function.  


Fill-In 1/ Fill-In 2 

Each accompaniment has its own variation to enhance  
performance effect. During the process of the style playing, press 
[Fi l l- In 1] button, the LCD displays NOR flashing or press [Fill 
In 2] button ,the LCD displays the VAR flashing , insert a 
interlude in playing style ,then, return to original main Section 
style to continue playing.


Start/Stop 

In default setting, press the button to play rhythm. Press 
“START/STOP” button to exit other functions. 

Содержание Subi88P2

Страница 1: ...88 Tasten E Piano 10006325 ...

Страница 2: ...itel Wiedergabe Transposition Transposition 7 Funktionsmenü 8 LCD Anzeige 9 Demo Stil Instrumentenstimme 10 Titel Lernen 1 Lernen 2 Lernen 3 11 Digitalregler 12 Keyboard teilen Dual Berührung Hall Chor 13 Speicherbänke M1 M2 M3 14 Ein Ausschalter LCD Anzeige 1 Nummernanzeige 2 Buchstabenanzeige 3 Lautstärke 4 Instrumentenstimme 5 Stil 6 Lied 7 Geschwindigkeit 8 Hall 9 Chor 10 Dual 11 Teilen 12 Akk...

Страница 3: ...deckung Notenständer Aufbau Ziehen den Notenständer aufrecht nach oben bis dieser steht Die Feder springt nun nach außen Stecken Sie nun den Federbügel auf den oberen Holzdeckel des Pianos Der Notenständer befindet sich nun an der richtigen Stelle Abbau 1 Ziehen Sie den Notenständer nach oben bis dieser senkrecht ist 2 Klappen Sie den Federbügel ein Notiz Sie müssen zum Vermeiden von Schäden ein S...

Страница 4: ...nnen Sie auch einen externen Verstärker oder andere Hifi Geräte anschließen Schalten Sie zuerst alle Geräte ab verbinden Sie die Geräte über den Line Ausgang und Eingang MIDI 1 MIDI Eingang Verbinden Sie diesen Anschluss mit einem MIDI Ausgang eines anderes Geräts Das Piano kann externe Daten über MIDI empfangen 2 MIDI Ausgang Schließen an diesen Anschluss einen MIDI Ausgang eines anderen Gerätes ...

Страница 5: ... gleichzeitig wiedergegeben 2 Sie können den Dual Effekt mit einstellen 3 Drücken Sie Sound Console um zwischen VOICER1V oder VOICER2V zu wechseln Sie können die beiden verschiedenen Lautstärken mittels regulieren Effekte Einstellungen Keyboard teilen In diesem Modus könne Sie die beiden Hälften des Keyboards mit verschiedenen Instrumentenstimmen belegen 1 Drücken Sie Keyboard Split und das entspr...

Страница 6: ...rücken Sie zum Aktivieren Metronom 2 Drücken Sie zum Einstellen des Takts Function Menu und danach entweder oder die entsprechende Nummerntaste 3 Dieser Bereich liegt von 0 9 4 Um das Metronom abzuschalten drücken Sie erneut Metronom Transposition Drücken Sie Transpose und die entsprechenden Töne werden angehoben bzw abgesenkt max 12 Drücken Sie gleichzeitig um den Standardwert 0 zu wählen Funktio...

Страница 7: ...et sich im Anhang 1 Drücken Sie Style 2 Drücken Sie zum Wählen entweder oder geben Sie die Nummer des gewünschten Stils direkt ein Intro Ende Drücken Sie vor Beginn die Taste wird ein Intro gespielt Drücken Sie die Taste während des Spiels wird ein Ende wiedergegeben Synchronisieren Drücken Sie Sync um die synchronisierte Begleitung zu starten Drücken Sie eine der 19 Tasten auf der linken Seite um...

Страница 8: ...Akkord auswählen Die Bedienung erfolgt wie hier beschrieben z B C Akkord C Großer Akkord spielt Hauptton Cm Kleiner Akkord spielt Hauptton und je eine schwarze Taste links und rechts gleichzeitig C7 Sieben Akkord spielt Hauptton und je eine weiße Taste links gleichzeitig Cm7 Kleiner Sieben Akkord spielt den Hauptton und eine schwarze und eine weiße Taste links gleichzeitig Fingerakkord Bei diesem ...

Страница 9: ...Gesamtbereichakkord Drücken Sie zum Aktivieren Full Range Chord Akkordbegleitung beenden Drücken Sie zum Beenden Chord Close Akkordübersicht ...

Страница 10: ...rlampe leuchtet Drücke Sie zum Starten der Aufnahme eine beliebige Taste Begleitungstitel Drücken Sie Recording das entsprechende Symbol wird nun angezeigt und das Gerät befindet sich im Aufnahmemodus Drücken Sie nun Accompaniment Track Der Taktpunkt wird angezeigt und die Indikatorlampe leuchtet Drücke Sie zum Starten der Aufnahme eine beliebige Taste Wiedergabe Drücken Sie Recording um den Aufna...

Страница 11: ...Song und wählen Sie mit das Lernlied Die Hauptmelodie wird nicht wiedergegeben Sie müssen die Hauptmelodie anhand der angezeigten Noten selber spielen Die Hintergrundmelodie wird für die Dauer des Liedes wiedergegeben Statusspeicher Sie können Ihre beliebstesten Instrumenten Einstellungen speichern um diese leichter wieder aufzurufen Folgende Daten werden gespeichert Begleitungseinstellungen Stil ...

Страница 12: ...uelle Ton gehalten Beim Loslassen hört Ton sofort auf Aufbau des Standfußes 1 Wie auf den folgenden Bildern zu sehen befestigen Sie zuerst den Fuß und befestigen Sie diesen mit M4 5x59 Schrauben 2 Befestigen Sie nun den rechten und linken Fuß an der rechten und linken Halteplatte und diese dann an den mittleren Pedal und Stützplatten mittels M6x60 Schrauben 3 Platzieren Sie nun das Piano auf der U...

Страница 13: ......

Страница 14: ...Anhang Instrumentenstimmen ...

Страница 15: ...Stile ...

Страница 16: ...nomen Klangunterschiede bei Beispieltönen Bei der Funktion Halten Wird jeder Ton unterschiedlich lange gehalten Normales Phänomen Die Haltedauer wird an den Ton angepasst Fehlfunktion der Lautstärke bzw Begleitungslautstärke Prüfen Sie die Lautstärkeeinstellungen Während der Synchronisation funktioniert die automatische Begleitung nicht Prüfen Sie ob Einzel oder Fingerakkord aktiviert sind drücken...

Страница 17: ...hränkungen pro Tag Monat Jahr sowie über etwa anfallende Kosten bei Abholung entnehmen Sie bitte den Informationen der jeweiligen Gemeinde Hinweise zur Batterieentsorgung Batterien dürfen nicht in den Hausmüll gegeben werden Als Endverbraucher sind Sie zur Rückgabe gebrauchter Batterien gesetzlich verpflichtet Sie können Batterien nach Gebrauch in der Verkaufsstelle oder deren unmittelbarer Nähe z...

Страница 18: ...u Sound Console Button 8 LCD Display Screen 9 Demo Style Voice Button 10 Song Teaching1 Teaching2 Teaching3 11 Digit Control button 12 Keyboard Split Dual Touch Reverb Chorus 13 Store M1 M2 M3 Memory Bank Button 14 Power Switch Button LCD Display Screen 1 Digital Display Area 2 Characters Display Area 3 Volume 4 Voice Selection 5 Style Selection 6 Song 7 Tempo 8 Reverb 9 Chorus 10 Dual 11 Keyboard...

Страница 19: ...he keyboard Music stand Raise music stand Pull the music stand up untill it was upright Now the spring bounces outside put the spring bracket on the top wooden cover of the piano the music stand will stand on the top wooden cover of the piano in a slant way Put down the music stand 1 Pull the music stand up untill it was upright 2 Fold the spring bracket inside Notice you need to lay EPE slice as ...

Страница 20: ...fi equipment Insert another end of audio LINE OUT in LINE OUT jack in the reverse of the electric grand piano MIDI 1 MIDI input connect MIDI input jack with MIDI output jack of another electronic equipment which is compatible with MIDI through the MIDI connection line the electric grand piano can receive the data of external MIDI equipment though the MIDI input 2 MIDI output connect the MIDI outpu...

Страница 21: ...CER1V or VOICER2V It can adjust the volume size of the dual voice if you press the digit buttons Effect Control Keyboard Split In the model of keyboard split you can play different voice at left side and right side of split point The setting of split point can be changed based on your requirement 1 Press the KEYBOARD SPLIT button LCD displays the symbol and the whole keyboard was divided into left...

Страница 22: ...ON MENU button to select 04 Beat Num then adjust the metronome number by the button 3 You can specify the metronome number of every subsection in the range 0 2 3 9 4 The metronome function closed if you press the METRONOME button again Transposition Press TRANPOSE button the corresponding musical scale goes up or goes down for one note when you play the black and white keys you can adjust the musi...

Страница 23: ... style altogether Please refer the table of style in the appendix 1 Press STYLE button to enter the status of selecting style 2 Select the style you require by pressing and digit buttons Intro Ending In default setting press the button to play rhythm Press START STOP button to exit other functions Sync Press SYNC button to start sync accompaniment function and press any key of 19 keys in left hand...

Страница 24: ...sound and a black key on its left side at the same time C7 7 chord play root sound and a white key on its left side at the same time Cm7 Small 7 chord play root round and a black and white key on its left side at the same time Fingered In this model the notes you play at left hand area of keyboard split point is the default No 25 key in auto accompaniment decide chord that has different accompanim...

Страница 25: ...hord was started you can play the chord sound on the full keyboard the fingering is the same as that of the fingered Chord Close Press the CHORD CLOSE button after the chord was started the chord accompaniment sound stops the style continues to play Table of Chord ...

Страница 26: ... to record Accompaniment Track Press the RECORDING but ton LCD displays the symbol of and the piano enters into the status of recording waiting Then press the ACCOMPANIMENT TRACK button the piano enters the record preparation The beat point displays as per current tempo while the indicator Light shines Press any key of keyboard to begin to record Play Press the RECORDING button firstly to exited t...

Страница 27: ... to enter the teaching 3 model then press SONG button the song plays after that press the DIGIT button to select the teaching song the main melody doesn t play The consumers press the corresponding keys depends on the notes that displayed on the LCD then the next note can play The background sound will play this subsection repeatedly It won t stop untill the song was over State Memory This instrum...

Страница 28: ...in Pedal the playing has a prolonged effect release the pedal the prolonged sound will stop immediately Installation of the Piano body 1 As shown in the figure first assemble the foot into one body and fix with two pieces of M4 5x59 screws separately 2 As shown in the figure connect left and right foot and left and right support plates with pedal bracket and front baffel plate and fix with four pi...

Страница 29: ......

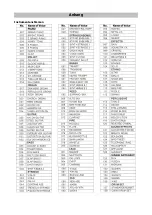
Страница 30: ...Appendix Table of Voice ...

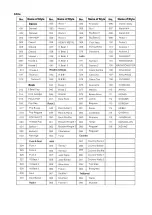
Страница 31: ...Table of Style ...

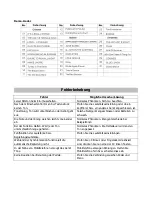
Страница 32: ...Table of Demo Troubleshooting ...

Отзывы: