Schmidt 4 Скачать руководство пользователя страница 5


Tel:  800/323-1332 

Geo. T. Schmidt, Inc.    6151 W. Howard Street 

Tel:  847/ 647-7117 

Fax: 800/934-3437 

Niles, Illinois 60714-3488 

Fax: 847/ 647-7593 

 www.gtschmidt.com 


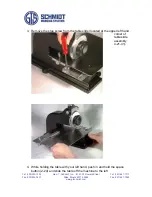
7.  Lift the table slide assembly 

from the machine base and 
remove. 


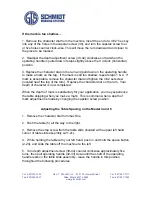
8.  Unscrew the depth adjustment screw (39-44) from the ram. The ram can 

then be pushed down and off the machine. 


Note: Occasionally, the gib (27, located on the left hand side of the dove-tail 
section) will drop off the machine when removing the ram. 
To re-install the gib, hold the gib in place while installing the new ram. The gib 
should be flush with the face of the casting, otherwise it will interfere with the 
character dial during operation.  There are three set screws (gib screws) with jam 
nuts that hold the gib in place.  The screws may have to be loosened in order to 
install the new ram (28).  When the new ram is in place, snug up the screws and 
then tighten the jam nuts.  Make sure that the ram (28) has free up and down 
motion when you pull down on the operating handle (32-33). If the ram does not 
travel freely, loosen the gib screws slightly and snug the jam nuts. 


Содержание 4

Страница 1: ...wear We recommend replacing the depth adjustment screw part number 033086 detail 39 44 at the same time the ram is replaced The most common adjustments are for tag thickness and table spacing The following tools will be needed to service the Model 4 and 6 3 32 long arm hex key 3 16 long arm hex key 5 16 box open end wrench 3 8 box open end wrench 6 adjustable wrench slotted blade screwdriver 6 inc...

Страница 2: ...tails removing the ram while section two details replacing the ram Upon completing the removal and replacement it is necessary to adjust the machine for the thickness of the tag you are marking Please see the section Adjusting the Model 4 or 6 for Tag Thickness to properly adjust the machine Removing the Ram 1 Unscrew the slotted screw in the center of the dial knob 45 and remove the character dia...

Страница 3: ...linois 60714 3488 Fax 847 647 7593 www gtschmidt com 3 Remove the stop screw from the table slide located at the upper left hand corner of table slide assembly 4 21 41 4 While holding the table with your left hand push in and hold the space button 2 24 and slide the table off the machine to the left ...

Страница 4: ...hine upside down and remove connector link 36 by pushing in on the space button 2 24 Occasionally the nut and screw on the bell crank 17 must be loosened to remove connector link 6 Remove the four 20 socket head cap screws from the table slide assembly They are located at bottom mid section of table slide and hold the table slide assembly to the machine casting ...

Страница 5: ... when removing the ram To re install the gib hold the gib in place while installing the new ram The gib should be flush with the face of the casting otherwise it will interfere with the character dial during operation There are three set screws gib screws with jam nuts that hold the gib in place The screws may have to be loosened in order to install the new ram 28 When the new ram is in place snug...

Страница 6: ...he new ram from the bottom up through the dove tail section of the casting then replace plunger spring 46 into hole at top of casting and screw the depth adjustment screw into the ram until the operating handle can be pulled down no further than the 9 o clock horizontal position 3 Re install the table slide assembly 4 21 41 onto the machine base using the four 20 socket head cap screws 4 Turn the ...

Страница 7: ...ll control the depth of mark and avoid bending the depth adjustment screw and breaking the ram Place a tag to be marked in the Table Gauge Assembly 41 73 or in your current tag fixture or nest and pull down on the operating handle Is there a mark Is the mark too deep or too shallow If the mark is too deep 1 Remove the character dial from the machine Insert the end of a 3 32 hex key into any of the...

Страница 8: ...l and tighten the 3 32 set screw located near the top of the ram Replace the character dial on the ram Your depth of character is now completed When the depth of mark is satisfactory for your application you may experience the table skipping when you make a mark This is common when a depth of mark adjustment is made by changing the capstan screw position Adjusting the Table Spacing on the Model 4 ...

Страница 9: ...erly the top of the pawl should be flush with the top of the flat gear on the escapement wheel assembly You should be able to run a fingernail across the flat starburst gear and across the pawl assembly To adjust the pawl assembly height continue with the following steps 7 Turn machine upside down and locate the nut and screw on the bell crank 17 8 Loosen the nut on the bell crank 9 Turn the screw...

Страница 10: ...e table back onto the machine and replace the stop screw on the table slide assembly 13 Install the character dial on the machine Important Note It is crucial that when making a mark with your Model 4 or 6 the operating handle should not be pulled down past the 9 o clock horizontal position The head of the depth adjustment screw 39 44 should hit the machine casting when the operating handle is pul...

Отзывы: