background image

53

Elevator positioning system USP 30 / 100

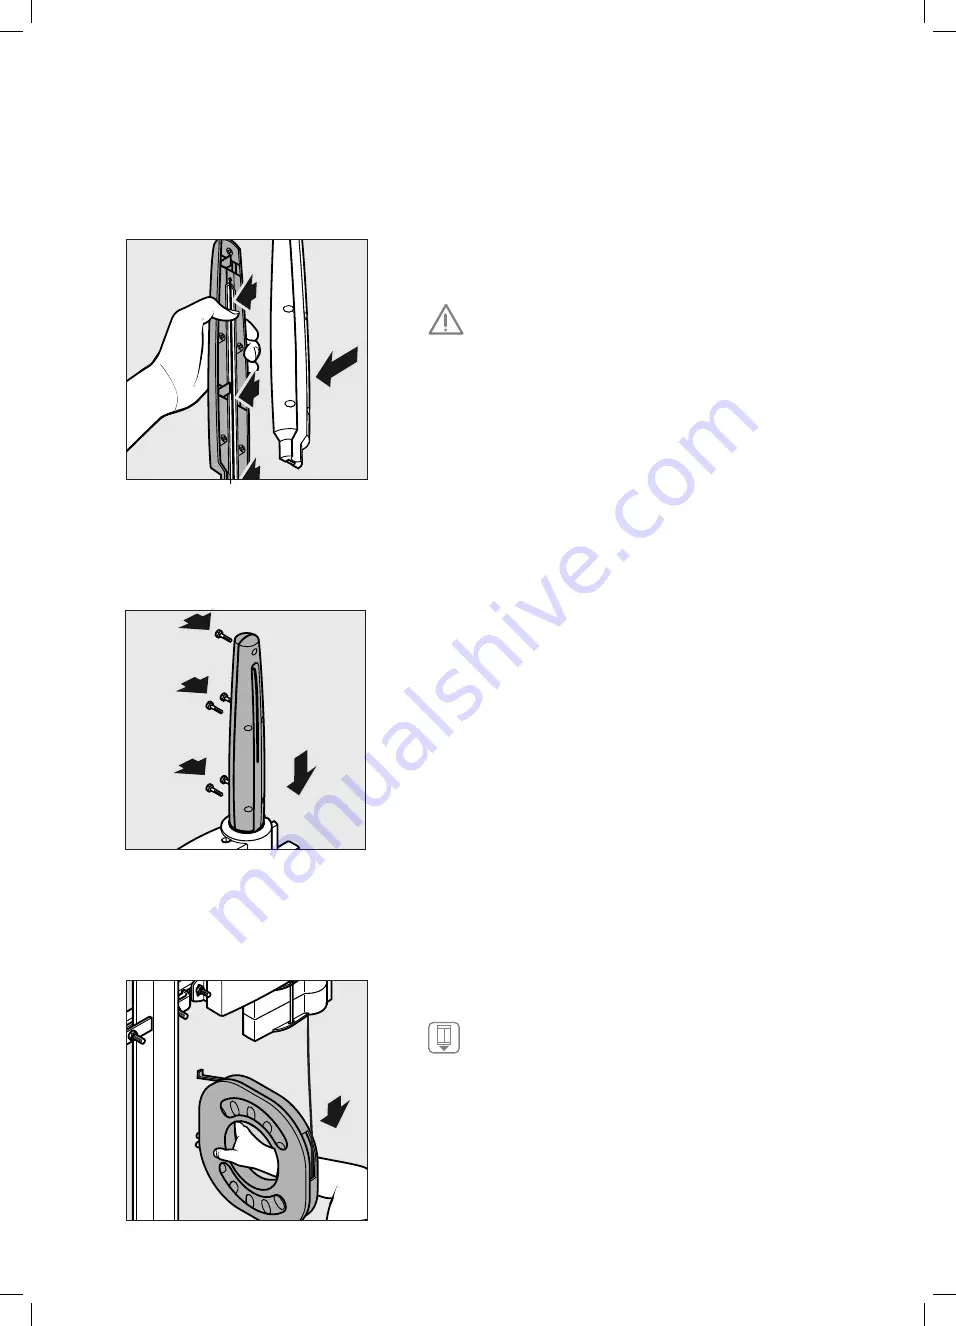
Align the signal wire centrally along the length of the damper 
mat. Ensure that the wire runs straight out of the damper. Now 
fix the second half of the damper, as illustrated. Hold the two 
halves of the assembled damper together by hand.

Follow this installation step very carefully. Signal wire and 
damper housing must not touch as this will result  
in a reflection of the ultrasonic signal and will therefore 
influence the function of the USP.

Insert the damper into the retainer.

Attach the two halves of the damper, held together, with the cap-
tive screws provided.

Mounting the signal wire

Take the mounting device and hold it in such a way that the wire 
is slightly tensioned. Remind it manually, if necessary. 

Ensure that the side links on the mounting device are pulled 
outwards and the wire can be pulled out straight into the 
shaft pit.

Travel in ”inspection travel” mode down to the shaft pit.

Ensure enough wire is pulled out straight and free from the 
mounting device! It must always be under slight tension. It  
must not be pulled or stretched over the edge of the opening.  
If the controller requires a two-hand-operation for the inspection 
ride, a second person must operate this bottom.

6

7

8

USP_Montage_GB.indd   53

18.02.2013   15:39:45

Содержание USP 100

Страница 1: ...Aufzug Positionssystem USP 30 100 Elevator positioning system USP 30 100 Montageanleitung Mounting instruction USP_Montage_Um indd 1 18 02 2013 15 36 30 ...

Страница 2: ...USP_Montage_Um indd 2 18 02 2013 15 36 30 ...

Страница 3: ...chtkopf 9 Abrollen des Signaldrahtes 11 Kontrollfahrt 16 Wartung 16 Empfängermontage in der Schachtgrube 17 Ablängen des Signaldrahtes 20 Kontrollfahrt 24 Montage des Korrektursensors und der Betätigungsmagnete für das System USP 100 25 Montage des Korrektursensors 25 Montage der Betätigungsmagnete 26 Initialisierungsfahrt mit dem System USP 100 27 Anschlussplan 28 Bedeutung der LED Zustandsanzeig...

Страница 4: ...bstständig durchgeführten Änderungen oder Ergänzungen innerhalb des USP oder an einzelnen Bauteilen des USP durchgeführt werden dürfen Haftungsausschluss Der Hersteller haftet nicht gegenüber dem Käufer dieses Produkts oder Dritten für Schäden Ver luste Kosten oder Ausgaben die vom Käufer oder Dritten verursacht wurden aufgrund von Unfall Missbrauch des Produktes falscher Montage oder unerlaubten ...

Страница 5: ... Montage Sperren Sie Gefahrenbereiche ab Schützen Sie Ihre Gesundheit Tragen Sie Arbeitskleidung Arbeitsschuhe Schutzhelm und Schutzhandschuhe Der Signaldraht enthält Nickel bestandteile Bei Personen mit Nickelallergien kann ein Kontakt mit dem Signaldraht zu Hautausschlägen führen Das Drahtende ist scharfkantig Tragen Sie Schutzhandschuhe Der Signaldraht steht unter federnder Spannung Bei Montage...

Страница 6: ...ahtes in Richtung Schachtgrube und Schachtkopf aus Der wahlweise in der Schachtgrube bzw im Schachtkopf be findliche Empfänger wandelt das ankommende mechanische Signal in einen elektronischen Positionswert um Dieser Posi tionswert steht der Steuerung als serielle Dateninformation zur Verfügung Der ausgewertete mechanische Impuls wird durch die beiden Dämpfer neutralisiert Die beim USP 100 zusätzl...

Страница 7: ...uch der Empfänger unten montiert werden sollte und der Pendelschutz im Schacht kopf als Dämpferhalter dient Grund der unterschiedlichen Anordnung der Systemkomponen ten ist die Verkabelung des Empfängers Eine nicht optimale Anordnung der Systemkomponenten kann dazu führen dass Sie die Verkabelung komplett durch den ganzen Aufzugschacht führen müssen Der vertikal durch das System verlaufende Draht ...

Страница 8: ...aulischen Aufzug mit Maschinenraum neben der Schachtgrube sollte der USP Empfänger in der Schacht grube montiert werden Bei einem Seilaufzug mit Maschinenraum oben sollte der USP Empfänger im Schachtkopf montiert werden Bei maschinenraumlosen Aufzügen sollte man darauf ach ten dass die elektromagnetische Verträglichkeit des USP Empfängers nicht durch Anlagenkomponenten wie Frequenz regler Motoren ...

Страница 9: ...tage im Schachtkopf Fahren Sie im Modus Inspektionsfahrt in den Schacht kopf Montieren Sie das erste C Profil mit den Montagewinkeln an die Führungsschiene Das C Profil muss ausserhalb des max Verfahrweges der Aufzugkabine oder anderer beweglicher Teile montiert werden Achten Sie bitte darauf dass in unmittelbarer Nähe keine EMV bedenklichen Geräte wie Frequenzregler Motoren o ä montiert sind Beac...

Страница 10: ...uf das Kabinendach ab ohne den Signaldraht zu knicken Entnehmen Sie einen Dämpfer aus der USP Verpackungsbox Führen Sie den Draht wie abgebildet ca 10 cm von innen durch das Loch der einen Dämpferhälfte Knicken Sie das Draht ende in einem Winkel 90º um und legen Sie den Draht so dass er außen in der Nut und innen mittig auf der Dämpfer matte liegt Der Signaldraht steht unter federnder Spannung und...

Страница 11: ...schrauben Sie nun die beiden Dämpferhälften Abrollen des Signaldrahtes Nehmen Sie nun die Montagespule und halten Sie diese so dass der Draht leicht gespannt ist Spulen Sie ihn eventuell von Hand zurück auf die Spule Vergewissern Sie sich dass die seitlichen Laschen an der Montagespule etwas herausgezogen sind und der Draht sich gerade und frei bei der anschließenden Fahrt in die Schacht grube abr...

Страница 12: ...etreten können Verlassen Sie das Dach der Aufzugskabine und gehen Sie in die Schachtgrube Montieren Sie in der Schachtgrube das zweite C Profil mit den Montagewinkeln an die Führungsschiene Das C Profil muss ausserhalb des max Verfahrweges der Aufzugkabine und ande rer beweglicher Teile montiert werden Beachten Sie dass Sie zwischen Schachtboden und C Profil einen Mindest abstand von ca 80 cm lass...

Страница 13: ... Abstand von min 15 cm vorhanden sein muss Richten Sie den Signaldraht auf der Länge der Dämpfermatte mittig aus Achten Sie darauf dass der Draht gerade aus dem Dämpfer herausläuft Setzen Sie nun die zweite Dämpferhälfte wie abgebildet auf Halten Sie die zusammengesetzten Dämp ferhälften mit der Hand zusammen Führen Sie diesen Montageschritt sehr sorgfältig aus Eine Berührung von Dämpfergehäuse un...

Страница 14: ...unterkante ge währleistet sein Begeben Sie sich wieder auf das Dach der Aufzugkabine Fahren Sie im Modus Inspektionsfahrt in den Schacht kopf Befestigen Sie das Montageblech an der Aufzugkabine Das Montageblech muss so befestigt werden dass bei der nach folgenden Montage des Senders gewährleistet wird dass der Signaldraht mittig in der Senderspule positioniert ist Lösen Sie den Sender vom Empfänge...

Страница 15: ...t mittig in der Senderspule positioniert ist Schließen Sie den 15 poligen Sub D Stecker an den Empfänger und den runden Stecker M12 an den Sender an und legen Sie das Senderanschlusskabel im Kabinenklemmkasten auf das Schleppkabel auf Die Pinbelegung der Stecker entnehmen Sie bitte den technischen Daten 15 16 USP_Montage_DE indd 15 18 02 2013 15 39 26 ...

Страница 16: ...icht von beweglichen Teilen berührt werden Das USP 30 System ist nun komplett montiert für das USP 100 System müssen für zusätzliche Referenzinformationen noch ein Korrektursensor sowie 5 Betätigungs magnete montiert werden Weiter siehe Seite 25 Wartung Das Aufzug Positionssystem USP ist wartungsfrei Wir empfehlen jedoch folgende Punkte zu beachten Führen Sie im Rahmen der allgemeinen Wartungsinte...

Страница 17: ...er befestigen zu kön nen Ausgehend vom C Profil dürfen im lotrechten Fall keine Teile hineinragen da hier später der Signal draht verlaufen wird Entnehmen Sie die vormontierte Empfänger Sendeeinheit aus der USP Verpackungsbox Schrauben Sie den Sender vom Empfänger ab Legen Sie den Empfänger zurück in die Verpac kungsbox und entnehmen Sie den Pendelschutz Schrauben Sie den Pendelschutz auf den Send...

Страница 18: ...aldraht zu knicken Entnehmen Sie einen Dämpfer aus der USP Verpackungsbox Führen Sie den Draht wie abgebildet ca 10 cm von innen durch das Loch der einen Dämpferhälfte Knicken Sie das Draht ende in einem Winkel 90º um und legen Sie den Draht so dass er außen in der Nut und innen mittig auf der Dämpfer matte liegt Der Signaldraht steht unter federnder Spannung und ist scharfkantig Bei Montagearbeit...

Страница 19: ... den mitgelieferten Schrauben Abrollen des Signaldrahtes Nehmen Sie nun die Montagespule und halten Sie diese so dass der Draht leicht gespannt ist Spulen Sie ihn eventuell von Hand zurück auf die Spule Vergewissern Sie sich dass die seitlichen Laschen an der Montagespule etwas herausgezogen sind und der Draht sich gerade und frei bei der anschließenden Fahrt in die Schacht grube abrollen lässt Fa...

Страница 20: ...s Sie anschließend die Schachtgrube betreten können Montieren Sie in der Schachtgrube das zweite C Profil mit den Montagewinkeln an die Führungsschiene Das C Profil muss ausserhalb des max Verfahrweges der Aufzugkabine und ande rer beweglicher Teile montiert werden Beachten Sie dass Sie zwischen Schachtboden und C Profil einen Mindest abstand von ca 80 cm lassen Es muss später gewährleistet sein d...

Страница 21: ...s Dämpfers lotrecht durch den Empfänger verläuft Der Empfänger kann zum besseren Erkennen der LED s mit der Unterseite nach oben montiert werden Fädeln Sie den Draht von oben durch den Empfänger Verwenden Sie in diesem Fall unser Anschlusskabel der Schutzart IP65 um eine Abdichtung des integrierten Sub D Steckers zu gewährleisten Schließen Sie den 15 poligen Sub D Stecker an den Empfänger an 11 12...

Страница 22: ...al draht kann zu einer Reflektion des Ultraschall signales führen und die Funktion des USP beeinträchtigen Verschrauben Sie die beiden Dämpferhälften Der Dämpfer muss frei hängen Der Dämpfer darf den Boden nicht berühren Aufgrund unter schiedlicher Ausdehungskoeffizienten zwischen dem Signal draht und dem Gebäude sollte ein Mindestabstand von ca 15 cm zwischen Schachtboden und Dämpferunterkante ge...

Страница 23: ...so aus dass der Signaldraht mittig in der Senderspule positioniert ist Schließen Sie den runden Stecker M12 an den Sender an und legen Sie das Senderanschlusskabel im Kabinenklemmkasten auf das Schleppkabel auf Die Pinbelegung der Stecker entnehmen Sie bitte den technischen Daten 16 USP_Montage_DE indd 23 18 02 2013 15 39 27 ...

Страница 24: ...n Teilen berührt werden Das USP 30 System ist nun komplett montiert für das USP 100 System müssen für zusätzliche Referenzinformationen noch ein Korrektursensor sowie 5 Betätigungsma gnete montiert werden Weiter siehe Seite 25 Wartung Das Aufzug Positionssystem USP ist wartungsfrei Wir empfehlen jedoch folgende Punkte zu beachten Führen Sie im Rahmen der allgemeinen Wartungsintervalle eine Kontrol...

Страница 25: ...der Aufzugkabine problemlos durch die geöffnete Etagentür auf die Etage gelangen können Bohren Sie 2 Befestigungslöcher max M4 in die rechte oder linke Seite der Aufzugkabine idealerweise oberhalb der Türme chanik an einem festen Element oder unterhalb der Türschwelle der Kabine und schrauben Sie den Korrektursensor wie abge bildet fest Achten Sie bei der Montage darauf dass der Korrektursensor ni...

Страница 26: ...en Betätigungsmagneten vorbeifährt d h Betätigungs magnete und Sensor dürfen bei Bündigkeit nicht gegen überstehen Zwischen Betätigungsmagnet und anderen Magnetschaltern sollte ein Sicherheitsabstand von min 0 5 m eingehalten werden Jeder Betätigungsmagnet muss so montiert werden dass ein maximaler horizontaler Abstand von 20 mm zwischen Korrek tursensor und Betätigungsmagnet nicht überschritten w...

Страница 27: ...endet wenn alle Korrektursensorpunkte Betätigungsmagnete 4 x überfahren wurden Die fünfte Anfahrt eines Sensorpunktes beendet die Initialisierungsfahrt Bei Betrieb an SSI Schnittstelle Brücke an Pin 9 und 10 wieder entfernen bzw bei asynchronem Betrieb Pin 9 und 10 wieder brücken Bei Betrieb mit USP PI Jumper wieder stecken USP 100 aus und wieder einschalten Normaler Betriebszustand Pin 9 und Pin ...

Страница 28: ...kten Signal auf rot grün gelb blinkend C Initialisierungsfahrt aktiv nur USP 100 grün aus C Initialisierungsfahrt korrekt beendet Aus und Einschalten notwendig nur USP 100 Sender gelb Normaler Betriebsmodus Gerät sendet Ultraschallimpulse 15 Can high 9 24V 10 Select SSI RS 485 11 Correction Sensor 12 Reserved 13 SSI_Data 14 SSI_Clock 4 Reserved 7 SSI_Clock 5 GND 8 Can low 6 SSI_Data 3 Reserved 2 G...

Страница 29: ...hutzart IP40 IP54 mit USP Empfängerkabel Standard IP65 Siehe auch unten stehende Tabelle Schutzklasse Gesamtsystem USP Einbaulage des Steckers beachten Störaussendung EN 50081 2 EN 12015 Störfestigkeit IEC 61000 6 2 EN 12016 Zulassungen Schutzklasse Gesamtsystem USP Empfängermontage Einbaulage Stecker USP USP Empfängerkabel Standard Kollmorgen NEW Böhnke Partner Weber Lifttechnik USP Empfängerkabe...

Страница 30: ...ersor gung Sender 3 4 Trigger Gnd Masse des Triggersignals Anschluss Empfänger mit Stecker Sub D 15 polig Pin Nr Bezeichnung Typ Signal 1 Trigger Ausgang Triggersignal Spannungsversorgung Sender 2 Trigger Gnd Masse des Triggersignals 3 Reserviert 4 Reserviert 5 Gnd Masse Versorgungsspannung Masse Korrektursensor 6 Daten B TX Ausgang Asynchrones Datensignal SSI Datensignal 7 Takt B R X Eingang SSI ...

Страница 31: ...ände Gelb und rot Fehlerindikation Normale Betriebszustände grün Seite 28 Referenz B Der USP Empfänger empfängt ein Ultraschallsignal Er kann es einwandfrei lesen und in einen absoluten Positionswert konvertieren Dies ist der normale Betriebszustand gelb blinkend nur USP 100 Seite 28 Referenz C Die Initialisierungsfahrt des USP 100 Empfängers wurde gestartet Es liegt kein Fehler vor es handelt sic...

Страница 32: ...em Kabinendach durch den Schacht fahren dabei optisch und auch mit Daumen und Zeigefinger den Draht überprüfen ob Knickstellen vorhanden sind Kleinere Knicke können mit der Hand ausgebessert werden nur in seltenen Fällen muss der Draht getauscht werden b Dämpfer überprüfen Ebenfalls kann es passieren dass beim Einlegen des Drahtes in den Dämpfer der Draht unter das Dämpfergehäuse geklemmt wird In ...

Страница 33: ...üfen Folgen Sie bitte der Fehlerbeschreibung unter gelb Überprüfen Sie ob die gelbe LED am Sender leuchtet Wenn die gelbe LED am Sender nicht leuchtet bitte die Verdrahtung überprüfen Als Fehlerstellen kommen in Frage die Übergabe des Triggersignals im Steuerungsschaltschrank auf das Schleppkabel das Schleppkabel selber die Übergabe des Triggersignals vom Schleppkabel auf die Sender Anschlussleitu...

Страница 34: ...achtgrube b Elektromagnetische Verträglichkeit EMV Seite 28 Referenz B E Wenn der Aufzug nicht fährt leuchten am Empfänger beide LED grün Sobald der Aufzug fährt schaltet die LED auf rot Hintergrund Der USP Empfänger ist im Inneren des Kunststoffgehäuses komplett abgeschirmt Es handelt sich um ein komplexes elektronisches Gerät das durch starke externe magnetische Felder be einflusst werden kann W...

Страница 35: ...im Signaldraht die dazu führt dass Signale im Empfänger nicht ausgewertet werden kön nen Sollten trotz größter Sorgfalt bei der Montage Fehler im Draht auftreten können diese in vielen Fällen auch ohne das Auswechseln des Drahtes behoben werden Es muss ledig lich die potentielle Fehlerstelle lokalisiert und der Draht wieder gerade gebogen werden Nicht reproduzierbare Fehler sind häufig auf externe...

Страница 36: ...36 Notizen USP_Montage_DE indd 36 18 02 2013 15 39 29 ...

Страница 37: ... the receiver in the shaft head 43 Mounting the signal wire 45 Cutting the signal wire to length 46 Test drive 50 Maintenance 50 Mounting the signal wire 53 Cutting the signal wire to length 54 Test drive 58 Maintenance 58 Installation of the correction sensor and the actuating magnets for the USP 100 system 59 Installation of the correction sensor 59 Installation of the actuating magnets 60 Initi...

Страница 38: ...sed for its intended purpose Note in particular that no unauthorized changes or additions may be made inside the USP or to individual components Exclusion of liability The manufacturer is not liable with respect to the buyer of this product or to third parties for dama ge loss costs or work incurred as a result of accidents misuse of the product incorrect installa tion or illegal changes repairs o...

Страница 39: ...at each floor should be kept closed during the in stallation work Block off the areas that constitute a risk Take all suitable safety measures Wear suitable work clothing shoes protective helmet and gloves The signal wire contains nickel This can cause skin irritation in persons suffering from nickel allergy The end of the wire is sharp edged Protective gloves should be worn The signal wire is spr...

Страница 40: ... the direction of both the shaft pit and the shaft head The incoming pulse is converted by the receivers located in either the shaft pit or the shaft head into an electronic positio ning value This positioning value can be recalled by the control unit at any time in the form of serial data The evaluated mecha nical pulse is then neutralized by the two dampers The additional components installed wi...

Страница 41: ...n the shaft pit and the swing protection as a holder for the dampers in the shaft head The reason for the different arrangement of the system compo nents is the wiring of the receiver A less than optimum arran gement of the system components can mean that it becomes necessary to draw the entire wiring along the whole length of the shaft The signal wire running vertically through the system is used...

Страница 42: ...levator with the machine room adja cent to the pit you should install the USP receiver in the pit If you have a cable lift with a machine room at the shaft head you should mount the USP receiver in the shaft head If the application of the USP is in a machine room less lift you should care that no other components like motors or inverters will influence the electromagnetic compatibility As there ar...

Страница 43: ...th the mounting brackets The C profile must be installed outside the maximum travel way of the elevator cabin or of any other moving parts Please make sure that no units like inverters or motors which may cause electromagnetic compatibility problems are not mounted closely to the USP receiver Ensure that you leave a minimum clearance of 45 cm between the ceiling of the shaft and the C profile Ther...

Страница 44: ...the mounting device down on the elevator cabin roof without kin king the signal wire Take a damper from the USP packing box Guide the signal wire as illustrated about 10 cm from the in side through the hole of the one damper half Kink the signal wire in an angle 90º and lay it on the outside groove and in the middle on the damper The signal wire is spring loaded and is sharp edged Take suitable pr...

Страница 45: ...the damper into the receiver Now fix the two shells of the damper housing with the screws Mounting the signal wire Take the mounting device and hold it in such a way that the wire is slightly tensioned Remind it manually if necessary Ensure that the side links on the mounting device are pulled outwards and the wire can be pulled out straight into the shaft pit Travel in inspection travel mode down...

Страница 46: ...t into the shaft pit Now leave the roof of the cabin and go to the shaft pit Attach the second C profile to the guiding rail with the mounting brackets The C profile must be installed outside the maximum travel way of the elevator cabin or of any other moving parts Ensure that you leave a minimum clearance of at least 80 cm between the floor of the shaft and the C profile It is necessary that the ...

Страница 47: ...f min 15 cm between the damper and the swing protection Align the signal wire centrally along the length of the damper mat Ensure that the wire runs straight out of the damper Now fix the second half of the damper as illustrated Hold the two halves of the assembled damper together by hand Follow this installation step very carefully Signal wire and damper housing must not touch as this will result...

Страница 48: ...nt co efficients of expansion of the signal wire and the building Return to the roof of the elevator cabin Travel in inspection travel mode up to the shaft head Attach the link to the elevator cabin The link must be fastened so that it is possible to ensure that the signal wire is centred in the transmitter coil during the subsequent installation of the transmitter Remove the transmitter from the ...

Страница 49: ...signal wire is centred in the transmitter coil Connect the 15 pin sub D plug at the receiver and the round M12 plug to the transmitter and apply the cable of the sender in the cabin terminal box to the trailing cable The technical data provides the pin assignment of the plug 15 16 USP_Montage_GB indd 49 18 02 2013 15 39 45 ...

Страница 50: ...alled but a correction sensor and up to 5 actuating magnets to provide additional reference information must be installed for the system USP 100 Please continue at page 59 Maintenance The elevator positioning system USP is maintenance free Nevertheless we recommend to observe the following steps Carry out a test drive as part of the general maintenance work Check whether the signal wire is centred...

Страница 51: ...ion respectively plus the dampers Do not allow any parts to stick out from the middle of the C profile as installed vertically since the signal wire will be tensioned later Take the preassembled receiver transmitter unit from the USP packing box Unscrew the transmitter from the receiver Put the receiver back in the packing box and take out the swing protection Attach the swing protection to the tr...

Страница 52: ... in the mounting device and put the mounting device down on the elevator cabin roof without kinking the signal wire Take a damper from the USP packing box Guide the signal wire as illustrated about 10 cm from the in side through the hole of the one damper half Kink the signal wire in an angle 90º and lay it on the outside groove and in the middle on the damper The signal wire is spring loaded and ...

Страница 53: ...lves of the damper held together with the cap tive screws provided Mounting the signal wire Take the mounting device and hold it in such a way that the wire is slightly tensioned Remind it manually if necessary Ensure that the side links on the mounting device are pulled outwards and the wire can be pulled out straight into the shaft pit Travel in inspection travel mode down to the shaft pit Ensur...

Страница 54: ...ravel mode until you can get into the shaft pit Attach the second C profile to the guiding rail with the mounting brackets The C profile must be installed outside the maximum travel way of the elevator cabin or of any other moving parts Ensure that you leave a minimum clearance of at least 80 cm between the floor of the shaft and the C profile It is necessary that the lower damper can hang freely ...

Страница 55: ... the receiver after installation of the damper In order to ease the identification of the LED s you may install the receiver upside down Guide the wire from top to the receiver In this case you are well advised to apply the cable with the protection class IP65 in order to guarantee a sealing of the integrated Sub D plug Connect the 15 pole Sub D plug to the receiver 11 12 USP_Montage_GB indd 55 18...

Страница 56: ...sonic signal and will therefore influence the function of the USP Fasten the two halves of the damper together The dampers must hang freely The dampers must not be allowed to touch the ground Ensure there is a minimum clearance of 15 cm between the floor of the shaft and the lower edge of the damper to allow for different co efficients of expansion of the signal wire and the building Return to the...

Страница 57: ... sender in a way that the signal wire finds its way to the middle of the sender coil Connect the round M 12 plug to the sender and apply the sen der wire in the termination box to the trailing cable The technical data provides the pin assignment of the plug 16 USP_Montage_GB indd 57 18 02 2013 15 39 46 ...

Страница 58: ...ystem is now fully installed but a correction sensor and up to 5 actuating magnets to provide additional reference information must be installed for the system USP 100 Please continue at page 59 Maintenance The elevator positioning system USP is maintenance free Nevertheless we recommend to observe the following steps Carry out a test drive as part of the general maintenance work Check whether the...

Страница 59: ...can get from the roof of the elevator cabin to the floor through the open elevator door Drill two fastening holes max M4 in the right hand or left hand side of the elevator cabin ideally above the door mechanism at a fixed element or underneath the threshold of the elevator cabin and attach the correction sensor with screws as illustra ted Ensure during the installation that the correction sensor ...

Страница 60: ... correction sensor and the actuating magnets should not be facing each other at the levelling position Be tween the actuating magnet and other magnet switches should be a safety distance of min 0 5 m Each actuation magnet must be installed so that there is a maxi mum horizontal clearance of 20 mm between the correction sen sor and the actuation magnet This figure may not be exceeded The sideways o...

Страница 61: ...on travel mode Initialisation drive is finished when all correction sensor points actuating magnets have been passed four times The initialisation drive ends once a sensor point has been passed for the fifth time At operation with SSI Interface remove bridge between pin 9 and 10 again At asynchronous mode bridge pin 9 and 10 again At operation with USP PI plug in jumper Switch USP 100 off and on a...

Страница 62: ...ion drive active only USP 100 green off C initialisation drive finished correctly switch power on and off only USP 100 Transmitter yellow standard operation device transmits ultrasonic impulses 15 Can high 9 24V 10 Select SSI RS 485 11 Correction Sensor 12 Reserved 13 SSI_Data 14 SSI_Clock 4 Reserved 7 SSI_Clock 5 GND 8 Can low 6 SSI_Data 3 Reserved 2 GND_Trigger 1 Trigger X1 Sub D 15 pol 15 2 4 1...

Страница 63: ...ction class IP40 IP54 with USP receiver cable IP65 Please see table USP overall system protection class below beware installation position of the SUB D plug EMC emission EN 50081 2 EN 12015 EMC immunity IEC 61000 6 2 EN 12016 Approvals USP overall system protection class location of receiver position of socket USP receiver cable Standard Kollmorgen NEW Böhnke Partner Weber Lifttechnik USP receiver...

Страница 64: ...signal power supply transmitter 3 4 trigger Gnd ground of trigger signal Connection Receiver with Connector Sub D 15 pole Pin no description type signal 1 trigger output trigger signal power supply transmitter 2 trigger Gnd ground of trigger signal 3 reserved 4 reserved 5 Gnd ground of power supply ground of correction sensor 6 Data B TX output asynchronous data signal SSI data signal 7 CLK B RX i...

Страница 65: ...ication of trouble Normal operation mode Green page 62 Reference B The USP receiver receives a clear ultrasonic signal It can read this signal and can convert it into an absolute position value This is the normal operation mode Flashing yellow only USP 100 page 62 Reference C The initial ride of the USP 100 receiver has started There is no failure as this is a normal condi tion The receiver is bus...

Страница 66: ...s Ride through the shaft on the cabin top with inspection pace and inspect the wire ptically and manually with your eyes and fingers for bends or scratches Fix small bends manually only in few cases you need to change the wire b Inspection of damper It may be the case that the wire is fixed between the shells of the damper housing In this case the not absorbed signal will be reflected back into th...

Страница 67: ...trouble shooting procedure yellow Check if the yellow LED of the sender is on If the yellow LED does not give a signal you should inspect the connection of the wiring Possible causes for these failures are The transit of the trigger signal to the trailing cable in the termination box The trailing cable itself The application of the trigger signal from the trailing cable to the connection wire term...

Страница 68: ...iven on page 39 Hint This is true in the same sense for installations in the shaft pit b Electromagnetic Compatibility EMC page 62 Reference B E As long as the car does not move both LED s show a green light As soon as the car moves you see a red light Background The USP receiver comes with a completely protected plastic housing However it is a complex electronic device which may be influenced by ...

Страница 69: ...ire will result in the fact that the signals cannot be read correctly in the receiver Even the most careful installation of the wire will occasionally lead to problems of the wire However usually you do not need to change the wire as bends can be removed manually in most cases Failures which cannot be re produced are usually caused by external factors which influence the electromagnetic compatibil...

Страница 70: ...70 Note USP_Montage_GB indd 70 18 02 2013 15 39 47 ...

Страница 71: ...USP_Montage_Um indd 71 18 02 2013 15 36 30 ...

Страница 72: ...e 30 D 42279 Wuppertal Postfach 24 02 63 D 42232 Wuppertal Telefon 49 0 2 02 64 74 0 Telefax 49 0 2 02 64 74 100 E Mail info schmersal com Internet www schmersal com 1 000 L W 03 2013 Teile Nr 101163293 BZ Nr 700 00 34V900 Ausgabe F USP_Montage_Um indd 72 18 02 2013 15 36 29 ...

Отзывы: