


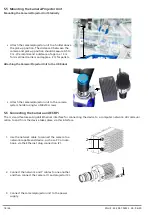


8. Slide the ECBPi onto the flange adapter on the ro-
bot arm
while observing the Poka Yoke mark-
ings. Attach the ECBPi radially using three
setscrews (M5x16), each tightened with 0.6 Nm
.
Flange adapter
plate
1
3 set screws M5x16
2
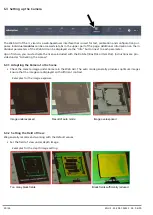
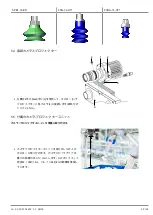
5.3 Suction Cup Selection Aid
SPB1-30-ED
FSG-32-HT1
FSGA-14-HT1
10.01.06.04530
10.01.06.01241
10.01.06.00932
For gripping cardboard boxes and
flat, rough surfaces.
For gripping round and inclined
parts.
The material leaves few marks and
is suitable for sensitive surfaces.
For smaller components or suction
areas.
The material leaves few marks and
is suitable for sensitive surfaces.
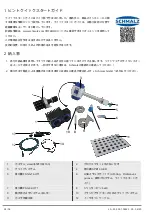
5.4 Joining the Camera and Projector
4
Attach the projector (1) to the camera (4) via the
holder (3) using the two supplied M4x8 screws (2)
(tightening torque 2.4 Nm).
3
2
2
1
4
EN-US · 30.30.01.02422 · 00 · 06/20
17 / 36
Содержание 3D-R
Страница 25: ...13 14 Y CE 3 ECPBi 4 4 4 4 4 4 60 C JA 30 30 01 02422 00 06 20 25 36...
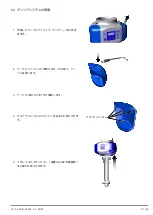
Страница 27: ...5 2 1 2 3 M12 4 ECBPi 5 ECBPi ECBPi JA 30 30 01 02422 00 06 20 27 36...
Страница 30: ...UR 4 M4x14 5 6 ECBPi rc_visard 1 2 PC 1 2 2 Y 1 3 3 3 4 LED LED LED LED 5 30 36 JA 30 30 01 02422 00 06 20...
Страница 32: ...6 3 rc_visard Web GUI Web Web GUI Rob Rob BoxPick ItemPick 6 3 1 4 Web GUI 32 36 JA 30 30 01 02422 00 06 20...
Страница 35: ...6 6 CAP 1 2 3 UR rc 4 4 5 27 JA 30 30 01 02422 00 06 20 35 36...
Страница 36: ...1 2 UR rc 4 3 6 7 UR Schmalz SP2 7 USB 1 2 36 36 JA 30 30 01 02422 00 06 20...