background image

 www.scheppach.com / 

 [email protected] / 

 +(49)-08223-4002-99 / 

 +(49)-08223-4002-58

GB | 27 

Then draw out the air filter housing (1). Draw the air 
filter housing (1) apart. You can now remove the air 
filter. Carefully knock out the air filter and the parts of 
the filter housing. 

These components must then be blown out with com-
pressed air (approx. 3 bar) and reassembled in re-
verse order.

15.7 Connections and repairs

Connections and repairs of electrical equipment may 
only be carried out by an electrician.

Please provide the following information in the 

event of any enquiries:

•  Type of current for the motor
•  Machine data - type plate
•  Motor data - type plate

Service information

Please note that the following parts of this product 
are subject to normal or natural wear and that the fol-
lowing parts are therefore also required for use as 
consumables.

Wear parts*: Air filters, belts, cylinders, pistons, pis

-

ton rings, Plastic clips

* Not necessarily included in the scope of delivery!

16. Disposal and recycling

The equipment is supplied in packaging to prevent it 
from being damaged in transit. The raw materials in 
this packaging can be reused or recycled. The equip-
ment and its accessories are made of various types 
of material, such as metal and plastic. Defective com-
ponents must be disposed of as special waste. Ask 
your dealer or your local council.

Old devices must not be disposed of with house-

hold waste!

This symbol indicates that this product must 
not be disposed of together with domestic 
waste in compliance with the Directive 
(2012/19/EU) pertaining to waste electrical and 

electronic equipment (WEEE). This product must be 
disposed of at a designated collection point. This can 
occur, for example, by handing it in at an authorised 
collecting point for the recycling of waste electrical 
and electronic equipment. Improper handling of waste 
equipment may have negative consequences for the 
environment and human health due to potentially 
hazardous substances that are often contained in 
electrical and electronic equipment. By properly dis-
posing of this product, you are also contributing to the 
effective use of natural resources. 

Do not use the compressor with a damaged or rusty 
pressure vessel. If you discover any damage, then 
please contact the customer service workshop.

m


Important!

The condensed water from the pressure vessel will 
contain residual oil. Dispose of the condensed water 
in an environmentally compatible manner at a suita-
ble collection point.

15.3 Safety valve (fig. B)

The safety valve (20) has been set for the highest 
permitted pressure of the pressure vessel. 

It is prohibited to adjust the safety valve or re-

move its seal. 

15.4 Checking the oil level at regular intervals 

(Fig. F)

Place the compressor on a level and straight surface.
The oil level must be at the centre of the oil sight glass 
(16) (red dot).

15.5 Changing the oil (fig. L)

The first oil filling must be changed after 100 oper

-

ating hours; afterwards perform an oil change every 
500 operating hours.
Switch the motor off and unplug the mains plug from 
the power outlet. Remove the oil drain screw (15). Ad-
ditionally open the oil sealing plug (18).
To prevent the oil from running out in an uncontrolled 
manner, hold a small metal chute under the opening 
and collect the oil in a vessel. If the oil does not drain 
out completely, we recommend tilting the compressor 
slightly.

 When the oil has drained out, re-fit the oil drain plug 

(15). 
Dispose of the old oil at a drop-off point for old oil.

To fill in the correct quantity of oil, make sure that the 

compressor stands on an even surface. Remove the 
oil sealing plug (18) and add new oil through the oil 

filler opening, until the oil level in the oil sight glass 

(16) has reached the correct quantity (red dot). 

Do not exceed the maximum filling quantity. Overfill

-

ing the equipment may result in damage.

Reinsert the oil sealing plug (18) in the oil filler open

-

ing.

15.6 Cleaning the air filter 

The air filter prevents dust and dirt being sucked in. 
It is necessary to clean this filter at least every 300 
operating hours. A blocked air filter significantly re

-

duces the compressor power. Remove the air filter by 
opening the wing nut (32) on the air filter housing (1). 

Remove the wing nut (32) and washer (33).

Содержание 5906136972

Страница 1: ...enehmigung Technische nderungen vorbehalten Abbildungen beispielhaft DE Kompressor Originalbedienungsanleitung 5 GB Compressor Translation of original instruction manual 18 Art Nr 5906136972 AusgabeNr...

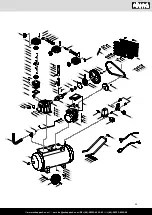
Страница 2: ...www scheppach com service scheppach com 49 08223 4002 99 49 08223 4002 58 2 A 2 1 4 3 18 y 16 15 6 5 9 8 7 10 11 13 14 17 12 B 20 19 22 21...

Страница 3: ...www scheppach com service scheppach com 49 08223 4002 99 49 08223 4002 58 3 G H C 14 23 24 2526 D 27 28 13 29 30 31 E 1 32 33 1 1 5 7 38 F 6 34 35 35 36 37...

Страница 4: ...www scheppach com service scheppach com 49 08223 4002 99 49 08223 4002 58 4 I 39 40 41 J 4 42 K 3 L 17 18 15 16 G 43...

Страница 5: ...werden Die Warnungen selbst beseitigen keine Risiken und k nnen korrekte Massnahmen zum Verh ten von Unf llen nicht ersetzen Vor Inbetriebnahme Bedienungsanleitung und Sicherheitshinweise lesen und be...

Страница 6: ...chreibung 7 3 Lieferumfang 8 4 Bestimmungsgem e Verwendung 8 5 Sicherheitshinweise 8 6 Technische Daten 11 7 Entpacken 11 8 Aufbau 11 9 Vor Inbetriebnahme 12 10 In Betrieb nehmen 12 11 Elektrischer An...

Страница 7: ...den die an diesem Ger t oder durch dieses Ger t entstehen bei unsachgem er Behandlung Nichtbeachtung der Bedienungsanweisung Reparaturen durch Dritte nicht autorisierte Fach kr fte Einbau und Austausc...

Страница 8: ...eten Teilen z B Rohren Radiatoren Elektroher den K hlger ten 4 Halten Sie andere Personen fern Lassen Sie andere Personen insbesondere Kinder nicht das Elektrowerkzeug oder das Kabel ber hren Halten S...

Страница 9: ...eren Zubeh rs kann eine Verletzungsge fahr f r Sie bedeuten 5 Bewahren Sie unbenutzte Elektrowerkzeuge si cher auf Unbenutzte Elektrowerkzeuge sollten an einem trockenen hochgelegenen oder abgeschloss...

Страница 10: ...h lter betrieben werden Stellen Sie Besch digungen fest so wenden Sie sich bitte an die Kundendienstwerkstatt Bewahren Sie die Sicherheitshinweise gut auf 22Lassen Sie Ihr Elektrowerkzeug durch eine E...

Страница 11: ...Betriebsart S1 Dauerbetrieb Die Ger uschemissionswerte wurden entspre chend EN ISO 3744 ermittelt Tragen Sie einen Geh rschutz Die Einwirkung von L rm kann Geh rverlust bewir ken 7 Entpacken Bei Beans...

Страница 12: ...N he des Verbrauchers erfolgen Lange Luftleitungen und lange Zuleitungen Ver l ngerungskabel sind zu vermeiden Auf trockene und staubfreie Ansaugluft achten Den Kompressor nicht in feuchtem oder nasse...

Страница 13: ...ale Lagertemperatur liegt zwischen 5 und 30 C 11 Elektrischer Anschluss Der installierte Elektromotor ist betriebsfertig ange schlossen Der Anschluss entspricht den einschl gi gen VDE und DIN Bestimmu...

Страница 14: ...nicht die maximale F llmenge Eine berf llung kann einen Ger teschaden zur Fol ge haben Setzen Sie die l Einf llschraube 18 wieder in die leinf ll ffnung Bewahren Sie das Werkzeug in der Originalverpa...

Страница 15: ...cen bei Informationen zu Sammelstellen f r Altger te erhal ten Sie bei Ihrer Stadtverwaltung dem ffentlich rechtlichen Entsorgungstr ger einer autorisierten Stelle f r die Entsorgung von Elektro und E...

Страница 16: ...ndem Aderquer schnitt verwenden Au entemperatur zu niedrig Nicht unter 5 C Au entemperatur betreiben Motor berhitzt Motor abk hlen lassen ggf Ursache der ber hitzung beseitigen Kompressor l uft jedoch...

Страница 17: ...www scheppach com service scheppach com 49 08223 4002 99 49 08223 4002 58 DE 17...

Страница 18: ...ng them Warnings themselves cannot remove risks and cannot substitute correct action for the prevention of accidents Read and follow the operating and safety instructions before you start working with...

Страница 19: ...ce description 20 3 Scope of delivery 21 4 Intended use 21 5 Safety information 21 6 Technical data 23 7 Unpacking 24 8 Attachment 24 9 Before starting the equipment 24 10 Starting up 25 11 Electrical...

Страница 20: ...pe your new tool brings you much enjoyment and success Note According to the applicable product liability laws the manufacturer of the device does not assume liability for damages to the product or da...

Страница 21: ...range indicated 7 Use the right electric tool Don t use low performance machines for heavy duty jobs Do not use the electric tool for purposes for which it was not intended 3 Scope of delivery Open t...

Страница 22: ...g operation Touching these parts will burn you The air which is sucked in by the compressor must be kept free of impurities that could cause fires or explosions in the compressor pump For example do n...

Страница 23: ...ay you can protect yourself against injury from the rebound ing hose Wear safety goggles when working with the blow out pistol Foreign bodies or blown off parts can easily cause injuries Do not blow a...

Страница 24: ...x Fig E Remove the transport protection from the air filter mount if applicable Remove the wing nut 32 and washer 33 from the threaded pin on the compressor pump Fit the air filter housing 1 with the...

Страница 25: ...alled is connected and ready for operation The connection complies with the ap plicable VDE and DIN provisions The customer s mains connection as well as the ex tension cable used must also comply wit...

Страница 26: ...drain screw by turning counter clockwise looking at the screw from the bottom of the compressor so that all the condensed water can run out of the pressure vessel Then close the drain screw again turn...

Страница 27: ...c equipment By properly dis posing of this product you are also contributing to the effective use of natural resources Do not use the compressor with a damaged or rusty pressure vessel If you discover...

Страница 28: ...on cable is not too long Use an extension cable with large enough wires Outside temperature is too low Never operate with an outside temperature of below 5 C Motor is overheated Allow the motor to coo...

Страница 29: ...www scheppach com service scheppach com 49 08223 4002 99 49 08223 4002 58 29...

Страница 30: ...za artikal RO declar urm toarea conformitate corespunz tor directivelor i normelor UE pentru articolul BG X 2014 29 EU 2014 35 EU X 2014 30 EU 2004 22 EC X 2014 68 EU X 2011 65 EU 89 686 EC_96 58 EC...

Страница 31: ...gratuitamente toda pieza de la m quina que dentro de este plazo se torne in til a causa de fallas de material o de fabricaci n Las piezas que no son fabri cadas por nosotros mismos ser n garantizadas...

Страница 32: ...jum ja mums ir garantija no saviem pieg d t jiem Jauno deta u uzst d anas izmaksas ir j uz emas pirc jam Pirkuma atcel ana vai pirkuma cenas samazin ana k ar jebkuras citas pras bas par boj jumu atl...

Отзывы: