


23
10
6m
30
Se rvic e life of batt ery
Th e batt ery no rmally last fo r abou t one
year althou gh thi s depe nds on how often,
and for wh at ope rations , the r emote
cont rol is u sed.
If the rem ote c ontrol fails to work even
whe n it is o perate d nea r the p layer, replac e
the b attery.
Us e one size C R2025 batte ry.
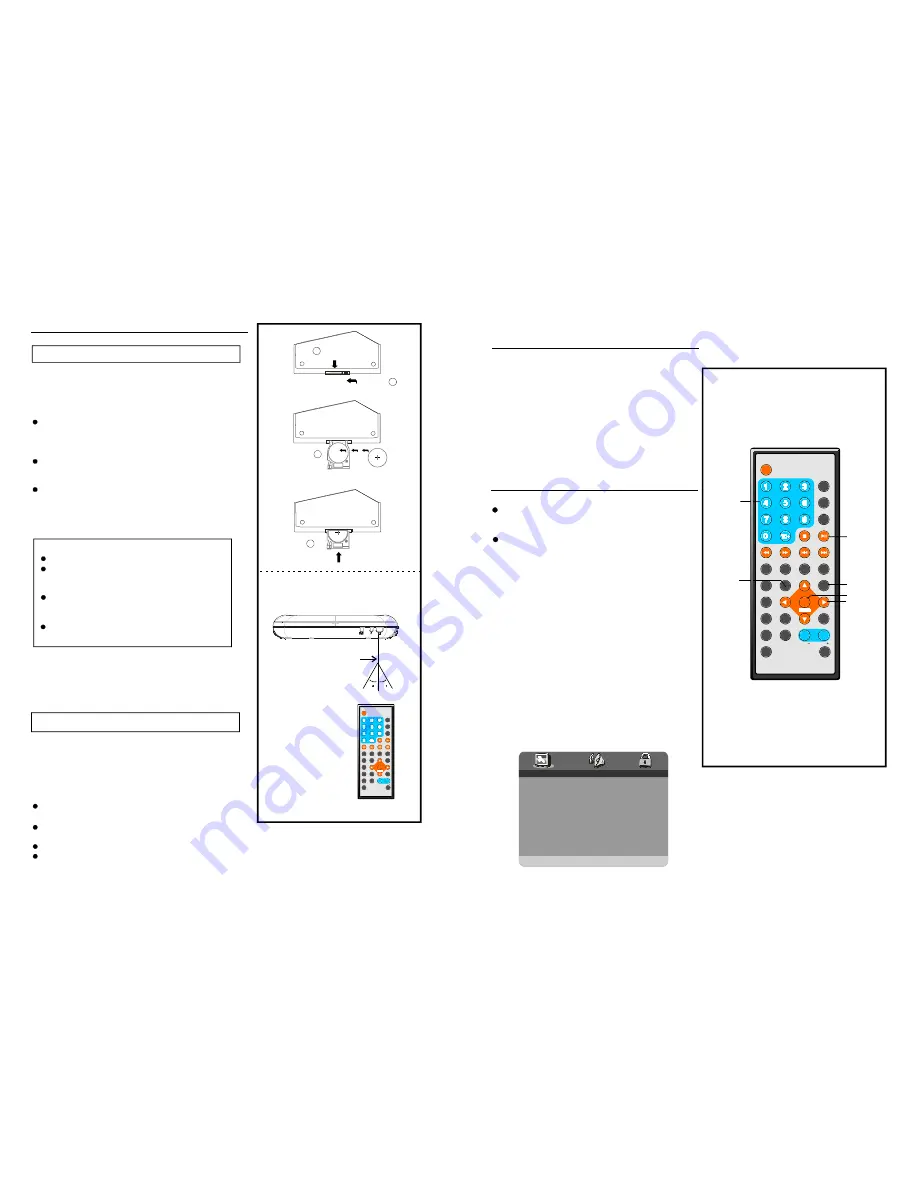
Remote co ntrol preparation
Battery installation
Inser t the b atterie s whil e obse rving the co rrect
(+) a nd (-) p olarit ies as illustra ted at right(F ig 1).
Remote control operation
1. Remo ve the prote ctive p lastic tab be fore
op eratin g the remote contr ol(Fig 2).
2. Point the remote c ontrol from n o mor e than
ab out 6 m from the re mote contro l sens or and
w ithin about 60 of th e front of the playe r(Fig 2 ).
The o perati ng dist ance m ay va ry acc ording to
th e brightness of the room.
Do no t point bright lights at rem ote co ntrol
se nsor.
Do no t place objec ts bet ween t he rem ote co ntrol a nd the remo te con trol se nsor.
Do no t use t his rem ote c ontrol while s imulta neous ly ope rating the re mote c ontrol of any
other
o
N OTE:
equipm ent.
Note:
D o not u se rec harge able (Ni-Cd) battery.
D o not a ttemp t to re charge , shor t-circu it,
disa ssem ble, he at or t hrow t he batt eries
into the fir e.
D o not d rop, s tep on or oth erwise impa ct
the remot e contr ol. Th is may dama ge the
par ts or le ad to malfun ction.
If the re mote c ontrol is not going to be
use d for a long t ime, re move the ba ttery.
RE MOTE CONTROL SENSOR
Fig 2
PUSH
OPEN
3
2
1
4
十
十
十
十
十
十
DISPLAY
1
2
3
4
5
6
7
8
9
0
10
+
SL OW
NEX T
OSD
N/P
PL AY/ PAU SE
STOP
FF
FR
PREV
GOTO
REPEAT
A-B
PR OGRAM
SETUP
STEP
ZOOM
ANGLE
MEN U
TITLE
L/R
USB/CARD/DVD
L ANGUAGE VOL
EN T E R
SUBTITL E
VOL
MUTE
Fig 1
DISPLAY
1
2
3
4
5
6
7
8
9
0
10
+
SLOW
NE XT
OSD
N/P
PLAY/PAUSE
STOP
F F
FR
PREV
GOTO
RE PEAT
A-B
PROGRAM
SETUP
STEP
ZOOM
ANGLE
MENU
TITLE
L/R
USB/CARD/ DVD
LANGUAGE VOL
EN TER
SUBTITLE
VOL
MUTE
So me DVDs may con tain sc enes w hich have
be en sho t simu ltaneo usly fr om a n umbe r of
dif ferent angles . For t hese discs, the sa me
sc ene ca n be v iewed from e ach of these
dif ferent angles using the A NGLE button .
Pr ess AN GLE d uring play, n umbe r of an gle
be ing pla yed w ill be d isplay ed in t he scr een,
press the butto n to ch ange to diffe rent a ngles.
1.G EN ERAL S ET UP
--GENERAL S ETUP PAGE--
TV DISP LAY
WIDE
TV SY STEM
PAL
ANGLE MARK
ON
OSD LA NGUAGE
FRE
CAPTIO NS
OFF
SCREEN SAVER
ON
DEFAULT
GO TO GENERAL SETUP PAGE
Viewin g from diffe rent
angle (DVD only)
r
l
Co mmon proc edure for in itial s etting s
Once t he init ial pro gramming is entere d it is
ret ained in mem ory u ntil ch anged , the p laye c an
alw ays b e oper ated u nder t he sam e con ditions .
The se ttings will be retain ed in t he me mory
un ti the setting s are chang ed eve n afte r settin g
the playe r to th e stan dby mode.
1.Press SETUP butto n.
2.U se th e navigation button s to se lect p referre d
i tem, a nd pre ss EN TER button, each s creen
f or sett ing the value is dis played . Then move
t he nav igatio n butto n to set the item an d pre ss
ENTER butto n to co nfirm the se ttings.
3.Press SETUP butto n to cl ose se tup menu in
a ny mo de.
4.U se lef t navig ation button to swi tch to another
main setup items
Initial Settings
PLAY
/PAUSE
SETUP
ANGLE
ENTER
NAV IGA-
TION
BUTTONS
NUMERIC
BUTTONS
1 .1 TV SYST EM
- It is for select ing the TV
s ystem accor ding t o the c olour s ystem of
t he TV.
Opt ions :PAL
N TSC
30
Содержание DVDP7-908
Страница 2: ......


