background image

 
SCEPTRE 

X246                                                                                                    Page9


Opening the Package


The SCEPTRE X246 is packaged in a carton together with standard accessories. The weight of the LCD display is 
approximately 13.1 lbs. Since the LCD panel can be easily scratched or broken, please handle the product gently. 
Never place the unit on a surface with the glass facing downwards unless it is on a protective padding. When opening 
the carton, make sure the product is in good condition and that all the standard accessories and items are included. 
After unpacking your LCD monitor, be sure to save the original box and all packing materials for future shipping 
needs. 


Package Contents


Monitor Display x 1


User Manual x 1 


Warranty Card x 1 


Power Cord x 1 


VGA Cable x 1 


3.5 mm Mini-jack Audio Cable x 1 


Installing or Uninstalling the Base


1. 

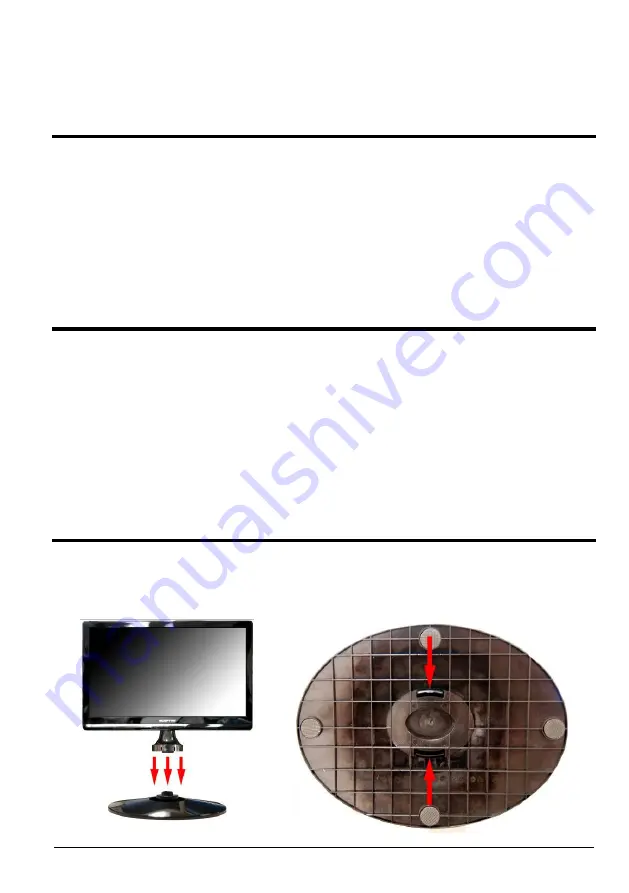
Please place the base on a flat surface (i.e. table).    Hold the monitor directly 90 degrees above the base. 
Connect the monitor to the base by inserting the monitor into the base.    To remove the base simply look at the 
bottom of the base and unlock the two buckles at the bottom of the base. 


Содержание X246

Страница 1: ...SCEPTRE X246 Page1 Important Information ...

Страница 2: ...rference to radio communications However there is no guarantee that interference will not occur in a particular installation If this equipment does cause harmful interference to radio or television reception which can be determined by turning the equipment off and on the user is encouraged to try to correct the interference by one or more of the following measures Reorient or relocate the receivin...

Страница 3: ... be required to take adequate measures Canadian Doc Notice For Class B Computing Devices This digital apparatus does not exceed the Class B limits for radio noise emissions from digital apparatus as set out in the Radio Interference Regulation of the Canadian Department of Communications Le présent appareil numérique n èmet pas de bruits radioélectriques dépassant les limites applicables aux appar...

Страница 4: ...t the safety purpose of the polarized or grounding type plug A polarized plug has two blades with one wider than the other A grounding type plug has two blades and a third grounding prong The wide blade and the third prong are provided for your safety If the provided plug does not fit into your outlet consult an electrician for replacement of the obsolete outlet 10 Protect the power cord from bein...

Страница 5: ... install the product too close to anything that produces smoke or moisture Operating the product close to smoke or moisture may cause fire or electric shock Slots and openings in the back and bottom of the bezel are provided for ventilation To ensure reliable operation of the X246 LCD MONITOR and to protect it from overheating be sure these openings are not blocked or covered Do not place the X246...

Страница 6: ... contact your dealer immediately Do not try to repair the product yourself Avoid using dropped or damaged appliances If the product is dropped and the housing is damaged the internal components may function abnormally Unplug the power cord immediately and contact your dealer for repair Continued use of the product may cause fire or electric shock Do not install the product in an area with heavy du...

Страница 7: ...ing Your Cables Connections 13 Connecting the LCD 14 If You Have DVI Connection on Your Video Card 14 If You Have VGA Connection on Your Video Card 15 If You Have HDMI Connection on Your Cable or Satellite Box 16 On Screen Display OSD Menu 17 AUTO ADJUST 17 CONTRAST BRIGHTNESS 18 INPUT SELECT 19 AUDIO ADJUST 19 COLOR ADJUST 20 INFORMATION 20 MANUAL IMAGE ADJUST 21 SETUP MENU 22 MEMORY RECALL 22 Su...

Страница 8: ...78 and select option 3 or email our tech support group at monitor ts SCEPTRE com For all other inquiries please call 1800 788 2878 and select option 4 or email our customer service group at cs SCEPTRE com We recommend you register your SCEPTRE monitor with the enclosed registration card and mail it in For peace of mind and to protect your investment beyond the standard warranty SCEPTRE offers a tw...

Страница 9: ...nd that all the standard accessories and items are included After unpacking your LCD monitor be sure to save the original box and all packing materials for future shipping needs Package Contents Monitor Display x 1 User Manual x 1 Warranty Card x 1 Power Cord x 1 VGA Cable x 1 3 5 mm Mini jack Audio Cable x 1 Installing or Uninstalling the Base 1 Please place the base on a flat surface i e table H...

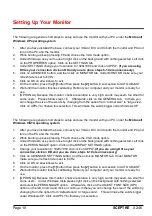
Страница 10: ...will make the words bigger under Windows XP The following are general short steps to setup and use the monitor with your PC under the Microsoft Windows VISTA operating system 1 After you have installed the base connect your VGA or DVI cord to both the monitor and PC and turn on the PC and the monitor 2 While booting up keep pressing F8 and choose the VGA mode option 3 Under Windows use your mouse ...

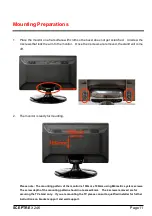
Страница 11: ...removed the stand will come off 2 The monitor is ready for mounting Please note The mounting pattern of the monitor is 100mm x 100mm using M4 metric system screws The screw depth of the mounting pattern should not exceed 8mm The 4 screws removed are for securing the TV stand only If you are mounting the TV please consult a qualified installer for further instructions on bracket support and wall su...

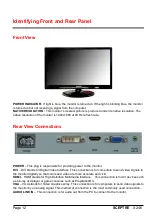
Страница 12: ...providing power to the monitor DVI DVI stands for Digital Video Interface This connection is for computers to send video signals to the monitor digitally so that colors and video are more accurate and vivid HDMI HDMI stands for High Definition Multimedia Interface This connection is for AV devices such as blu ray dvd player or game consoles such as Playstation 3 VGA VGA stands for Video Graphics A...

Страница 13: ...tton moving your selection to the next one If you entered the function this button acts as the increase adjustment button This button also acts as the hotkey for selection preset color modes under Opticolor Mode 4 2 This button confirms your selection i e If you want to adjust brightness you would highlight brightness and press 2 to begin adjusting brightness This button acts as hotkey for selecti...

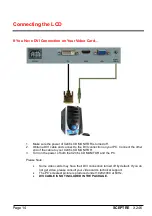
Страница 14: ...ion on your PC Connect the other end of the cable to your X246 LCD MONITOR 3 Turn on the power of both the X246 LCD MONITOR and the PC Please Note Some video cards may have their DVI connection turned off by default If you do not get video please consult your video card s technical support The PC s clearest picture is produced under 1920x1080 at 60Hz DVI CABLE IS NOT INCLUDED IN THE PACKAGE ...

Страница 15: ...NG on the desktop with nothing selected After you have right clicked select the PROPERTIES option Click on the SETTINGS tab Click on the ADVANCED button Click on the MONITOR tab In that tab change the refresh rate to 60Hz and click on APPLY After the refresh rate changed please shut down the computer and monitor 3 Obtain the VGA cable and connect to the VGA connection on your PC Connect the other ...

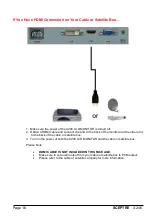
Страница 16: ...one end to the back of the monitor and the other end to the back of the cable or satellite box 3 Turn on the power of both the X246 LCD MONITOR and the cable or satellite box Please Note HDMI CABLE IS NOT INCLUDED IN THIS PACKAGE Make sure to set audio output from your cable or satellite box to PCM output Please refer to the cable or satellite company for more information ...

Страница 17: ... the 2 button to enter each of the function or when you re in the function already use the 2 button to select the option you want to adjust Use the or buttons to adjust each option s values AUTO ADJUST This function auto adjusts the clock and phase of the monitor when using VGA cable so the monitor will sync better with the video card and produce a clearer picture 1 To use this function press the ...

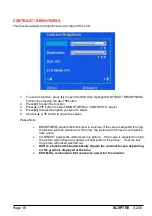
Страница 18: ...o adjust the values Please Note BRIGHTNESS adjusts the black level in a picture If the value is adjusted too high the picture will look washed out If too low the picture will not have much detail in dark colors CONTRAST adjusts the white levels in a picture If the value is adjusted too high the picture will not have any details in bright parts of the picture If set too low the picture will looked ...

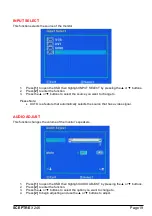
Страница 19: ...source you want to change to Please Note AUTO is a feature that automatically selects the source that has a video signal AUDIO ADJUST This function changes the volume of the monitor s speakers 1 Press 1 to open the OSD then highlight AUDIO ADJUST by pressing the or buttons 2 Press 2 to enter the function 3 Press the or buttons to select the option you want to change to 4 Press 2 to begin adjusting...

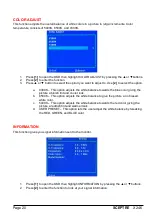
Страница 20: ... balance towards the blue color giving the picture a bluish tint and cooler look b 6500K This option adjusts the white balance to give the picture a no biased white color c 5400K This option adjusts the white balance towards the red color giving the picture a reddish tint and warmer look d USER PRESET This option lets the user adjust the white balance by tweaking the RED GREEN and BLUE color INFOR...

Страница 21: ...adjusting data clock of your signal d SHARPNESS This option adjusts the sharpness of the signal e VIDEO MODE ADJUST This option adjusts the various scaling of video i FULL SCREEN This mode stretches anything to full screen ii OVER SCREEN This mode is for watching TV where it will perform overscan for most TV videos iii ASPECT RATIO This mode maintains the aspect ratio of the resolution f OPTICOLOR...

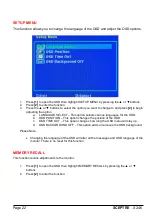
Страница 22: ... option selects various languages for the OSD b OSD POSITION This option changes the position of the OSD c OSD TIME OUT This option changes how long the OSD menu will stay up d OSD BACKGROUND OFF This option adds or removes the OSD background Please Note Changing the language of the OSD will alter all the messages and OSD language of the monitor There is no reset for this function MEMORY RECALL Th...

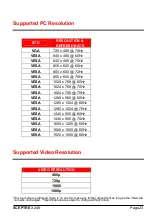
Страница 23: ...0Hz VESA 1024 x 768 75Hz VESA 1280 x 960 60Hz VESA 1280 x 1024 60Hz VESA 1280 x 1024 75Hz VESA 1440 x 900 60Hz VESA 1440 x 900 75Hz VESA 1600 x 1200 60Hz VESA 1680 x 1050 60Hz VESA 1920 x 1080 60Hz Supported Video Resolution VIDEO RESOLUTION 480p 720p 1080i 1080p Once a mode is optimized there is no need to make any further adjustment as long as the VGA card remains unchanged Specifications are su...

Страница 24: ... go to display settings by right clicking on your desktop with nothing selected Choose the PROPERTIES option 2 Click on the SETTINGS tab verify the resolution is NOT higher than 1920x1080 and click on the ADVANCED button 3 Click on the MONITOR tab and change the refresh rate to 60Hz 4 Click on OK 2 3 times to finalize your change If you do NOT have a CRT monitor or it s already broken please make ...

Страница 25: ...reen resolution You ll need to upgrade your video card to a newer one I DO NOT HEAR ANY SOUND FROM THE SPEAKERS Check your 3 5 mm mini jack cable and see if it is connected correctly between the computer and the monitor Check the volume of your computer and also the volume of the monitor THE VIDEO IS TOO BRIGHT NO MATTER WHAT I ADJUST Sometimes having older video cards this type of problem might h...

Страница 26: ...exit 6 Once you have finished rebooting the computer is ready for use For Windows VISTA 1 Right click on the background with nothing selected Left click on the PERSONALIZE option 2 Click on ADJUST FONT SIZE DPI option on the left column and 3 Click on CONTINUE 4 In there you can change the size of the words by changing from the option DEFAULT SCALE to LARGE SCALE 5 Click on APPLY to finalize your ...

Страница 27: ...ter and wipe again Wipe the display with a dry micro fiber cloth or 100 cotton cloth afterwards Please Note Make sure you wring the water out of the cloth before cleaning the bezel in order to prevent water from penetrating into the electronics Cleaning the Screen 1 Use a 100 cotton cloth or micro fiber cloth for cleaning 2 The LCD screen glass is extremely fragile Do not scrape it with any materi...

Страница 28: ...ast 1000 1 NATIVE Response Time 5ms Gray to Gray Viewing Angle Typical 160 160 Degree Horizontal Vertical Lamp Life of Backlight 50 000hrs Monitor Display Dimension 22 3 W X15 3 H X8 D inches 546 35 W X374 85 H X196 D mm Weight 13 12 lbs 5 96 Kgs Power input 100V to 240V AC 50 60 Hz Max 50W Features I O VGA DVI HDCP HDMI AUDIO IN SPEAKER OUTPUT 2 Watt x 2 Compliance UL CE FCC B Energy Star Specifi...

Страница 29: ...or repairs after the warranty period please contact our support department at the number below For technical help contact our SCEPTRE Technical Support Group via email or phone Please have your SCEPTRE p n number serial number and date of purchase available before you call Tech Support E mail monitor ts SCEPTRE com Customer Service Email cs SCEPTRE com TEL 626 217 1022 Operation Hours Mon Fri at 8...

Страница 30: ...cretion repair or replace defective parts including replacement of the entire Panel The Customer will be required to ship the unit to the Service Center indicated at the time Customer Support is contacted to make the necessary repairs you are responsible for all transportation charges to the service facility SCEPTRE is NOT responsible for the de installation or re installation of the unit Packagin...

Страница 31: ...n a combination of color and brightness of dead pixels Any number of dead or bad pixels under the limit is considered normal specification Owner s Responsibility Effective Warranty Date Warranty begins on the date of sale to the end user To ensure warranty service keep the dated bill or sale receipt as evidence of the purchase date Warranty Service For warranty service information contact SCEPTRE ...

Страница 32: ... liable for technical or editorial errors or omissions contained herein nor for incidental or consequential damages resulting from furnishing this material or the performance or use of this product In the interest of continuing product improvement Sceptre Inc reserves the right to change product specifications without notice Information in this document may change without notice No part of this do...

Отзывы: