Installation
Sensor Installation
WR-3 Plus's sensor bottom cap has a 1/4” threaded hole for installation.
You can use Scarlet’s Magnetic Sensor Mounting Bracket to attach the sensor to any iron/steel surface
and to keep it perpendicular to the ground.
WR-3 Plus’s Receiver Holder Kit comes with an anti-slip display holder with neodymium magnets on
both ends and three pieces of adhesive metal flakes.
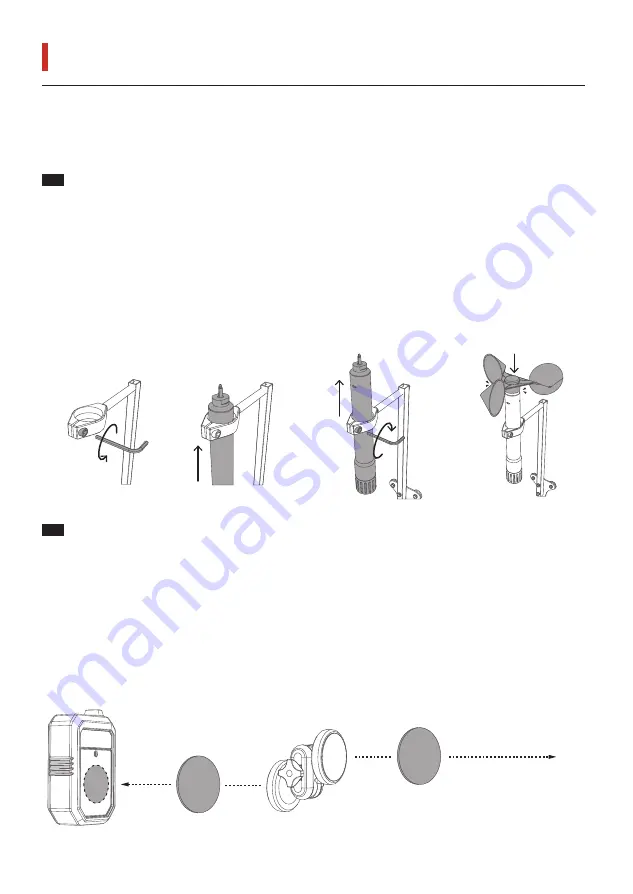
1. Peel off the backing paper of the metal flake to reveal the adhesive side
2. Press and stick the adhesive side of the metal flake to the Receiver’s back cover
3. Attach the receiver to the display holder magnetically
You can attach the display holder on any magnetic surface or adhesive the metal flake on the non-mag-
netic surface first before attaching the magnetic display holder.
1. Loosen the clamp
2. Insert the sensor body from the bottom of the clamp
3. Tighten the clamp
4. Apply wind cups on wind sensor bearing
5. Make sure you hear a “CLICK” sound that indicates all parts are locked in place.
6. Attach the bracket on the desire magnetic surface
Receiver Installation
18
WR-3 Plus's magnetic installation accessories support fast and flexible installation and do not require
any welding or wiring on the equipment. The system setup takes place automatically upon booting
up.
Receiver (Back)
Paste Anywhere
Metel
Flake
Receiver Holder
CLICK
Metel
Flake
Paste
Here


