background image

PRODUCT MANUAL

“Charger” Voice Recorder : SB-VR5700

Page 3

www.SafetyBasement.com     Phone: 877-345-2336   Fax: 888-236-2524

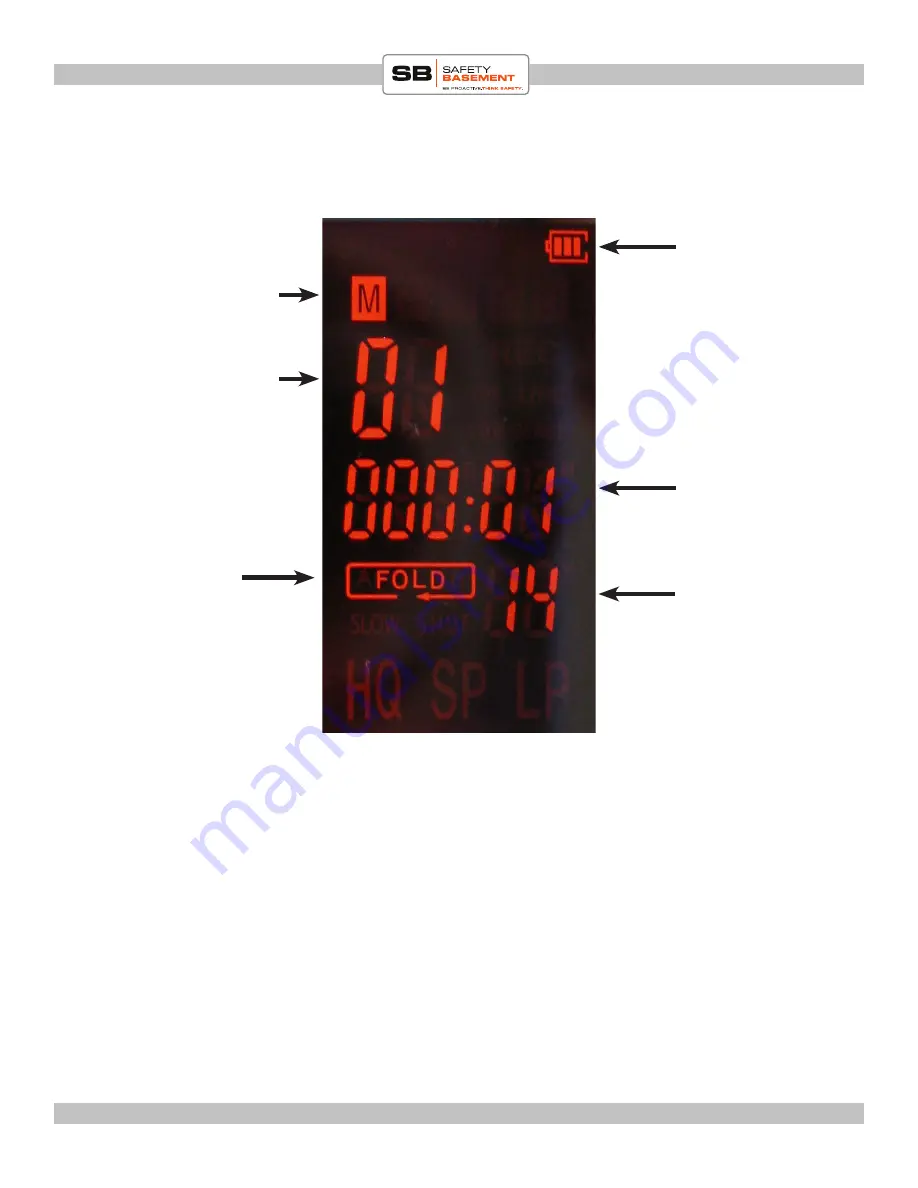
Repeat / Loop 

Setting

Current Folder

A, B, C, D

or M (MP3)

Battery Level

File Time

Hours : Minutes

PLAYBACK SCREEN REFERENCE

Track

File Time

Seconds

VOLUME

To adjust the Volume during playback or monitoring, press the Navigation Stick UP and 

DOWN.

Содержание SB-VR5700

Страница 1: ... this simple manual to help you enjoy your new product as quickly and easily as possible Be sure to check the TECH SUPPORT tab on your product page at SafetyBasement com for the latest available manual INSTRUCTION MANUAL Revised Feb 14 2013 The Charger 40 Hour Voice Recorder SB VR5700 ...

Страница 2: ...Page 2 PRODUCT MANUAL Charger Voice Recorder SB VR5700 www SafetyBasement com Phone 877 345 2336 Fax 888 236 2524 PRODUCT REFERENCE Speaker ...

Страница 3: ...com Phone 877 345 2336 Fax 888 236 2524 Repeat Loop Setting Current Folder A B C D or M MP3 Battery Level File Time Hours Minutes PLAYBACK SCREEN REFERENCE Track File Time Seconds VOLUME To adjust the Volume during playback or monitoring press the Navigation Stick UP and DOWN ...

Страница 4: ...yBasement com Phone 877 345 2336 Fax 888 236 2524 Recording Quality HQ SP LP Current Folder A B C D MP3 folder is not available for recordings Recording Light File Time Hours Minutes RECORDING SCREEN REFERENCE Track File Time Seconds Voice Activated Recording is ON ...

Страница 5: ...Do not use other adapters as they may damage your device 1 Be sure that the device is OFF 2 Plug USB cable into device first 3 Plug the other end into the wall adapter 4 Plug the adapter into your power outlet Please let the device charge for several hours before your first use BEFORE YOUR FIRST USE No other files are needed to use this device No device drivers are needed for Windows or Mac use NE...

Страница 6: ...g the Power Switch UP to the ON position If your Charger Recorder goes to sleep you can turn it back on by holding the PLAY button until it turns back on To turn off the Charger Recorder hold the PLAY button until it shuts down To turn off the Charger Recorder and prevent it from turning on accidentally push the Power Switch to the OFF position POWER ON ...

Страница 7: ...UP Your Charger Recorder will immediately start recording using the current settings To stop recording and save your file push the RECORD button DOWN Note the display will go dark after several seconds but the recorder will continue to record The Recording Light may be on while recording depending on your settings To check the status of your recorder press the PLAY button quickly QUICK RECORD ...

Страница 8: ... first option in the menu 2 To ERASE the current track press PLAY The display will show DONE when it has deleted that track NOTE Proceed carefully as these files can not be retrieved once deleted 3 To ERASE ALL files in your current folder press the Navigation Stick to the right until AL appears To ERASE ALL press PLAY NOTE Proceed carefully as these files can not be retrieved once deleted SETTING...

Страница 9: ...uality Setting 3 Press the Navigation Stick RIGHT and LEFT until you have the setting you desire for your voice recordings Your options are HQ SP LP HQ is the best quality but will use the most memory LP is the lower quality but will use the least amount of memory SETTINGS RECORD QUALITY Quality Setting LINE External Microphone or Phone Adapter Setting 4 Note that you also see an option for LINE I...

Страница 10: ... see ERASE Erase is the first option in the menu 2 Press the Navigation Stick until you see VOR This is your Voice Activated Recording option 3 Press the Navigation Stick RIGHT and LEFT until you have the setting you desire Voice Activation can be ON or OFF 4 Press PLAY to keep that setting SETTINGS VOICE ACTIVATION VOR is ON The VOR icon will appear in your display when recording ...

Страница 11: ...he Navigation Stick until you see REP This is your Repeat or Looping option 3 Press the Navigation Stick RIGHT and LEFT until you have the setting you desire You can Repeat an entire FOLDER a single file or turn Repeat OFF 4 Press PLAY to save your setting SETTINGS REPEAT LOOPING Repeat is ON This will repeat your current folder Repeat is ON This will repeat your current track Repeat is OFF This a...

Страница 12: ...in the menu 2 Press the Navigation Stick until you see LED This is where you can turn the Recording Light ON and OFF 3 Push the Navigation Stick RIGHT and LEFT until you have the option you desire 4 Press PLAY to save your setting SETTINGS RECORD LIGHT LED is ON The Record Light will Blink during recording The LED Recording Light is located above the display This will blink during recording when s...

Страница 13: ...until you see ERASE Erase is the first option in the menu 2 Press the Navigation Stick until you see SENSE This is where you can adjust the sensitivity of your Voice Activated Recordings 3 Push the Navigation Stick RIGHT and LEFT until you have the option you desire 4 Press PLAY to save your setting SETTINGS SENSITIVITY It is recommended that you leave this setting in HI ...

Страница 14: ... To record to a particular folder A B C or D push the Folder Button until your folder is selected Your next recording will be saved in that folder 4 If you are in MP3 mode the M folder will be lit Hold the Folder Button until the M folder is no longer lit then choose the folder you in which you want your recordings saved RECORDING Recording to be saved in C folder Recording VOR is ON Track in this...

Страница 15: ...r recorder 1 The Charger Recorder 2 The Telephone Adapter Box 3 A Telephone cord to connect to your phone 4 The audio cable RECORDING TELEPHONE ADAPTER First you will need to connect the Telephone Adapter to your phone line The Telephone Adapter is shown here Remove the line that is currently connected to your phone and plug it into the LINE A connection on the Adapter This is the line coming from...

Страница 16: ...nto the Telephone Adapter into the connector named TEL Plug the other end of this cable into your phone where the telephone line was previously Please test your phone You should hear a dial tone RECORDING TELEPHONE ADAPTER Connect one end of the audio cable into the other side of the Telephone Adapter in the connector named AUDIO OUTPUT 1 foot telephone cable goes here Audio Cable goes here ...

Страница 17: ...t com Phone 877 345 2336 Fax 888 236 2524 Your Telephone Adapter should look like this RECORDING TELEPHONE ADAPTER Connect the other end of the audio cable to the LINE IN connector on your recorder Line In Connector Audio cable Other end is plugged into the Telephone Adapter ...

Страница 18: ...APTER Refer to the SETTINGS RECORD QUALITY part of this manual You will need to change the RECORDING QUALITY to LINE Normally your Record Quality is set to HQ SP or LP for the built in microphone To use the Telephone Adapter you must choose LINE IN for your Quality Setting Recording in LINE IN mode To record a call with the device ON push the Record Switch UP to record Push DOWN to stop recording ...

Страница 19: ...want to playback from 2 If you want your MP3 collection hold the folder button until the M folder lights up 3 Push the Navigation Stick RIGHT and LEFT to choose a track 4 Push the Navigation Stick UP and DOWN to adjust volume level 5 Press PLAY to play your file 6 Press PLAY again to PAUSE 7 Press STOP to stop PLAYBACK Current Folder Track in this folder Track Time ...

Страница 20: ...w show AFOLDB You have just set the Starting Point of your segment that will repeat 2 Let the file play until you have reached the end of the segment you want to repeat 3 At the end of the segment press the Folder Repeat Button again You have just set the End Point The segment will now start to play and it will repeat at the end 4 To stop the repeating segment press the Folder Repeat button again ...

Страница 21: ...evice from Windows before unplugging it MAC OS X RETRIEVE YOUR FILES 1 Device must be OFF before connecting to your Mac 2 Connect USB cable to watch first 3 Connect other end of USB cable to your Mac using USB port directly on Mac Note A USB hub may cause your device to not work properly 4 Please wait until Mac recognizes your device This may take several seconds It will mount as a Device in your ...

Страница 22: ...5 2336 Fax 888 236 2524 Audio Format Voice Recordings WAV Audio Encoding Voice Recordings HQ 192kbps SP 64kbps LP 32kbps LINE IN 384kbps Audio Format Playback MP3 WAV Playback of WAV files created on Device Audio Encoding Playback Standard MP3 files Memory Internal 4 GB DEVICE SPECIFICATIONS ...

Страница 23: ...rg vlc index html The VLC Media Player can play almost any video or audio file type There is a version for Windows and for Mac OS X VIDEO EDITING for WINDOWS MOVIE MAKER 2012 http windows microsoft com en US windows get movie maker download Movie Maker is a simple video editing program from Microsoft Please go to this link and choose the download for your version of Windows Please note Movie Maker...

Отзывы: