background image

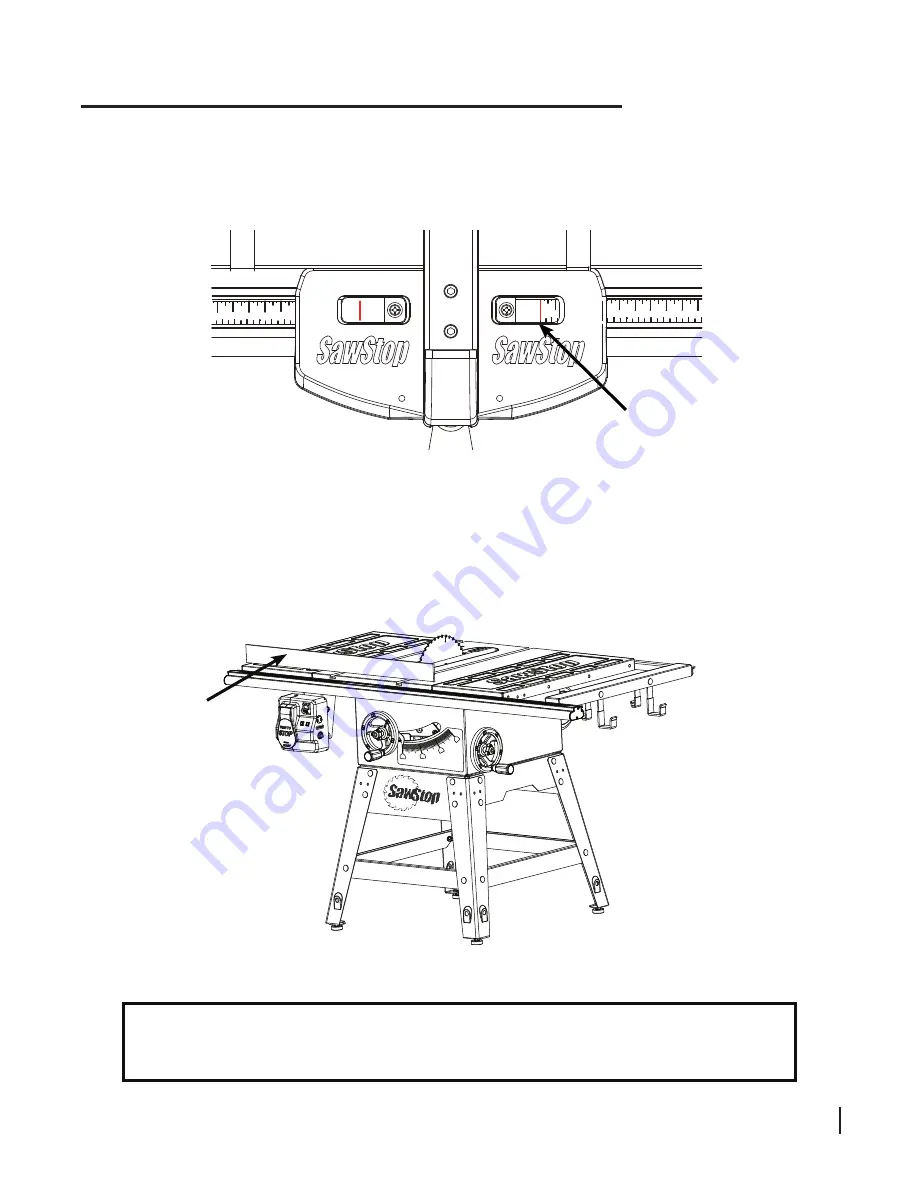
right fence scale 

should read zero

straight-edge

SawStop Contractor Fence Assembly    7

0

3

10

6 0

7 0

8 0

4

5

9 0 10 0

1 0

2 0

3 0

0

1

2

4 0

3 0

2 0

1 0

6 0

5 0

16.  Use a straight-edge to level the front edge of the left extension wing to the cast iron table top (see Fig. 16). 

You may have to pull up or push down on the outer edge of the extension wing. You also may need to remove 

the fence from the table to provide clearance for the straight-edge. Be careful not to change the position of the 

front rail. Once the front edge of the left extension wing is level, use a 13 mm wrench to fully tighten the nuts in 

the front rail that extend through the left extension wing and the table top. Repeat this process to level the front 

edge of the right extension wing and the material support shelf and then fully tighten the remaining nuts in the 

front rail.

Fig. 16

Installing Your Fence Assembly

Congratulations, your fence assembly is now 

installed and your saw is ready to use.

Fig. 15

15.  With the fence unclamped and still against the right side of the saw blade, gently tap one end of the front rail 

with a rubber hammer or mallet to move the rail to the right or left until the cursor on the right fence scale is 

aligned with zero on the underlying ruler (see Fig. 15). Be careful to tap the front rail gently or the plastic cap 

at the end of the rail may be damaged. Once the right fence scale reads zero the front rail is in the correct 

position. 

0

15

30

45

SawStop

10” Contractor Saw

Содержание CNS-SFA

Страница 1: ...SawStop OWNER S MANUAL Contractor Fence Assembly Model CNS SFA...

Страница 2: ...ial and workmanship for ONE YEAR from the date of purchase This warranty does not apply to defects arising from misuse abuse negligence accidents normal wear and tear unauthorized repair or alteration...

Страница 3: ...the eight square head screws but do not fully tighten the nuts at this time Position the front rail so that the left end of the rail extends about inch past the edge of the left extension wing 17 18...

Страница 4: ...square head screws from the hardware pack and slide the square head of each screw into the slot along the rear edge of the front rail see Fig 2 Fig 2 3 Adjust the position of each square head screw so...

Страница 5: ...s and one M8 hex nut see Fig 5 Insert one hex screw into the hole in the extension wing and then use a lock washer and hex nut to hold the screw in place as shown The other two hex screws thread into...

Страница 6: ...e nuts see Fig 8 17 18 16 Fig 8 9 Position the material support shelf between the front rail and the right rear rail by sliding the heads of the two square head screws into the slot on the right end o...

Страница 7: ...to the left side of the material support shelf see Fig 11 Fully tighten the nuts using a 13 mm wrench 12 Locate the fence and red fence handle Thread the handle into the cam lock on the front of the...

Страница 8: ...ssary 14 Do not expose to rain or use in damp locations 15 Do not put your hands inside or underneath the cabinet while the blade is spinning WARNING Moving belts and parts can pinch cut or crush Do n...

Страница 9: ...rough the left extension wing and the table top Repeat this process to level the front edge of the right extension wing and the material support shelf and then fully tighten the remaining nuts in the...

Страница 10: ...width of cut when the fence is on the right side of the blade Each indicator lens in positioned above a ruler on the front rail Each lens has a red cursor line that indicates the precise width of cut...

Страница 11: ...el to the cutting surface of the blade The fence should be securely locked to the rails when the red handle is in the downward locked position If the fence locks tightly and cannot be easily moved no...

Страница 12: ...Contractor Fence Rails Assembly Exploded View 13 12 3 2 13 14 3 2 8 11 2 3 3 2 1 10 2 7 6 4 6 5 1 2 3 3 2 13 13 10 10 10 9 0 15 30 SawStop 10 ContractorSaw 10 SawStop Contractor Fence Assembly...

Страница 13: ...M4x8 Button Head Philips Sheet Metal Screw SFA 07 006 4 7 Right Front Rail End Cap SFA 07 007 1 8 Left Rear Rail SFA 07 008 1 9 Right Rear Rail SFA 07 009 1 10 M8x1 25x16 Hex Screw SFA 07 010 8 11 Ma...

Страница 14: ...Contractor Fence Assembly Exploded View 13 12 14 2 1 27 29 28 19 24 26 25 23 22 17 16 20 21 18 5 8 3 4 9 6 11 15 7 10 SawStop 30 12 SawStop Contractor Fence Assembly...

Страница 15: ...cator Lens SFA 07 027 2 13 M5 3x12x1 Washer SFA 07 028 2 14 M5x0 8x6 Button Head Philips Screw SFA 07 029 2 15 M8x40 Spring Pin SFA 07 030 1 16 Fence Rod SFA 07 031 1 17 Fence Spring Retaining Plate S...

Страница 16: ...Tualatin Oregon 97062 www sawstop com Main Phone 503 570 3200 Service 503 582 9934 Fax 503 570 3303 Email info sawstop com June 2014 Copyright SawStop LLC All Rights Reserved Updates of this manual m...

Отзывы: