


7
Figure 16
NOTE:
LIGHT KITS ARE AVAILABLE AT YOU
SAVOY HOUSE RETAILER. THE FAN IS
ALREADY WIRED TO SUPPORT THE LIGHT
KIT OPTION.
WARNING:
TO REDUCE THE RISK OF FIRE,
ELECTRIC SHOCK, OR OTHER PERSONAL
INJURY. MOUNT FAN ONLY ON AN OUTLET
BOX OR SUPPORTING SYSTEM MARKED
ACCEPTABLE FOR FAN SUPPORT.
Figure 14
Figure 15
GROUND TO
MOUNTING
BRACKET
OR DOWNROD
POWER LINES 120V
GREEN
GROUND
WIRING
BOX
BLK
WH
BLUE
BLK
WH
FAN
LIGHT
WH
WH
BLUE
BLK
LIGHT
FAN
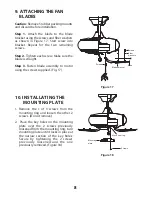
8. FINISHING THE
INSTALLATION
STANDARD CEILING INSTALLATION
Slide canopy up to the ceiling as shown in
Figure 15. Make sure you place the wires
safely into the outlet box. Secure the
canopy to the hanger bracket with the
four screws with your fan.
CLOSE-TO-CEILING INSTALLATION
Remove the fan from the hook on the
hanger bracket. Secure the canopy to the
hanger bracket as shown in Figure 16 with
four screws included with your fan.
Outlet box
Hanger
bracket
Canopy
Screws
Outlet box
Hanger
bracket
Canopy
Screws