background image

EN 

1

10 

Opening Panel 

• Open the Panel by pulling it.
• Clean the outside with a damp cloth and neutral detergent.
• Clean the inside using a damp cloth and neutral detergent; do

not use wet cloths or sponges, or jets of water; do not use
abrasive substances.

Metal grease filters 

These can be washed in the dishwasher, and need to be cleaned 
whenever the 

S1

 Led comes on or at least once every 2 months 

use, or more frequently if use is particularly intensive. 

CLEANING THE FILTERS 

Resetting the alarm signal 

• Turn the Lights and the Suction Motor off.
• Press 

T3

 and hold for at least 3 seconds, until LED flashes

three times in confirmation.

Cleaning the Filters 

• Open the doors.
• Remove the Filter, pushing it towards the back of the unit and

at the same time pulling downward.

• Wash the filter without bending it, and leave it to dry thor-

oughly before replacing (if the surface of the filter changes
colour over time, this will have absolutely no effect on its effi-
ciency).

• Replace, taking care to ensure that the handle faces forwards.
• Close the doors again.

Lighting unit 

• For replacement contact technical support ("To purchase

contact technical support").

Содержание R-9709-W

Страница 1: ...R 9709 W R 9709 W3 Instructions Manual K ytt ohje Bruksanvisning...

Страница 2: ...CS 6 INSTALLATION 7 USE 8 CARE AND CLEANING 9 SIS LT TURVALLISUUSTIETOJA 11 MITAT JA OSAT 14 ASENNUS 15 K YTT 16 PUHDISTUS JA HUOLTO 17 INNEH LL S KERHETSINFORMATION 19 EGENSKAPER 22 INSTALLATION 23 A...

Страница 3: ...eight please refer to the paragraphs on working dimensions and installation If the instructions for installation for the gas hob specify a greater distance this must be respected Check that the mains...

Страница 4: ...to be adopted for fume discharging it is important to closely follow the regulations pro vided by the local authorities WARNING Before installing the Hood remove the protective films Use only screws a...

Страница 5: ...ls not applicable to appliances that only discharge the air back into the room The symbol on the product or on its packaging indicates that this product may not be treated as household waste Instead i...

Страница 6: ...EN 6 6 CHARACTERISTICS Dimensions...

Страница 7: ...trong enough at the suspension point the installer must provide strengthening using suitable plates and backing pieces anchored to the structurally sound parts ELECTRICAL CONNECTION Connect the hood t...

Страница 8: ...siveor24h areon T3 Fixed Turns the Motoron atspeed three Press and hold the button for approximately 3 seconds with all the loads turned off Motor and Lights to resetthe Filtersaturation alarm TheLED...

Страница 9: ...e Increases the working speed each time it is pressed Delay 24H Brief pressure Activates Deactivates the Delay function automatic switch off with a 30 delay The display shows the operating speed and t...

Страница 10: ...TERS Resetting the alarm signal Turn the Lights and the Suction Motor off Press T3 and hold for at least 3 seconds until LED flashes three times in confirmation Cleaning the Filters Open the doors Rem...

Страница 11: ...allit voidaan asentaa alemmas katso ty ja asennusmittoja koskevaa kappaletta Jos kaasuk ytt isen keittotason asennusohjeet m r v t ett et isyyden on oltava yll mainittua suurempi ohjeita on noudatetta...

Страница 12: ...suuteen liittyvien toimenpiteiden suhteen on noudatettava tarkkaan paikallisten viranomaisten antamia m r yksi VAROITUS Poista suojakalvot ennen liesituulettimen asentamista K yt vain liesituulettimel...

Страница 13: ...a k ytet n samanaikaisesti kaasulla tai muilla polttoaineilla toimivien laitteiden kanssa ei koske laitteita jotka poistavat tilaan vain ilmaa Merkki tuotteessa tai sen pakkauksessa osoittaa ett tuote...

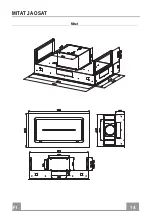
Страница 14: ...FI 1 14 MITAT JA OSAT Mitat...

Страница 15: ...le kiinnityskohdassa riitt v n tukeva asentajan t ytyy vahvistaa sit laatoilla ja vastalaatoilla jotka kiinnitet n rakenteellisesti lujiin osiin S HK LIIT NT Liit liesituuletin s hk verkkoon asentamal...

Страница 16: ...tett viss kun tehonopeus tai 24h ontoiminnassa T3 Kiinte K ynnist moottorinkolmannellanopeudella Jos pid t painiketta painettua noin 3 sekuntia kun kaikki toiminnot moottori ja valo on sammutettu tapa...

Страница 17: ...i poistaa k yt st tehonopeuden 24H Ajastus Lyhyt painallus Aktivoi poistaa k yt st ajastustoiminnon automaattisen 30 minuutin kuluttua tapahtuvan sammumisen N ytt k ytt nopeuden ja oikealla alhaalla o...

Страница 18: ...in jos niit k ytet n paljon SUODATTIMIEN PUHDISTUS H lytyksen kuittaus Sammuta valo ja imumoottori Paina painiketta T3 ainakin 3 sekunnin ajan kunnes led vilk kuu kolme kertaa Suodattimien puhdistus A...

Страница 19: ...kten r 650 mm vissa modeller kan installeras p en l gre h jd se avsnittet g llande drift och installationsm tt Om installationsanvisningarna f r gasspish llen anger ett st rre avst nd n det ovan angiv...

Страница 20: ...kerhetsm ssiga tg rder som ska vidtas f r avledning av r k VARNING Ta bort skyddsfilmen innan du installerar k ksfl kten Anv nd endast skruvar och beslag som r l mpliga f r k ksfl kten VARNING Om det...

Страница 21: ...ksfl kten anv nds samtidigt med andra apparater som anv nder gas eller andra br nslen g ller inte apparater som endast sl pper ut luft i lokalen Symbolen p apparaten eller emballaget anger att appara...

Страница 22: ...SE 2 22 EGENSKAPER M tt...

Страница 23: ...kt i upph ngningspunkten ska installat ren se till att f rst rka den med l mpliga plattor och motplattor f rankrade i strukturm ssigt motst ndskraftiga delar ELEKTRISK ANSLUTNING Anslut k ksfl kten ti...

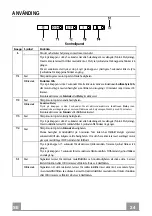
Страница 24: ...f rdr js med 30 minuter Kan inte aktiveras n r Intensiv eller24h raktiverad Fast Sl rp motorn p dentredjehastigheten T3 Tryck p knappen i cirka 3 sekunder n r alla belastningar r avst ngda Motor Bely...

Страница 25: ...Aktiverar avaktiverar funktionen Intensiv 24H Delay Kort tryck Aktiverar avaktiverar funktionen Delay den automatiska avst ngningen efter 30 minuter Displayen visar fl kthastigheten och punkten i den...

Страница 26: ...v anv ndning RENG RING AV FILTER terst llning av larmsignal Sl ck belysningen och st ng av utsugningsmotorn Tryck p knappen T3 i minst 3 sekunder tills den tredubbla blinkningen av lysdioden som bekr...

Страница 27: ......

Страница 28: ...991 0563 398_ver2 181126 D0005221_01...

Отзывы: