background image

EN 

1

10

MAINTENANCE


REMOTE CONTROL (OPTIONAL) 

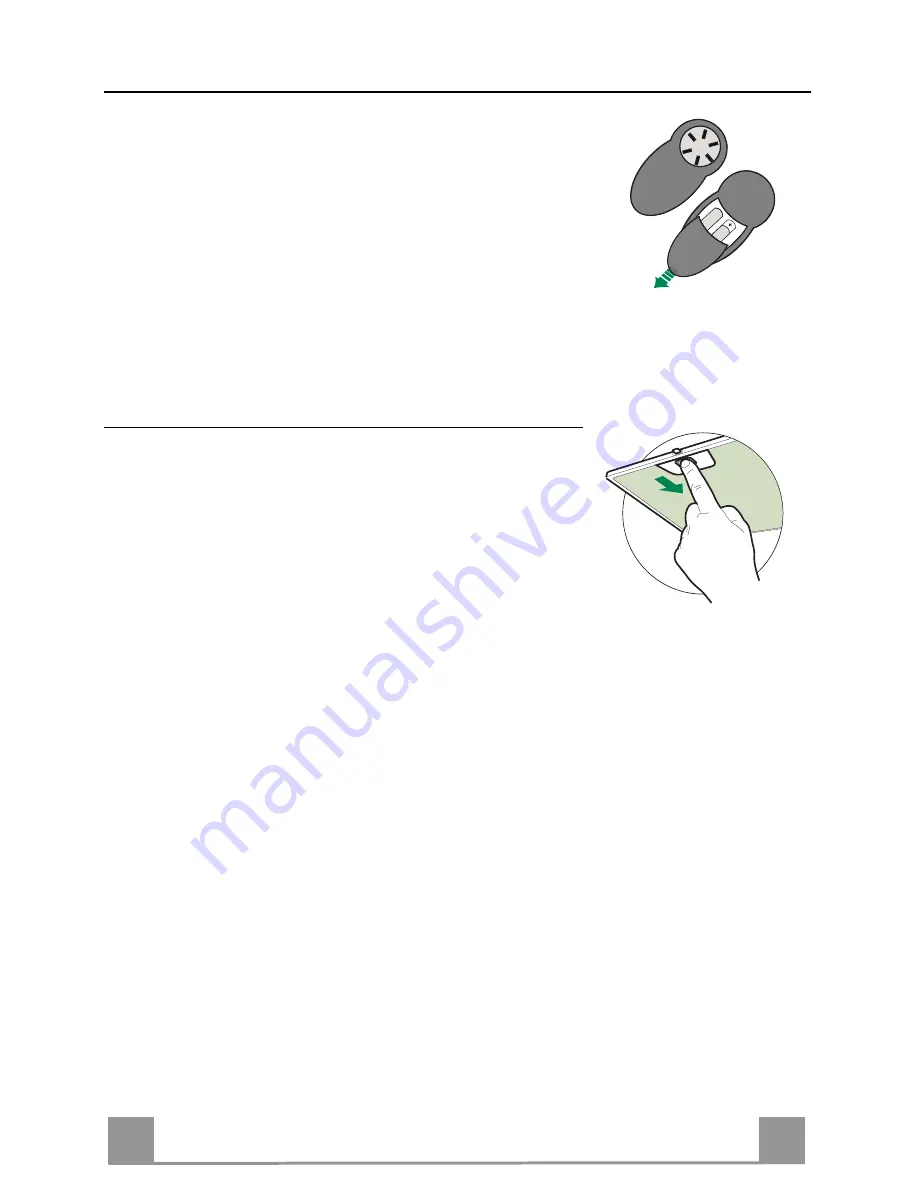
The appliance can be controlled using a remote control powered 
by a 1.5 V carbon-zinc alkaline batteries of the standard LR03-
AAA type (not included). 
• Do not place the remote control near to heat sources.
• Used batteries must be disposed of in the proper manner.

Metal grease filters 

These can be washed in the dishwasher, and need to be cleaned 
whenever the 

S1

 Led comes on or at least once every 2 months 

use, or more frequently if use is particularly intensive. 

CLEANING THE FILTERS 

Resetting the alarm signal 

• Turn the Lights and the Suction Motor off.
• Press 

T3

 and hold for at least 3 seconds, until LED flashes

three times in confirmation.

Cleaning the Filters 

• Open the lighting unit by pulling on the nocth.
• Remove the Filter, pushing it towards the back of the unit and

at the same time pulling downward.

• Wash the filter without bending it, and leave it to dry thorough-

ly before replacing (if the surface of the filter changes colour
over time, this will have absolutely no effect on its efficiency).

• Replace, taking care to ensure that the handle faces forwards.
• Replace the lighting unit.

Содержание C-7804-S

Страница 1: ...Instructions Manual Käyttöohje C 7804 S C 7804 W ...

Страница 2: ...2 2 INDEX RECOMMENDATIONS AND SUGGESTIONS 3 CHARACTERISTICS 4 INSTALLATION 5 USE 9 MAINTENANCE 10 SISÄLTÖ OHJEET JA SUOSITUKSET 12 MITAT JA OSAT 13 ASENNUS 14 KÄYTTÖ 18 HUOLTO 19 EN FI ...

Страница 3: ...cifyagreaterdistancespecifiedabove thishas tobetakenintoaccount Regulationsconcerningthedischargeofairhavetobefulfilled USE Theextractorhoodhasbeendesignedexclusivelyfordomesticusetoeliminatekitchensmells Neverusethehoodforpurposesotherthanforwhichithasbeendesigned Neverleavehighnakedflamesunderthehoodwhenitisinoperation Adjust the flame intensity to direct it onto the bottom of the pan only makin...

Страница 4: ...quipped with the Exhaust Group 7 1 tube in PVC 8 1 Directioned grid 8c 1 Air outlet reduction ø 120mm 9 1 Reduction flange ø 150 120 mm 10 1 Dumper Ref Q ty Installation components 11 4 Small blocks ø 10 12a 4 Screws 5 x 70 12b 4 Screws M4 x 15 12e 2 Screws 2 9 x 9 5 13 4 Screws plug M4 Q ty Documentations 1 Instruction booklet 11 12a 3 10 12b 13 1 9 7 12e 8 8c ...

Страница 5: ...l line at a minimum of 1050 mm above the Cooker Top As indicated mark a reference point at 100 mm to the right of the vertical reference line Repeat this operation on the other side checking that the two marks are level As indicated mark a reference point at 390 mm above the horizontal reference line and at 100 mm to the right of the vertical reference line Repeat this operation on the other side ...

Страница 6: ... the air outlet hole in the wall proceed in accord ance with the scheme in the paragraph concerning the wall drilling In case the connection is made with a ø 120 mm pipe insert the reduction flange 9 on the hood body outlet Fix the pipe with an adequate quantity of pipe clamps This material is not supplied together with the hood Remove the charcoal filter if present AIR OUTLET ON THE UPPER PART OF...

Страница 7: ...and fix it laterally with the 4 12b screws Cover the screw seats with the plugs 13 supplied with the hood Recycling version Remove the pre cut piece Lean the hood body on the support and fix it laterally with the 4 12b screws Cover the screw seats with the plugs 13 supplied with the hood Place the directioned grid 8 on the pipe and make sure that it is correctly installed Fix the directioned grid ...

Страница 8: ... them towards the back of the group and pulling down at the same time Being sure that the connector of the feeding cable is correctly inserted in the socket placed on the side of the fan Connect the control connector Cmd Connect the Spotlights connector Lux to the socket provided behind the lighting unit cover Replace the filters make sure that the handle is visible on the outside and the lighting...

Страница 9: ...onds with all the loads turned off Motor and Lights to perform a reset of Filter saturation alarm The LED S1 flashes three times T4 Fixed Turns the Motor on at INTENSIVE Speed This speed is timed to run for 6 minutes At the end of this time the system returns automatically to the speed that was set before If it is activated with the motor turned off the hood will switch to OFF at the end of the ti...

Страница 10: ...quently if use is particularly intensive CLEANING THE FILTERS Resetting the alarm signal Turn the Lights and the Suction Motor off Press T3 and hold for at least 3 seconds until LED flashes three times in confirmation Cleaning the Filters Open the lighting unit by pulling on the nocth Remove the Filter pushing it towards the back of the unit and at the same time pulling downward Wash the filter wi...

Страница 11: ...m signal Turn the Lights and the Suction Motor off Press T3 and hold for at least 3 seconds until LED flashes three times in confirmation Changing the Filter Open the lighting unit by pulling on the notch provided Remove the Metal Grease Filter Remove the saturated Activated charcoal filter using the hooks provided Fit the new Filter hooking it into place Fit the Grease filter and the Light Unit b...

Страница 12: ...ntamuuhuntarkoitukseenkuin mihinseonsuunniteltu Äläkoskaanjätäavotultaliesituulettimenalleliesituulettimenollessakäynnissä Säädäliekintehositen ettäliekkikohdistuuvainastianpohjaaneikäsenreunoille Syviä paistinpannuja on paiston aikana koko ajan pidettävä silmällä sillä ylikuumentunut öljy voi leimahtaatuleen Lapsettaihenkilöt joitaeioleopastettulaitteenoikeaankäyttöön eivätsaakäyttääliesituuletin...

Страница 13: ...a imuyksikkö 7 1 PVC putki 8 1 Ilmansuuntausritilä 8c 1 Ilmanpoistoputken muhvi ø 120 mm 9 1 Supistuslaippa ø 150 120 mm 10 1 Laippa ja venttiili Nro Määrä Asennusosat 11 4 Tappi ø 10 12a 4 Ruuvi 5 x 70 12b 4 Ruuvi M4 x 15 12e 2 Ruuvi 2 9 x 9 5 13 4 Ruuvinpäällisnapit M4 Määrä Kirjallinen materiaali 1 Käyttöohjeet 11 12a 3 10 12b 13 1 9 7 12e 8 8c ...

Страница 14: ...tysuora viiva kattoon tai ylärajaan saakka liesituulettimen asennusalueen keskikohdalle vaakasuora viiva vähintään 1050 mm keittotason yläpuolelle Merkitse kuten kuvassa viitepiste 100 mm pystysuorasta viitelinjasta Toista toimenpide toiselle puolelle ja tarkista että ne ovat samalla tasolla Merkitse viitepiste 390 mm vaakasuoran viitelinjan yläpuolelle ja 100 mm oikealle pystysuorasta viitelinjas...

Страница 15: ... poraus kappaleen piirrosta Sovita supistusmuhvi 9 tuulettimen ilman ulostuloaukkoon mikäli käytät ø120 mm n putkea Käytä putken kiinnitykseen tarpeellinen määrä putken kiinnitysosia Tämä materiaali ei tule tuulettimen mukana Poista mahdolliset aktiivihiilisuotimet LIITOS TUULETTIMEN YLÄPUOLELTA Mikäli käytät ø 150 mm n putkea yhdistä tuuletin ilman ulosmenoaukkoon joko jäykällä tai taipuisalla pu...

Страница 16: ...ennusta Aseta tuuletin tukiosaan Kiinnitä se sivuilta neljällä ruuvilla 12b Aseta mukana tulevat ruuvinpäällisnapit 13 ruuveihin Kiertoilmaversio Poista irrotettava osa ulostuloaukon päältä Aseta tuuletin tukiosaan Kiinnitä se sivuilta neljällä ruuvilla 12b Aseta mukana tulevat ruuvinpäällisnapit 13 ruuveihin Aseta ilmansuuntausritilä 8 putkeen Tarkista sen virheetön asennus Kiinnitä ilmansuuntaus...

Страница 17: ... painamalla kiinnitintä Poista suodatin työntämällä sitä ryhmän takaosaan päin ja vetämällä se alas Varmista että virtajohdon liitin on oikein kiinnitetty imurin pistorasiaan Liitä kytkimien liitin Cmd Liitä Lux valojen liitin valaistusryhmän kannen takana olevaan pistorasiaan Aseta rasvasuodatin takaisin paikalleen ja sulje valaistusryhmä Cmd Lux ...

Страница 18: ...ät painiketta painettua noin 3 sekuntia kun kaikki toiminnot moottori ja valo on sammutettu tapahtuu kuittaus ja merkkivalo S1 vilkkuu kolme kertaa T4 Kiinteä Käynnistää moottorin TEHONOPEUDELLA Nopeus on ajastettu 6 minuutin ajaksi Kun aika on kulunut järjestelmä palaa automaattisesti aikaisemmin valitulle nopeudelle Jos käynnistät toiminnon moottorin ollessa sammutettu määrätyn ajan kuluttua lai...

Страница 19: ...yy tai vähintään 2 käyttökuukauden välein tai useammin jos niitä käytetään paljon SUODATTIMIEN PUHDISTUS Hälytyksen kuittaus Sammuta valo ja imumoottori Paina painiketta T3 ainakin 3 sekunnin ajan kunnes led vilkkuu kolme kertaa Suodattimien puhdistus Avaa valaistusryhmä vetämällä kiinnikettä Poista suodatin työntämällä sitä ryhmän takaosaan päin ja vetämällä samalla alas Pese suodatin varoen taiv...

Страница 20: ...a VAIHTO Hälytyksen kuittaus Sammuta valo ja imumoottori Paina painiketta T3 ainakin 3 sekunnin ajan kunnes led F vilkkuu kolme kertaa Suodattimen vaihtaminen Avaa valaistusryhmä vetämällä kiinnikettä Irrota rasvasuodatin Poista aktiivihiilihajusuodatin irrottamalla se koukuista Asenna uusi suodatin ja kiinnitä se paikalleen Aseta metalliset rasvasuodattimet uudelleen paikoilleen Sulje valaistusry...

Страница 21: ......

Страница 22: ......

Страница 23: ......

Страница 24: ...991 0364 426_ver1 150209 ...

Отзывы: