background image

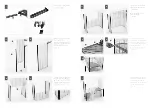
Attach on all 4 profiles (f ) the 4 
corner pieces (h).

Slide the 2 side panels (o) in the 
vertical profiles (k). 
Make sure that the closures are 
facing outwards and the panels 
are well placed in the corner 
pieces (h).

Slide the back panel with hooks 
(q) in the vertical profiles (k). 
Make sure the hooks are facing 
upwards and the vertical wires 
of the panel are on the outside .

Turn the cage 180 ° and slide 
the front panel with hooks (n) 
in the profiles. 

Make sure that the closure of 
the door is facing 
outwards.

Insert 4 x g in every platform 
(b). Place the  first platform left 
back: knobs between wire 12 
and 13, height 13.5 cm or 5 ¼ 
inch as shown in 5 c. 
Do not tighten the screws (f ) 
too strongly. 

Repeat as indicated in figures 
5a, 5b & 5c  and place the 2nd 
platform right front: knobs 
between wire 35 and 36, height 
37.5 cm or 15 inch, as shown 
in 6.

1

2A

2B

3A

3C

4A

4B

5C

5A

5B

6

A

A

O

K

H

Q

G

B

F

Содержание Zeno 3 Empire

Страница 1: ...assembly instructions Zeno 3 Empire petslovesavic ...

Страница 2: ... all the components If any part is missing or damaged do not use your cage instruction video A B C D E J I H G F ATTENTION To avoid leakage always fill bottle 100 Om lekken te vermijden vul de fles altijd 100 Afin d éviter des fuites toujours remplir la bouteille 100 Um Tropfen zu vermeiden Tränke immer 100 füllen Para evitar gotas siempre llenar la botella 100 Rince spout with hot water before fi...

Страница 3: ...e panel are on the outside Turn the cage 180 and slide the front panel with hooks n in the profiles Make sure that the closure of the door is facing outwards Insert 4 x g in every platform b Place the first platform left back knobs between wire 12 and 13 height 13 5 cm or 5 inch as shown in 5 c Do not tighten the screws f too strongly Repeat as indicated in figures 5a 5b 5c and place the 2nd platf...

Страница 4: ... knobs between wire 52 and 53 height 57 5 cm or 22 inch as shown in 8 Place the roof panel l on top Insert the top front panel m into the profiles Again make sure the closure of the door is on the outside Attach the hammock j on the roof panel place the corner toilet i in the bottom tray and connect the platforms with the ladder c 7 8 9A 9B 10A 10B 11A 11B P M L ...

Страница 5: ...lly install the drinking bottle e and the feeding bowl d and your cage is now ready for use 12 www savic be Ringlaan 10 B 8501 Heule Belgium Tel 32 56 35 33 45 Fax 32 56 35 77 30 info savic be Doc nr 931868 ...

Отзывы: