background image

9

Accessories

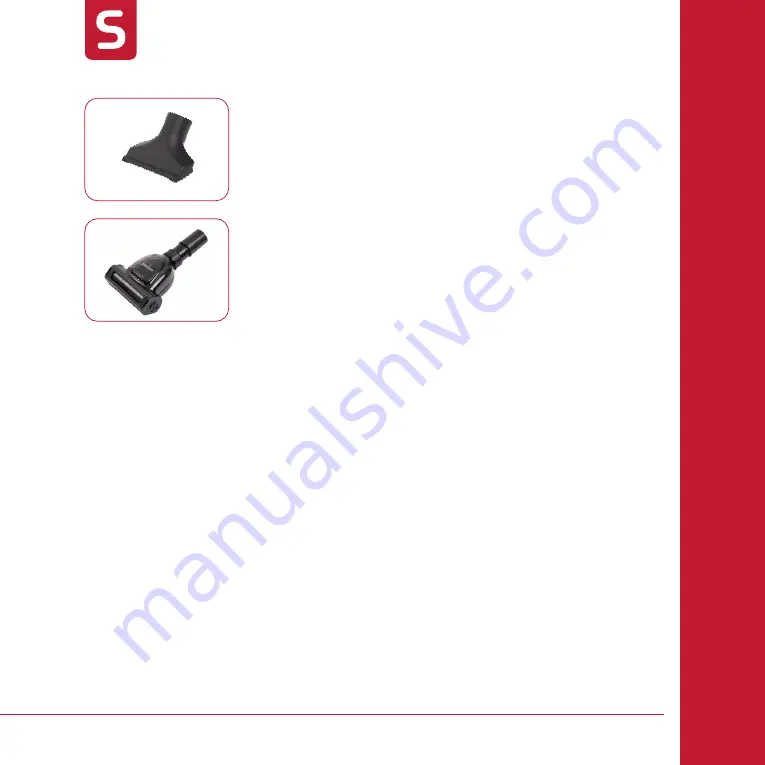
Upholstery Tool

Designed to remove dust from sofas, chairs, mattresses and cushions.

Mini Hand Turbo Tool

Makes light work of removing pet hair from your furniture, car  
and upholstery.

Safety Precautions: 

1.  Keep hair, hands and feet away from rotating brush while 

the motorised brush is running. 

2.  Do not run the motorised brush over electric cables or 

string. 

3.  Do not use the motorised brush on pets. 

4.  If children are present, make sure to turn the vacuum off 

when leaving the motorised brush unit unattended. 

5.  Do not attempt to service or unclog the motorised brush 

while the vacuum is running. 

6.  The motorised brush will operate when it is connected to a 

running vacuum.

Содержание SJ-100

Страница 1: ...pro pets bagged vacuum SJ 100 ...

Страница 2: ...2 A B K L M N O P C H I J D E F G Accessories Q U R S T ...

Страница 3: ...ew Sauber vacuum cleaner There are many useful features built into your cleaner We recommend that you carefully read this instruction manual for the best results Accessories Q Combination Floor Tool R Mini Hand Turbo Tool S Crevice Tool T Dusting Brush U Upholstery Tool Specifications Rating 220 240VAC Max Power 1500W 1600W with Powerhead Dust Capacity 2 5L Telescopic Tube Aluminium Power Cable Le...

Страница 4: ...nnected to an AC power supply at the voltage shown on the rating plate This cleaner should only be used for its intended purpose as described in these instructions Precautionary measures 1 Do not operate the vacuum cleaner too close to heaters radiators and other hot surfaces 2 Before inserting the power plug into the power supply make sure your hands are dry 3 Before turning on the vacuum cleaner...

Страница 5: ... use the power cable as a handle or pull the power cable around sharp edges or corners Avoid running the appliance over the power cable 8 Ensure the appliance is switched off before unplugging 9 Do not handle or operate the appliance with wet hands and follow electrical safety precautions at all times 10 Extreme caution should be exercised when using the appliance on stairs 11 Do not attempt to ch...

Страница 6: ... electrical contacts and electrical tubes are damaged have them replaced immediately 25 Never clean the vacuum cleaner or any of the electrical parts especially the electrical connections with water or liquid cleaners 26 Never attempt to make any modifications electrically to the vacuum cleaner 27 Always store the appliance indoors in a cool and dry place 28 Do not pick up water dry household use ...

Страница 7: ...ed on the handle is in the Off position before fitting the handle to the rod When not using the Powerhead ensure that the Powerhead On Off Button is in the Off position Before You Begin Assembly IMPORTANT Always remove the power plug from the power supply before fitting or removing accessories LIVE PARTS within the hose rod and Powerhead Fitting Insert the flexible hose into the hose inlet of the ...

Страница 8: ...hard floors WARNING Seek advice from carpet manufacturers before using the motorised Powerhead on woollen or delicate carpets Accessories Combination Floor Tool Perfect for hard floors or carpeted surfaces Crevice Tool For crevices corners and hard to reach areas Dusting Brush Soft bristles help remove dust without scratching surfaces ...

Страница 9: ...et away from rotating brush while the motorised brush is running 2 Do not run the motorised brush over electric cables or string 3 Do not use the motorised brush on pets 4 If children are present make sure to turn the vacuum off when leaving the motorised brush unit unattended 5 Do not attempt to service or unclog the motorised brush while the vacuum is running 6 The motorised brush will operate w...

Страница 10: ...xtend the cable beyond the red mark 2 Insert the power plug into the power supply 3 Press the On Off button to turn the vacuum On or Off 1 Press the On Off Button to turn off the vacuum 2 Unplug the power cable from the power supply 3 To rewind the power cable press the Cable Rewind Button with one hand and guide the power cable with the other hand to ensure that it does not whip Turning On Off th...

Страница 11: ...stored separately Vacuum Cleaner Storage Replacing the Dust Bag Note only use the dust bag supplied or recommend by the manufacturer to avoid causing damage to the machine and voiding the warranty Note Always operate the cleaner with the dust bag installed If the dust bag is not installed or installed incorrectly the dust bag cover may not close completely Instructions For Use Maintenance 1 Remove...

Страница 12: ...ag and reinsert the bracket and dust bag assembly by sliding it back into the machine 6 Gently close the cover you will hear a click when closed properly Note please ensure that the dust bag is fully inserted into the bag holder before you close the cover to avoid dust leaking from the dust bag ...

Страница 13: ...sembly 2 Gently remove the pre motor filter 3 Replace with a new filter or clean as described Note 1 The Pre Motor Filter should be replaced every six months or when it becomes visibly dirty 2 Always operate the cleaner with clean filters otherwise there may be a reduction in the suction power or use could result in the motor being damaged 3 Do not use a washing machine to wash the filter or a hai...

Страница 14: ...move the Exhaust Grille to access the Rear Motor filter 2 Gently remove the Rear Motor filter as shown 3 Replace with a new filter or clean as described Note It is recommended to replace the filter every 6 months or when it becomes visibly dirty ...

Страница 15: ...the rotating bristles push the lock button on the side of the turbo brush to the downward position The rotating bristles must be unlocked and in the upward position 3 Remove the clear cover 4 Remove any dirt or hair from the roller brush 5 Replace the clear cover 6 Lock the collar lock by twisting clockwise 7 Rotate the rotating bristles to the downward position and lock in place by pushing the lo...

Страница 16: ...erhead hose and or rod are faulty Depending on how much your vacuum is used the motorised Powerhead drive belt will occasionally require changing 1 Disconnect the Powerhead from the telescopic tube Cleaning the Rotating Brush WARNING Ensure that the cleaner is disconnected from the power supply and the Powerhead is disconnected from the rod before performing any maintenance Note The Rotating Brush...

Страница 17: ...ide of the brush first from the Powerhead followed by the left side where the belt loops around the end cap Slide the old belt off the drive shaft and then off the end cap If the belt is broken remove all the broken pieces 5 Place the new belt over the drive shaft first and then around the end cap Make sure the text on the belt is outward facing then insert the rotating brush back in to the Powerh...

Страница 18: ...tch is in the ON position The vacuum performance is deteriorating Check the appliance to ensure there are no blockages Clear any blockages that may be found Check that the air inlet filter is not dusty frequently clean rubbish or replace air inlet and air outlet HEPA filters every 6 months The cleaner makes an abnormal sound when switched on Turn off the cleaner immediately Check the appliance to ...

Страница 19: ...9 Part Part Number Dust Bag 32440504 Exhaust Inlet Filter Set 32201776 Rod 31300826 Hose Assembly 31220968 Powerhead Brush Roller 33788166 Powerhead Belt 32100175 Spare Parts Troubleshooting Spare Parts ...

Страница 20: ...e Aids Pty Limited Brandon Office Park Building 3 First Floor 530 540 Springvale Road Glen Waverley Victoria 3150 or on 1800 728 237 AUS or 0800 282 288 NZ Monday Friday 9am 5pm EST The decision to repair or replace the cleaner is at the sole discretion of Electrical Home Aids Pty Limited If Electrical Home Aids Pty Limited decide to repair or replace the cleaner it will do so at its own cost Elec...

Отзывы: