background image

PRODUCT DESCRIPTION

HOW TO USE

        ", 

If no need to set the cooking time, when turn counterclockwise the timer knob to "


the timer will not return to "


0


" automatically and the oven will keep in power-on state.


If need to set the cooking time, turn clockwise the timer knob to the time you need. 
When the setting cooking time was reached, the timer will return to "


0


" automatically 

with the sound of "


Ding, Ding, Ding


" and the oven will be power-off.

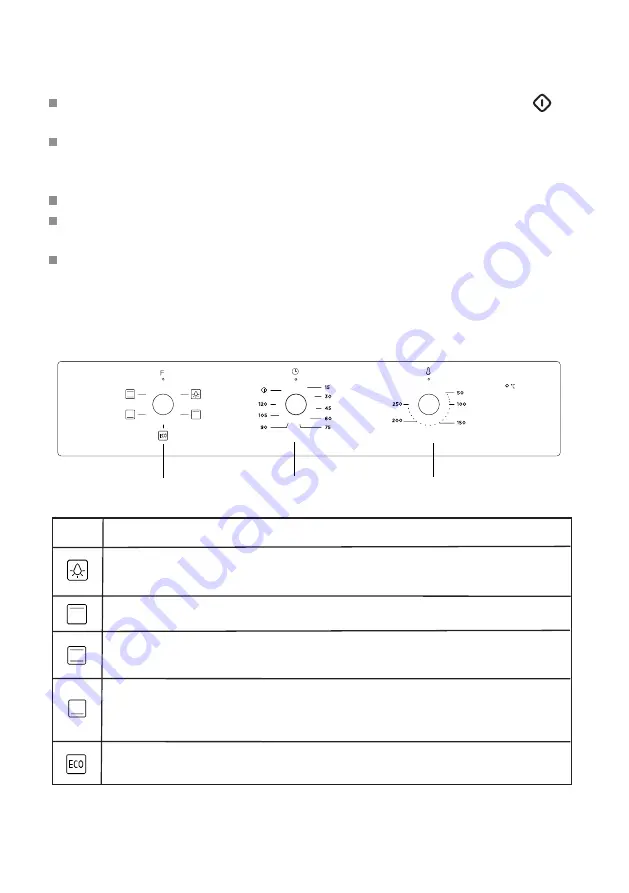
To set functions by turning the function knob to desired level.
To set the temperature by turning the temperature knob.
The oven will automatically start cooking after function, time and temperature are set.


If the oven is not in use, always set all the knobs to "


0


".

Symbol

Function description

Oven Lamp: Which enables the user to observe the progress of cooking without 

opening the door. Oven lamp will light for all cooking functions. except ECO function.

Top heater: The top heating element is working.

Function Knob  

  Timer Knob  

       Temperature Knob

Conventional cooking: Heaters from the upper and the lower side uniformly heat the 

exposed food. Baking and roasting is possible only at single level.

Bottom heater: Heat is applied only by the bottom side of the oven. Use this option 

for browning the bottom side of the food. This function is suitable for slow cooking 

recipes or for warming up meals.

18

 For energy-saved cooking. Cooking the selected ingredients in a gentle manner, and the heat 

comes from the top and the bottom.

EN-6

Содержание 1-4FF Series

Страница 1: ... ...

Страница 2: ......

Страница 3: ...adulto Este horno no puede ser utilizado por niños de 8 años o más o por personas con facultades físicas sensoriales o mentales reducidas o con falta de experiencia y conocimientos a menos que sea bajo supervisión o siguiendo indicaciones sobre su uso de forma segura y de que comprendan los peligros relacionados Deberá asegurarse de que los niños no jueguen con el horno La limpieza y el mantenimie...

Страница 4: ...e responsabiliza de ningún daño que pueda haber sido causado por su instalación en un lugar inadecuado o por parte de personal no autorizado No deje nada encima de la puerta del horno cuando ésta se encuentre abierta ya que podrí a volcar el horno o romper la puerta Algunos componentes del horno pueden mantener el calor durante mucho tiempo espere a que se enfrí e completamente antes de tocar los ...

Страница 5: ...sterior del horno y la pared o superficie contigua deberá haber un mínimo de 45 mm DECLARACIÓN DE CONFORMIDAD Una vez desempaquetado el horno asegúrese de que no presente ningún tipo de daño Si tuviera alguna duda acerca de ello no lo utilice y contacte a un técnico cualificado Mantener los materiales de embalaje como bolsas de plástico poliestireno o clavos fuera del alcance de los niños INSTALAC...

Страница 6: ...los mandos a 0 DESCRIPCIÓN DEL PRODUCTO Selector de funciones Temporizador Selector de temperatura Símbolo Bombilla del horno Permite controlar el progreso de la cocción sin tener que abrir la puerta del horno Resistencia superior está trabajando Ambas resistencias Las resistencias superior e inferior funcionan al mismo tiempo para proporcionar una cocción por convección El horno tiene que estar p...

Страница 7: ...los raíles laterales del horno Ello garantizará una correcta retirada de la parrilla y que los alimentos calientes no se deslicen ni se caigan OR Soporte desmontable Este soporte se sitúa en el lado quitar para limpiar las paredes del horno sólo para modelos específicos derecho y en el lado izquierdo del horno pudiéndose Guías telescopicas Algunos de los modelos contienen guías telescópicas para f...

Страница 8: ...scar la cubierta de vidrio en su sitio ABERTURAS DE VENTILACIÓN Una vez finalizada la cocción la temperatura de la cavidad será de más de 70 grados La ventilación a través de las aberturas seguirá funcionando durante 15 minutos después de haber finalizado la cocción con el horno FIJACIÓN DEL HORNO EN SU COMPARTIMIENTO 1 Coloque el horno en su compartimiento 2 Abra la puerta del horno 3 Fije el hor...

Страница 9: ...s dependerá del modelo de horno que haya adquirido L N CONEXIÓN DEL HORNO 555 20 595 595 560 570 min 560 606 600 80 250 100 Nota 1 Solo son admisibles las desviaciones expuestas 2 En el hueco de encastre no está incluido el interruptor principal ES 8 ...

Страница 10: ... No utilice un limpiador de alta presión para limpiar el horno Las bandejas para horno pueden lavarse con un detergente suave Este aparato electrodoméstico está etiquetado de acuerdo a la Directiva europea 2012 19 EU de Residuos de Aparatos Eléctricos y Electrónicos Al garantizar el desechado correcto de este producto ayudará a evitar posibles consecuencias negativas para el medio ambiente y la sa...

Страница 11: ... 90 minutes to clean oil impurities inside the cavity During the first use it is completely normal that there will be a slight smoke and odors If it does occur you merely have wait for the smell to clear before putting food into the oven Please use the product under the open environment The appliance and its accessible parts become hot during use Care should be taken to avoid touching heating elem...

Страница 12: ... to avoid the possibility of electric shock The means for disconnection must be incorporated in the fixed wiring in accordance with the wiring specifications Children should be supervised to ensure that they do not play with the appliance This appliance is not intended for use by persons including children with reduced physical sensory or mental capabilities or lack of experience and knowledge unl...

Страница 13: ... metal scrapers to clean the oven door glass since they can scratch the surface which may result in shattering of the glass A steam cleaner is not to be used The appliances are not intended to be operated by means of an external timer or separate remote control system The instructions for ovens that have shelves shall include details indicating the correct installations of the shelves EN 4 ...

Страница 14: ...te the fixing holes open the oven door and look inside To allow adequate ventilation the measurements and distances adhered to when fixing the oven IMPORTANT If the oven is to work properly the kitchen housing must be suitable The panels of the kitchen unit that are next to the oven must be made of a heat resistant material Ensure that the glues of units that are made of veneered wood can withstan...

Страница 15: ...ture are set If the oven is not in use always set all the knobs to 0 Symbol Function description Oven Lamp Which enables the user to observe the progress of cooking without opening the door Oven lamp will light for all cooking functions except ECO function Top heater The top heating element is working Function Knob Timer Knob Temperature Knob Conventional cooking Heaters from the upper and the low...

Страница 16: ... grill with fan NOTE When placing dishes on the oven floor please DO NOT use functions with bottom heater to prevent heat gathering at bottom only for specific models Telescopic runner Some models might with telescopic runners to facilitate the use of oven These telescopic runners and slider brackets could be disassembled by unscrewing the screws used to fix it After disassembled dishes and tray c...

Страница 17: ...SHELF PLACEMENT WARNING To ensure the oven shelves operate safely correct placement of the shelves between the side rail is imperative Shelves and the pan only can be used between the first and fifth layers The shelves should be used with the right direction it will ensure that during careful removal of the shelf or tray hot food items should not slide out OR SECURING THE OVEN TO THE CABINET 1 Fit...

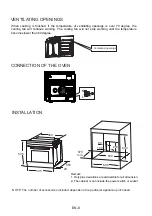
Страница 18: ...is not include the power switch or socket VENTILATING OPENINGS CONNECTION OF THE OVEN Ventilating openings L N When cooking is finished if the temperature of ventilating openings is over 70 degree the cooling fan will continue working The cooling fan will not stop working until the temperature becomes lower than 60 degree 555 20 595 595 560 570 min 560 606 600 80 250 100 EN 9 ...

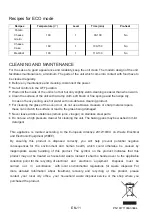
Страница 19: ... be washed in mild detergent CLEANING AND MAINTENANCE This appliance is marked according to the European directive 2012 19 EU on Waste Electrical and Electronic Equipment WEEE By ensuring this product is disposed correctly you will help prevent potential negative consequences for the environment and human health which could otherwise be caused by inappropriate waste handling of this product The sy...

Страница 20: ......

Отзывы: