


Reference
31
6
Reference
30
6
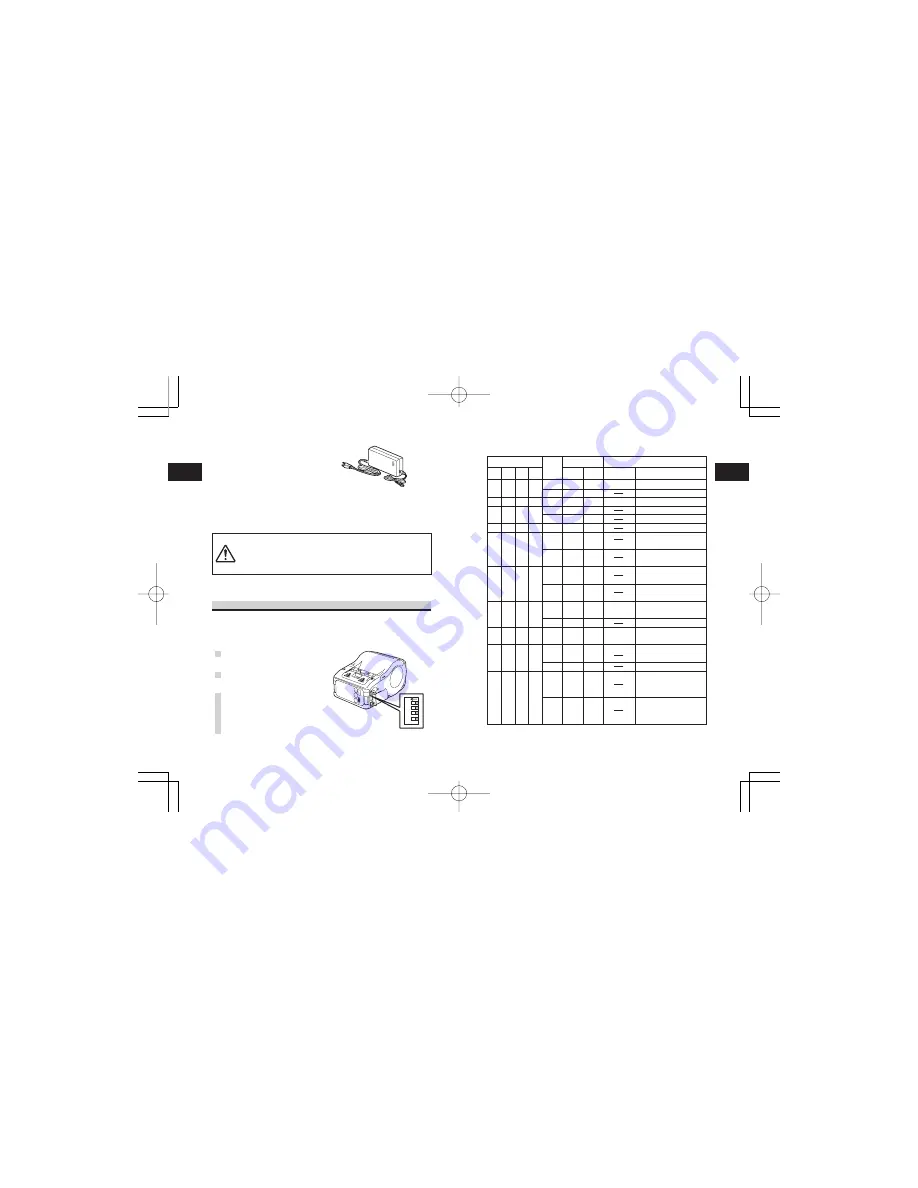
DIP Switch Setting
RS-232C
RS-232C
IrDA
interface
IrDA
interface
Cover
DIP switch
Starting mode
1
Key
Interface
Description
OFF
OFF
OFF
OFF
OFF
OFF
ON
ON
ON
ON
2
OFF
OFF
OFF
ON
ON
ON
OFF
OFF
OFF
ON
3
OFF
ON
OFF
OFF
OFF
ON
OFF
ON
OFF
ON
4
OFF
ON
ON
OFF
ON
ON
OFF
ON
ON
ON
OFF
OFF
OFF
ON
OFF
OFF
ON
OFF
ON
OFF
OFF
OFF
OFF
ON
OFF
ON
OFF
Normal print mode
User test print mode
HEX dump mode
Auto peeling mode
Manual print mode
User test print mode
Head check (print area)
designation
Head check
designation clear
CRC check enable
designation
CRC check disenable
designation
Normal print mode
Test print mode
HEX dump mode
Head check (Barcode
print area) designation
Head check clear
Online command
designation
(Petit lapin compatible)
Online command
designation
(SBPL command)
FEED
OFF
ON
OFF
OFF
ON
ON
OFF
ON
OFF
ON
OFF
ON
OFF
OFF
ON
OFF
ON
Close
Close
Close
Open
Open
Close
Open
Open
Open
Open
Close
Close
Close
Open
Open
Open
Open
• Be sure to use the specified AC adapter.
• Plug or unplug the AC adapter while holding its body.
• Pay attention not to injure the cord.
• Keep the AC adapter unplugged when not in use.
AC Adapter
Used to supply power from
domestic power supply.
The DC output terminal of the AC
adapter is connected to the
printer.
Model No. PT/MB200-ADP
(Sunfone Electronics Co., Ltd.
Model No. ACML-06)
DIP Switch
Setting DIP switch
1
Turn the printer power off.
2
Open the DIP switch cover.
3
Change the position of
the switch you want to
change using a pointed
tool such as the tip of
ball-point pen.
234
4
D
1


