


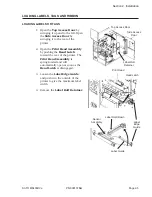


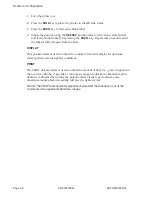

11. Adjust the outside Label Edge
Guide until it touches the outside
edge of the label and tighten the
thumb screw. Make sure the labels
are also touching the inside edge
guides.
CAUTION: Using media narrower than
the maximum print width may cause
excess head wear due to the label
edge. See page 2-9 for precautions.
12. If the ribbon is already loaded,
close the Print Head by rotating
the black Head Latch toward the
front of the printer until it latches
closed.
13. If the ribbon is not loaded, see the
following description for loading
instructions.
14. Close both the Access Doors.
SATO M8400RVe
PN 900107
5A
Page 2-7
Section 2. Installation
Adjustable Label
Edge Guide
Inside Label
Edge Guides
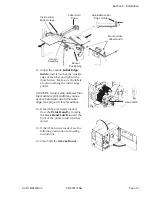
Sensor
Assembly
Sensor
Positioning
Route under
Label Guide
Label Hold
Down
Head Latch
Содержание M-8400RVe Series
Страница 1: ...PN 9001075A M 8400RVe Thermal Transfer Printer Operator and Technical Reference Manual ...
Страница 10: ...This page left intentionally blank Page viii PN 9001075A SATO M8400RVe Preface ...
Страница 66: ...This page left intentionally blank Page 4 8 PN 9001075A SATO M8400RVe Section 4 Cleaning and Maintenance ...
Страница 79: ...Printer Output SATO M8400RVe PN 9001075A Page 5 13 Section 5 Programming Reference ...
Страница 145: ...This page left intentionally blank SATO M8400RVe PN 9001075A Page 5 79 Section 5 Programming Reference ...
Страница 194: ...This page left intentionally blank Page 5 128 PN 9001075A SATO M8400Rve Section 5 Programming Reference ...
Страница 222: ...This page left intentionally blank Page 7 8 PN 9001075A SATO M8400RVe Section 7 Troubleshooting ...
Страница 236: ...This page left intentionally blank Page A 14 PN 9001075A SATO M8400RVe Appendix A Quick Command Reference ...
Страница 280: ...This page left intentionally blank Page E 4 PN 9001075A SATO M8400RVe Appendix E Custom Protocol Command Codes ...