Sartorius QC34EDE-S Скачать руководство пользователя страница 23

23

SARTORIUS QC - Scales

Installation of the YDI01IS-0CE (Industry Printer)

It is possible to use the industrial printer (paper strip or label) YDP01IS-0CE
(from the isi range) together with the QC scales.

The following changes must be done on the QC´s menu configuration:

9600 Bd

5 1 7

Space Parity

5 2 2

2 Stopbits

5 3 2

Handshake 2 Z.

5 4 2

Print Art-Nr ID

7 4 3

(Restriction: Date/time print is not possible; for this feature you need to use
the YDP02-0CEV3)

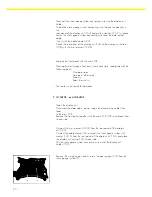
The following initialisation procedure must be done on printer YDP01IS-0CE
if paper shifts out several print lines after pressing FEED key:

Hold FEED key while power switching on. Release if paper begins to shift
out automatically.
Wait until shift out stops (approx.after 20cm). Then again press the FEED
key.
Switch power off and on again, now FEED works for the rest of printers life
with only one line shift.

Note:

You can use the printer YDP01IS-0CE for label printing!

Spare Parts

Due to the relatively simple construction of the QC scales, only complete
subassemblies need to be replaced (main PCB, strain gauge system).

The following parts list is current as of July 1, 1995.

Designation

QC7CCE

QC34EDE

QC64EDE

-S

-S0UR

-S

-S0UR

-S

-S0UR

Main PCB

69QC0003

Strain Gauge System, compl.

69QC0007

69QS0056

69QS0063

Back Panel

69QC0005

Front Plate, compl.

69QC0001 69QC0009 69QC0001 69QC0009 69QC0001 69QC0009

Pan

69QS0036

69QS0001

Set of misc.Parts (Display Head)

69QC0002

Set of misc.Parts (System)

69QC0008

--

--

Dust Cover

--

6960IB01

Содержание QC34EDE-S

Страница 1: ...CE S S0UR QC34EDE S S0UR QC64EDE S S0UR Q U A L I T Y S Y ST E M C E R T I F I E D Q U A L I T Y S Y S T E M Reg No 19440 02 C E R T I F I E D DIN EN ISO 9001 Sartorius AG Weighing Technology Sartoriu...

Страница 2: ...2...

Страница 3: ...tivating the BPI Mode 11 Adjusting the QC Scales 11 Table of Adjustment Data 11 Adjustment Sequence 12 Overload Stops 12 1 QC7CCE 12 2 QC34EDE QC64EDE 14 Zero Point Offset Value 15 Adjusting the Linea...

Страница 4: ...equipped with a different keyboard foil compared to the standard versions for american users Brief Operating Instructions Key Functions S S0UR ID key for generating ID codes with data output Memory k...

Страница 5: ...o open the display unit The factory setting of the menu access switch is accessible open Selecting a Code Press u to change the number in series 1 2 3 9 1 Press p to move from the 1st to the 2nd 2nd t...

Страница 6: ...lay 1 4 1 None 1 4 2 Short 1 4 3 Long 1 4 4 Extremely long 1 5 Tare Parameter 1 5 1 At any time 1 5 2 After stability 1 6 Auto Zero 1 6 1 On 1 6 2 Off 1 7 Weight Units 1 7 1 User definable o 1 7 2 Gra...

Страница 7: ...t 2 APPLIKATION PROGRAMS 2 1 Counting 2 1 1 blocked 2 1 4 free 2 2 Tare Memory 2 2 1 blocked 2 2 2 Tare input memory 2 2 3 Tare input memory automatically 2 4 Clearing Function CF Key 2 4 1 clearing a...

Страница 8: ...ee 3 13 2 blocked 4 CHECKWEIGHING APPLIKATIONSPARAMETER 4 2 Printout 4 2 1 free 4 2 2 blocked 4 3 Control through Control Lines 4 3 1 Only in check range 4 3 2 Always 4 3 3 Only at stability in check...

Страница 9: ...meters 7 2 Data ID Code 7 2 1 without header 7 2 2 with header 7 3 Auto Output of the Tare Memory Data 7 3 1 Last net value 7 3 2 Tare memory data total 7 4 Data Output with Time and ID 7 4 1 keineNo...

Страница 10: ...2 Acoustic Signal 8 2 1 On 8 2 2 OFF 8 3 Keyboard Function 8 3 1 free 8 3 2 Blocked 8 4 Universal Key 8 4 1 p 8 4 2 8 4 3 8 4 4 g 8 4 5 o 8 4 6 u 8 4 7 z 8 4 8 S 8 5 Power On Mode 8 5 1 off on Standby...

Страница 11: ...in the BPI mode Important Note After working in the BPI mode make sure to set the write protect again with the Sartorius MC1 server close so that the QC scale returns to the standard data output proto...

Страница 12: ...dle of the weighing pan Unscrew the stop screws 113 until you can hear that the stop is free Turn one of the screws 113 slowly against the stop while checking the distance by pressing down on the load...

Страница 13: ...orner stops The actual value of the gap as determined with the feeler gauge is 1mm The target value is 0 25 mm The deviation actual minus target value is in this example 0 75mm The lead of the stop sc...

Страница 14: ...refully turn the set screw until it just touches the System and then attach the locknut Check your adjustment by placing the maximum load on the scale QC34 34kg QC 64 64kg the set screw must be free a...

Страница 15: ...Zero Point Offset Value The are two ways of adjusting the zero point offset value 1 using a digital voltmeter 2 using the PSION server Datapack version 4 4 and newer 1 Adjustment using a digital voltm...

Страница 16: ...arity Note There are two methods for adjusting the linearity 1 As described in this manual or 2 Using the MC1 PSION server Test the linearity of the scale in 1000g steps over the entire weighing range...

Страница 17: ...replacing the main PCB read out and store the scale s data records using the MC1 PSION server if possible If this is not possible order a replacement PCB make sure you supply the model and serial numb...

Страница 18: ...from the rear panel of the display unit 104 and place the display unit casing 104 to one side Pull the strain gauge System connecting wire out of the display unit holder 108 Remove the weighing pan an...

Страница 19: ...ely Position the strain gauge system 116 and tighten down the two screws 116 C to 7 5 0 4 Nm Set the pan support 118 and load spring 117 on the strain gauge system 116 and screw them down loosely Posi...

Страница 20: ...llowing points Overload stops Zero point offset value Linearity Span Sensitivity The scale is now ready for operation 2 QC34EDE and QC64EDE Open the display unit Disconnect the data output power suppl...

Страница 21: ...attach the strain relief Loosely attach the screws that hold the pan support 102 on the strain gauge system then position it and tighten the screws 25 Nm Now pull the strain gauge system connecting wi...

Страница 22: ...Temperature compensation TC converter not functioning no value passed to the scale processor from the TC switch TC sensor or main PCB defective replace Err 54 Level control in A D converter under the...

Страница 23: ...n Release if paper begins to shift out automatically Wait until shift out stops approx after 20cm Then again press the FEED key Switch power off and on again now FEED works for the rest of printers li...

Страница 24: ...without the prior written permission of Sartorius AG The status of the information specifications and illustrations in this manual is indicated by the date given below Sartorius AG reserves the right...

Отзывы: