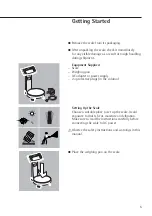
Sartorius PMA7501-000W Скачать руководство пользователя страница 5

5

Getting Started

§

Remove the scale from its packaging.

§

After unpacking the scale, check it immediately 
for any visible damage as a result of rough handling
during shipment.

Equipment Supplied 

– Scale
– Weighing pan
– AC adapter or power supply
– 2

+

protective plugs (in the column)

Setting Up the Scale 

Choose a suitable place to set up the scale. Avoid
exposure to drafts, heat, moisture and vibration.
Make sure to read the instructions carefully before
connecting the scale to AC power.

!

Observe the safety instructions and warnings in this
manual.

§

Place the weighing pan on the scale.

°C

Содержание PMA7501-000W

Страница 1: ...98648 014 21 Installation Instructions Sartorius PMA Quality PMA7501 PMA7501 000W Electronic Paint mixing Scales...

Страница 2: ...xing applications 8 c key Clear and REC key for paint mixing applications 9 L key ENTER and MEM key for paint mixing applications 10 Display 11 Weighing pan 12 Interfaces D Sub connector 9 contact 13...

Страница 3: ...ased device drivers to generate application programs Note Read the installation and operating instructions carefully before connecting the weighing platform and putting it into operation The applicati...

Страница 4: ...y damage or injuries that occur when using cables not supplied by Sartorius When connecting the scale to the power supply the laws valid in your country must be observed If you should have any questio...

Страница 5: ...lied Scale Weighing pan AC adapter or power supply 2 protective plugs in the column Setting Up the Scale Choose a suitable place to set up the scale Avoid exposure to drafts heat moisture and vibratio...

Страница 6: ...hat the voltage rating of the AC adapter matches that of your local line voltage mains supply If it does not match your local voltage rating or if the plug design differs from your local standard cont...

Страница 7: ...ntil the desired weight of your formula is reached Remove the filled paint can from the weighing pan Never use a hammer to close the lid of a paint can while it is still on the weighing pan Otherwise...

Страница 8: ...symbol appears in this case g Pour in additional components until the desired weight of your formula is reached Remove the filled paint can from the weighing pan Important Note If you tare the scale a...

Страница 9: ...ortant Note The flashing arrow n on the display means that the weight shown is not verified for use in legal metrology not legal for trade Example As you pour in the components of your formula the wei...

Страница 10: ...or downwards using the S key 4 When you then press the L key MEM 9 the scale will automatically calculate and display the amounts of paint in g to add for each of the other components that you alread...

Страница 11: ...key 4 several times to correct the value to 200 0 g 10 Press the L key MEM 9 COR 01 11 1 Add the first component C1 is displayed 1 7 g 12 Pour in paint until 0 0 g is displayed 0 0 g 13 Press the L k...

Страница 12: ...accuracy 0 075 g After connection to AC power and before each calibration adjustment allow the scale to warm up for approx 30 min Hold down the U key 5 for 2 sec When 5000 is displayed release the key...

Страница 13: ...ess the L key ENTER to select the third level Level 3 The menu items in the third level Level 3 will be displayed Use the RS keys to select the desired menu item Press the L key ENTER to select the fo...

Страница 14: ...key ENTER SCALE Press the L key ENTER UNIT Press the RS keys to select DECIMALS GRAMS Press the L key ENTER o PT LB Press the RS keys to select STANDARD DECIMALS Press the L key ENTER o appears o STAN...

Страница 15: ...ill be displayed The scale will automatically be locked preventing further weighing operations Level 1 Level 2 Level 3 Level 4 SETUP Press the L key ENTER EXTRAS Press the RS keys to select EXTRAS Pre...

Страница 16: ...Password PW OLD will be displayed Following the correct input PW NEW will automatically appear You can now enter a new password or confirm each blinking dash by pressing the L key ENTER Blank spaces...

Страница 17: ...rst be entered Level 1 Level 2 Level 3 Level 4 SETUP Press the L key ENTER RESET Press the RS keys to select RESET Press the L key ENTER MENU Press the RS keys to select MENU Press the L key ENTER YES...

Страница 18: ...er area changes constantly Too much vibration or Access the menu to select the scale is exposed to draft the appropriate code to adapt the scale to the particular weighing environment refer to Menu Se...

Страница 19: ...mage to the AC adapter power supply The AC adapter power supply no longer functions properly The AC adapter power supply has been stored for a relatively long period under unfavorable conditions The e...

Страница 20: ...not members of the European Economic Area EEA or where no Sartorius affiliates subsidiaries dealers or distributors are located please contact your local authorities or a com mercial disposal operator...

Страница 21: ...ractive g 999 95 7500 Max linearity g 0 2 Stabilization time average digit 0 25 to 4 Moisture proof rating F Non condensing Allowable ambient operating temperature range C 0 to 40 Weighing pan d mm 23...

Страница 22: ...as Defined immunity acc to product standard EN 61326 1 minimum require ments unmonitored operations Note The operator shall be responsible for any modifications to Sartorius equipment and for any conn...

Страница 23: ......

Страница 24: ...ingen Germany All rights reserved No part of this publication may be reprinted or translated in any form or by any means without the prior written permission of Sartorius AG The status of the informat...

Отзывы: